EScanlon
Free Member
-
Joined
-
Last visited
Everything posted by EScanlon
-
Tabco Body Panels. E
-
Excellent! Take the camera and some donuts! E
-
Gary; Check the bottom of your seat rails and see if they're mounted on one or more hexagonal or round spacers. If they are, you can remove those and gain about 1/2" PER spacer. Don't know that I would recommend removing only from the rear bolts, as that may cause undue stress on the spacers up front and could cause a catastrophic failure (i.e. have them shatter when you hit a bump and now the front of the seat is free to bounce up and down). But, IIRC you can put up to 3 or 4 of them to RAISE the seat, and you can remove them completely to LOWER the seat to contact the seat rails to the mounts. FWIW Enrique
-
Stephen is correct. The lower valances are different, and that's the area where the turn signals/ front marker lights get mounted to. Side markers are the same. However, from the picture of your fenders, you have got the typical Cowl Drain Detritus Dump Rot. That rust you see is the result of years of debris being flushed out of the cowl by the cowl drain hose and being dumped into the space between the fender and body rocker panel. You may be looking at a major problem once you can get a look at the rocker panel below the fender. Get that fender off, check the condition of your rocker panel, and if everything is okay there, BEFORE you mount the new fenders, do the Cowl Drain Tube Extension I have pictured in my gallery. This was just recently discussed here: http://www.classiczcars.com/forums/showthread.php?t=24649 HTH E
-
The stripes in the link provided by KTM look pretty darn GOOD! (IMO). The offset color and the width balance to the rest of the body make them look correct. Then again, those are some healthy wheel flares! That's half the "fun" in doing stripes, too thin and they won't look right, too wide and again they won't look right, and once again...the eye of the beholder. 2¢ E
-
Stripes, as with other paint modifications, tend to be an item that is more in the "Eye of the Beholder" class. Done well, they look great...in my opinion. But done poorly they don't, again...my opinion. What defines great and poor is where the individual's perception lies. I painted the lower rocker panel and the flat portion of the wheel openings in black and then highlighted with a thin gold stripe. I've had comments ranging from "Gaudy" to "Looks Sharp!" to "It's your car, do what you want!", so you can see what you can expect. I've also had people "recall" that that was the way they came from the factory! I was looking to repaint the rocker panels after having sanded off the rock chips. The paint I had matched, although a good match, would not have stretched to doing both rocker panels. Black Gloss was available on the shelf and considerably cheaper than having a quart of paint mixed up. Afterwards, I kind of liked it, and it blends in well with the molded mud flaps. When I repaint the car, I may or may not keep the black. That's half the fun of painting! FWIW Enrique
-
Carl, and John: Between the two of you, could you guys post a pic of these clips you're referring to? I don't recall seeing any clips in the last two or three sets of the chrome drip rails I've removed, so I'm interested in finding out what I missed. That's why in the sketch I made it was tricky to show the TWO little bends in the bottom part of the rail. I didn't do the corresponding on the bottom of the rain gutter, but it IS there. Can you pull one out of the little plastic baggy and picture it Carl? E
-
The problem may be in getting the "new" connector. Other's who have tried to find them have found them to be somewhat elusive. IIRC Dave Irwin (Z'sondabrain) had them for use when he manufactured the Parking Light Relay Harness. You might give him a PM. The Connector is a 6 Spade Female connector (wide) and they're arranged 3 side by side, and two rows. I hope that explains it. Look at the back of your ignition switch and you'll see that only 5 of the 6 connectors actually get used. HTH E
-
Insert that putty knife at the back like Will mentioned, from the underneath of the rain gutter and under the edge of the chrome drip rail, then gently work it under the lip of the chrome rail. Once you have the blade slightly under the edge, lift up on the handle (which will be downwards) and the edge of the chrome rail should slide OFF the car's rain gutter metal. See the attached Paint picture that I sketched. And as WebDawg said...take it very carefully and SLOWLY. If you rush it, you WILL bend and twist it. It MAY show a twist to it when it finally comes off, but that's due to the nature of the beast (at least in my experience in having removed several pairs), this will work itself out when you put them back on the car. HTH E Chrome Drip Rail Removal.bmp
-
Hey Arne! NICE response!!! E
-
Actually Will, on the basis of the term; "Forgiveable", I would have have omitted the first option: "Factory parts specified for my model and year!" since that (hopefully!) wouldn't be considered a "Faux Pas". Which some might argue applies to the second option. But the rest are good options. Maybe someone else has thoughts. The 3rd one is very apropos seeing as we have members in various parts of the world and the subject of the RHD Driver's side mirror being used in LHD countries as a true pair to the LHD mirror was heavily debated. Last I recall, the discussion seemed to finish with the RHD mirror being identical to the LHD mirror (referring to the one that mounts on the door and not the one's that mount on the fenders). Which defeats the intent of LHD drivers looking for a matched pair to their original OEM mirror. But I'm sure that someone out there is drooling over buying a set of the original Hexagon center hubcaps instead of the "D" hubcaps that we received in the U.S., as well as some U.K. enthusiasts would love to find a turn signal stalk WITHOUT the passing light switch. The other points are very well put ... well except for the Duct Tape and similar (Sorry Bill!). 2¢ E
-
1,2,3,6, and 7 for me, although I should have also done an 8. I would say most people will opt for an OEM part whenever possible, if not, a superceded and lastly for repro. Then you get into the "or-equal" items from other cars and era's. But it is interesting to see the different choices. Who said this site didn't opt for newer items on their Z's? :devious:
-
Especially if she's wearing one of those micro-mini BELTS the girls are wearing lately. E
-
Keep an eye on it, so that the wire doesn't catch against the steering wheel surface and then gets bent and makes contact with the steering column....that would make the horn sound continuously. Glad it helped! E
-
Bill's last two cars.... J/K E

-
Camo...I hope you took it in jest as that is what was meant. If on the other hand you didn't...well, no beer for you! These language differences in English are much the same way in other languages. Spanish for example has Camaron (Shrimp or Prawn), Gamba (Prawn if large or Shrimp if small), Langosta (Lobster w/o pincers, although also Locust), Bogavante (Lobster with pincers), Langostino(King Prawn), and the regional differences are interesting. Crayfish can be River Crab or if in salt water...Lobster(Langosta)!! In Chile you won't find Shrimp on the menu but Langostinos...even though they ARE shrimp, and other times they are Prawns...but the menus said the same = Langostinos. So, half the fun is in figuring it out. So, every country has their own way of nationalizing their language to make it their own. It has been said that England and the U.S. are two countries separated by a common language...maybe you could throw Australia in as well. On the other subject of Paul Hogans, Steve Irwins, Yahoo Serious's, and Mel Gibsons, it IS a shame that they play off on the stereotypical Australian which, once you get to know a TRUE Australian you can recognize WHY and HOW they ARE stereotypes. Undoubtedly people in other parts of the world have just as skewed an image of Americans due to the....STEREOTYPICAL American. Heck, you're constantly referring to us as Septic Tanks, POMS, and other terms....aren't you? The trick is in recognizing that a stereotype need not describe YOU...unless you chose to be defined by the stereotype. And lastly, would stereotypes exist if there weren't people acting in the manner described by the stereotype in sufficient numbers to CREATE the stereotype.... So, hopefully no one took offense at my rambling, if so....no beer for them. E
-
In the best Soup Nazi imitation..."No Beer for you!...Next!" I thought Prawns were FRESH water crustaceans, and Shrimp were SALT water crustaceans, and Lobster were COLD SALT water crustaceans..... But that's ok....No Shrimp/Prawns for Camo either.... You're right Rick. If there were nothing else, he'd wizz and moan, but he'd probably drink it. E
-
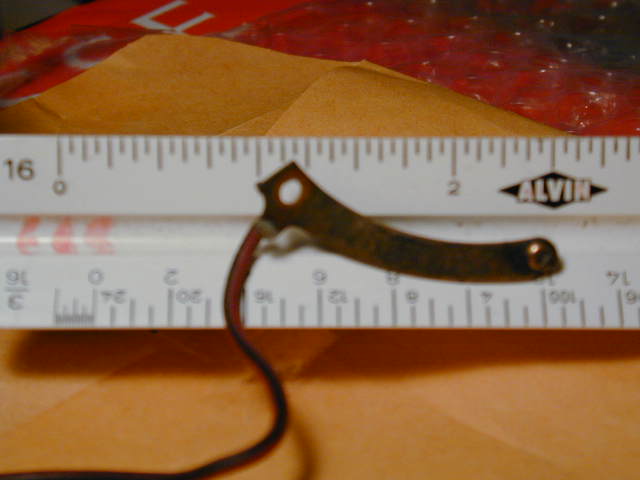
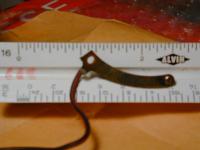
Here's a picture of one. The Base is about 1/4" wide and it's length is right about 1-1/2". It does have a curve which you'll see in the attached photo. E
-
Old style Lights-On alarm?
-
Fast explanation of the B H S initials: B = Battery H = Horn S = Switch The Green wire is the one that INTERNALLY (in the Relay) is switched but connects to the HORN. H on the Relay. The Green/Black is the one that connects to the steering wheel, to allow the Horn Button at the wheel to finish the circuit to ground. This in essence is the SWITCH or S on the Relay. The Green/Red is the power, and it comes directly from the Fuse Box, (4th fuse down on the Left side, 10A), and it connects to the Battery B on the Relay. Some of the old time American cars had a "stutter" relay, which when actuated would actually stutter on and off allowing the horns to blow. The Z's does not. What this means is that you can provide 12VDC directly to the Green Wire at the Relay and the horns should sound. This should tell you if the horns need rebuilding or not. If they do not sound, the problem could be that the connections to them are corroded and need cleaning, OR that they need to be taken apart and cleaned inside. Once you get the horns working, then you can address the missing contact arm coming off the turn signal assembly. But let's see if you get sound first. FWIW E
-
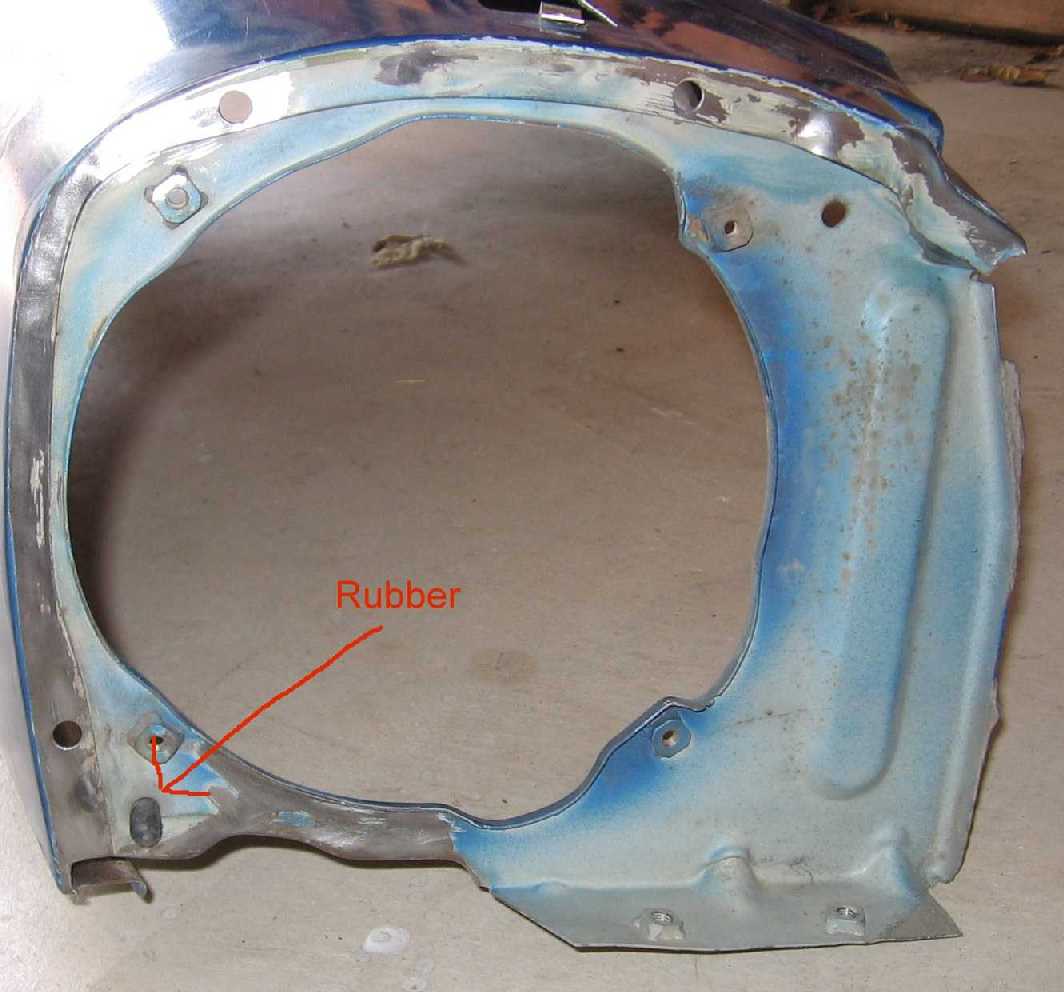
Steve: Actually, even though the size of the file in bytes was ok, it was the size in pixels. That happens to me a lot too. I've asked a couple of friends, and the only credible theory was that the ZG sugarscoop needed different attachment points than the standard Z scoop. If you'll notice, they're about the same size as the ones right by the fender's edge. The search goes on.... E
-
This should do it. Apparently the problem is in that it was too big for the limits imposed by the site, and the error handling portion of the program is whack-o. E Now, as to what it is:....At a guess, I am going to guess simply hole plugs. I remember them, and recall that I scratched my head....and put them back in. Anyone else? E

-
Video link that was forwarded to me. http://www.youtube.com/watch?v=abqJ9Hc9l90 Bit long (7:43) and somewhat repetitious, but very nice view of the ZG on the road. Good tunes though. Sent to me by another Z enthusiast in Australia. E
-
Steve: What kind of nasty photo did you post that it's not approved yet? E
-
Tom: You're absolutely correct, I should have re-checked my memory. If you reverse the term in the description that I wrote, it should be correct. \ The problem is that work-hardening causes the metal to achieve a degree of hardness that prevents it from flexing without microscopic fractures developing in the metal. Over time these migrate and join with other cracks and before long, the metal begins to crack along the stress line. Look at the top of the Z's doors and often times you'll see the result of years of door slamming. E