EScanlon
Free Member
-
Joined
-
Last visited
Everything posted by EScanlon
-
Just off your description of mirror paper, (I haven't disassembled a 280Z turn signal that had that) why not try "Speed Tape". "Speed Tape" is basically metal adhesive tape. If you get the right stuff you can even give it a nice shine by polishing/buffing it's surface. Even if you were to keep the light on for hours, it wouldn't be affected by heat. FWIW E
-
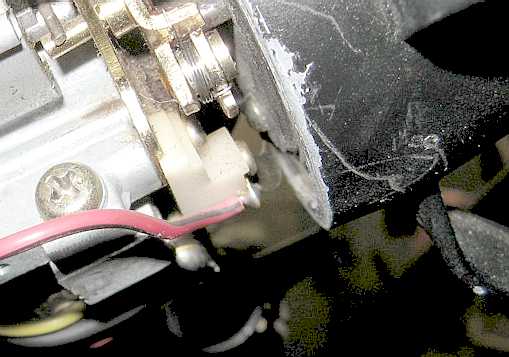
MikeW's picture shows the Red/Black wire going to the Brass Arm I was referring to. In the attached picture I magnified and lightened a portion of his picture and you can just make out the curve of the arm. That arm just brushes against the underside of the steering wheel, which then has a wire going through the hub to the horn button. E
-
Matt; Check to see if there is a brass "arm" that sticks up off of the turn signal mount and brushes against the underside of the steering wheel. Without that there is no electrical contact with the steering wheel. E
-
Picture is held for approval. I'll confirm when it does get posted. E
-
A woman and her lover suddenly hear the front door of the house open and her husband announce: "Honey, I'm home!" The Lover jumps out the window at the woman's insistence, bare naked. Since it's quite early in the morning, barely 7 am, and not having had time to get dressed, and noticing a group of joggers coming around the corner he decides to join them. Surprised, one of the joggers looks at him and asks: "No running shoes?" The lover replies, "Yes, this is for better ventilation of my toes!" "No Shirt?" the jogger continues. "Better armpit ventilation!" the lover answers back. "No shorts, no underwear, no jockstrap?" the jogger queries. "Yes! More agility and no chaffing!" is the reply. "Ahhh! I understand, and the rubber is in case it rains, right?"
-
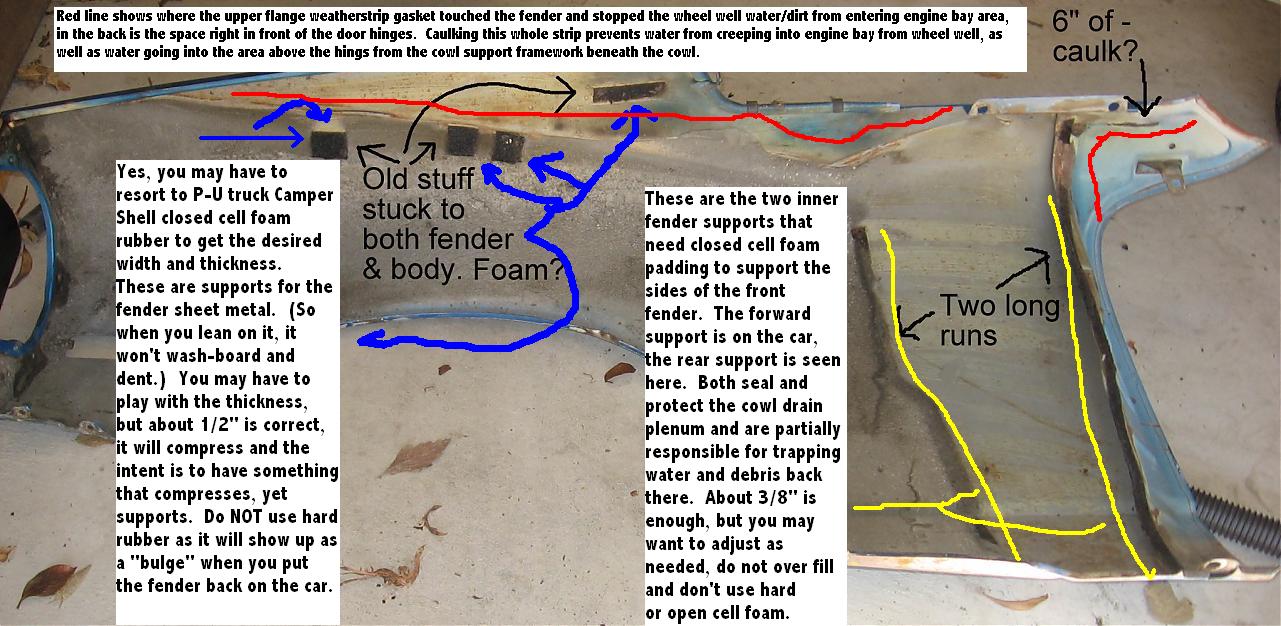
EXCELLENT OBSERVATION! This is one of those little tiny details that so many people might glib over and never notice. In fact, I don't know that it would even show up in the FSM or any other technical literature, but I believe others will also note that they have discovered the same little item. Once you pointed out where and what it was, I remembered that I also had it on mine. Other cars that I've worked on have either not had it, it wasn't noticed/noticeable or I fail to recall it being there. On my car, and on Gary's we POR'ed the underside of the fender, and on the other cars I worked on, we undercoated, or the undercoating was still intact. As a result it can easily be overlooked. But your post clarifies exactly what it is for. The stamped fender has a very distinct and sharp corner along two axis. It is very difficult to bend metal along 2 axis without having excess material bunch up and cause a problem in the stamping. For this reason, often times in manufacturing production, they'll cut, grind, or "fold" the excess away when the design calls for this type of bend. Then again, they can just notch the sheet of metal before they do the second bend. Unfortunately, when they notch the sheet of metal, it introduces an edge very close to where the bend is made AND with the subsequent vibration stress over the years, the bent corner now becomes slightly annealed. Annealed metal can begin to crack due to the hardness it has acquired over the non-annealed metal around it. These are referred to as "stress" cracks. In addition to the possibility of the stress crack, there is also the fact that with a hole so close to the finish edge of the piece, that it could literally, LEAK from the water being splashed up in to the wheel well. This is the "fix" that you are seeing. The caulk not only seals the cut metal close to the bend, but also helps support the piece to minimize the stress right at the bend. When I did my fenders I used POR all over the inside, and it was in those corners that it would seep through to the "finish" side. Once it hardened, I didn't have that problem any more, but it alerted me to the possibility of water leaking there in vehicles without that "plug". If someone else knows differently, please post. As far as your vehicle, if you are planning on doing some further undercoating / rust-proofing, keep it in mind to ensure you coat the corner. Otherwise, at least push a bit of the caulking into that corner to ensure that you don't have a leak to the outside. E
-
Check this auction out! http://cgi.ebay.com/ebaymotors/DATSUN-2000-Roadster_W0QQitemZ140076199643QQihZ004QQcategoryZ33617QQrdZ1QQcmdZViewItem This is the description: The Auctioner : wroughtdog1 (87) 97.8% So is the Auctioner selling the option of calling him to HAGGLE? Or is this a uniquely blatant way of using the e-bay auction board as a bulletin board to advertise without paying much? Sounds suspiciously like another "dog". E<!-- End Description -->
-
Notice on Stephen's picture a couple of directional flow arrows. If you go inside, you'll see that the hose with the arrow flowing INTO the car is the one that goes to the HC Valve. That is so you can regulate the amount of heated water you release into the core to then transfer heat to the air being circulated around it. If you were to connect it the other way around, the core would constantly receive the FULL amount of hot water from the engine and you would be regulating only the amount of RETURN. If you were to connect it this way, even with the HCV at full close you would still feel heat coming from the heater core, due to the convection of heat through the water. 2¢ E
-
The blonde reports for her university class final exam, which consists of "true/false" questions. She takes her seat in the examination hall, stares at the exam paper for a few minutes, and in an apparent act of desesperation, reaches into her purse and pulls out a coin and begins tossing the coin and marking off the answer sheet. Within 15 minutes she's done with all 200 questions, while the rest of the class is still feverishly marking and erasing and chewing on their pencils. However, she keeps her seat and continues tossing the coin. The test moderator, worried that she might end up distracting the rest of the students notices her. The blonde however, is still flipping the coin, but now is busily erasing her answers and re-marking the answer sheet. As the test hour begins to wrap up, the blonde is seen desperately tossing the coin, swearing and wiping the sweat from her brow. The moderator, now alarmed, approaches her and asks her if she's ok, and will she be able to finish the test. To which she replies: "I finished the test in the first fifteen minutes. Now I'm having a heck of a time rechecking my answers!"
-
The Gold Medal in Wrestling was down to a match between a Russian and an American. Although both were formidable men, the Russian had gained a measure of notoriety for being able to tie his opponents up and winning easily. The American coach, just before the bout is trying to fill in his pupil: "This guy has a hold that's been nicknamed "The Pretzel". Once he gets you all wrapped up in it, there's no hope left. Everyone that has been caught in his grip with this hold has had to pound the mat for release and ended up spending weeks in the hospital." The American wrestler's eyes get wide, but he continues to listen to his coach: "Is there any way of beating him?" "Yes," says the coach, "don't let him catch you in that "Pretzel" hold or you're done for. Do ANYTHING, and I mean ANYTHING to get out of it!" The bell rings and both contestants enter the ring and begin circling each other. Turn after turn, each one takes a swipe at the other only to come up empty. The crowd begins getting antsy and you can hear the roar of the crowd getting louder and louder. When the crowd's yelling seems to build to a fever pitch...the Russian lunges forward and grabs the American...quickly wrapping him up in the "Pretzel". The crowd's groans are obvious, as the sound slowly fades away it's apparent that in a few seconds the Russian will have once again demolished his opponent. The coach can't look, and buries his face in his hands, knowing that defeat is imminent. Suddenly, the crowd's groans turn into screams of surprise! The coach looks up just in time to see his pupil miraculously writhe out of the "Pretzel" turn around, grab the Russian by the neck and waist, pick him up bodily and throw him down to the mat with a resounding back slap....Flat Back to the mat. The American WINS!!! The referee declares him the Gold Medal winner as the stretcher is brought forward to carry the Russian away. The crowd is hysterical, you can literally see the fans' eyes tearing with happiness. There are chants of "U.S.A...U.S.A...." as the coach leads his pupil back into the locker rooms. Later, in their locker room, the coach asks:"How did you do it? Until now it's been impossible for anyone to get out of it, let alone decisively beat their opponent." "Well," the wrestler says, "once he finally grabbed me, and wrapped me up in his arms and I knew he had me in the "Pretzel" hold....I knew I was a goner. I fought, and squirmed, and twisted every which way, but it just made things worse! I knew it would only be a few seconds before I couldn't do anything....then when I opened my eyes and right in front of them, I spied a pair of balls...well, at that moment, I remembered what you said about doing anything to get out of it, and with the last bit of movement and strength I could muster....I BIT THEM!" The coach looks at his pupil aghast! "And then.....what?" "You know coach, you just can't imagine what you're capable of.....till you bite yourself in the balls!"
-
Steve; Actually the exit end of the clear pvc tube ends up being just above the bottom edge of the fender. It just barely protrudes out of the plenum hole (that triangle hole I outlined in your picture). There you can see that there is plenty of space for the tubing to exit and still remain above the fender line. Then when you cut the end at an angle you should just barely notice it when you lie on the ground looking right behind the tire. It's a bit wet in Vancouver right now, otherwise I'd step outside and take a picture for you. As far as that "bit of foam" in the front corner, it doesn't ring a bell. Could it be a cocoon, or some other insect's nest? That's just a wild thought, but you'd be surprised at what you can find. Could you take a picture of the remaining one? Then one of us on the site is bound to identify it. E
-
-
An elderly couple were celebrating their 50th wedding anniversary, and to do so, they decided to return to their small town where they'd met originally. They sat down in the small town cafe at the edge of town, and commented to their waiter about their mutual love and how they had met at this very site. Seated nearby was the local sheriff who smiled as they related their story. When the waiter left the couple, the old man says to his wife, "Do you remember the first time we made love? It was right over there in the field just across the road and I leaned you up against the fence." "Do you want to do that again?" he prompted his wife who enthusiastically responded "Sure, why not? It'll be fun!" They exited the cafe and crossed the road to the field. The sheriff smiled, thinking that this was very romantic, but decided to take a look just to make sure nobody would bother the older couple. He watched the elderly couple cross the road carefully, walk across the field and as they were approaching the fence on the other side, they began to shed their clothing. Once they were totally naked, the old man lifts his wife and leans her up against the fence. The sheriff, who by now could not tear his gaze away, could not believe what he was seeing. With the vitality of a much younger woman, the lady was thrashing her whole body against her husband while the husband resembled a pile driver. They kept this up for a good while, until both fell to the ground exhausted. Slowly, they began to rise and gather their clothing and got dressed. Once they were crossing the street, the sheriff walked up to them and said: "That has to be the most sexually energetic way of making love that I've ever seen or read about. You must have been a truly wild pair when you were younger!" "Not really," said the old man, "when we were younger, that fence wasn't electric!"
-
The "snorkel" that Ed refers to, is the Fresh Air Intake. Depending on the condition of the flange that raises it's edge up and into the "mushroom" cap umbrella (rain shield), you may have some leaks through there. For the most part, those leaks would show up on the sides or at the bottom of the Fan Cage Housing. The Cowl Drain on the other hand, has it's flange (actually a tube) projecting INTO the passenger compartment. It is there that the Cowl Drain Hose connects to and then exits via the Kick Panel and grommet into the plenum between the fender and body. If the rubber hose has corroded, cracked, or disintegrated, your cowl drain is literally draining into the car. While OEM Drain Hoses and regular replacement hoses in this size may be hard if not impossible to find, you can just use 1-1/2" Clear PVC tubing, available at many Pond / Pool servicing establishments. With careful use of a heat gun, you can soften this enough to mold and shape it into the required double 90°-S curve required and then route it out behind the flapper valve behind the tire. Here's another post recently that needed a bit more clarification on the drain hose system I devised: http://www.classiczcars.com/forums/showthread.php?threadid=24649 HTH Enrique
-
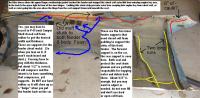
Steve: I figure you have looked at these pictures often enough, but they're included here for clarity. Look closely and you'll notice that I'm using a 45° PVC Elbow of 1-1/2" OD, which is then inserted into the cowl drain tube. The cowl drain tube is then clamped over the pvc elbow. The clear pvc hose then fits into the 45° elbow and you cut the flexible pvc tubing at an angle. This angle cut gives you a long tongue of clear pvc which you insert into the elbow to follow the outside line of the inner tube curve. The intent is to NOT have a ledge inside the 45. Remember you're essentially necking down the tubing twice within the bend of the 45. Where it exits the cowl drain plenum, you'll again cut it at an angle, but this time facing towards the back of the car. Don't cut towards the front or you'll catch the edge into the air and you'll have crud blowing UP through the tube and then in front of your windshield. By facing BACK, the air is forced to venturi around and help suck dust and debris OUT of the tube, especially when it's dry. When the material is wet the venturi is still enough to PULL water through as well as help disloge debris that may fall into the cowl. When you wash the car, pour enough water through the cowl to disloge any debris as well as dissolve any dried salts. If you note any change in the manner in which it pours out of the drain you'll know that you need to poke a length of weed-eater cable to dislodge it. In the Pac-NW there are a lot of pine trees and I have a neighbor with a large Maple in her front yard. This is the system I came up with to avoid having the same problem that other's have had...rusted front fender doglegs that eventually causes the rocker panel to perforate and rust from within...and then emerge at the REAR of the rocker. If this happens, it is not at all uncommon to have a completely rotted rocker panel. That sometimes spells death for many cars. The links to the pictures are from my gallery, the clear pvc hose hasn't been final trimmed since the fender is still off the car. I link it so that you can see that it will not interfere with the fender bottom once mounted and how it is behind the flapper valve. HTH E http://www.classiczcars.com/photopost/showphoto.php?photo=2601&cat=500&ppuser=1490 http://www.classiczcars.com/photopost/showphoto.php?photo=2602&cat=500&ppuser=1490
-
Depends...do you ever want to shift/brake? In a nutshell: different compression factors and "shear" factor. The first relates to the amount of compression you can impart upon a liquid and not have a significant loss in volume, and the other describes the liquids ability to NOT cavitate. Cavitation being the sudden introduction of low pressure voids (bubbles) into a liquid due to inequalities in the liquid pressure at that volume. (You can push water out of the way mechanically, faster - than it can flow back in behind your pushing i.e. low pressure.) While ATF is pumped and recirculated in a recycling system, Brake and Clutch fluid are counting on the constant and stable compressionability of the liquid. Think of it as ATF being pumped like if it were a water hose onto the vanes of a little windmill. Brake and Clutch fluid are mostly "Step on this piston and that piston over there goes up". FWIW E
-
Carl; Actually, I STILL think this was a very nice tongue in cheek post of yours, and I apologize if I didn't catch on and blew it out of the water. But you made some very good points that MUST be emphasized and not glibly passed over. I put the itallics on the item that is still being actively discussed and even argued about amongst auto body workers. You can derive your own opinion by searching as I did. But you should always cover bare metal with an ETCHING PRIMER. Most commonly available Epoxy Primer IS self-etching. There are brands of Epoxy Primer that are NOT self-etching, but these are usually special purpose primers and or filler primers. Allowing enough time for the body filler / glaze / red-cap / primer / sealer to properly cure is critical. Far too often the imperfections visible in the reflection of the finished and polished paint are due to the base materials shrinking AFTER the job was done. While there are minimum times after which you can continue with the next product to go on the car, these times are subject to a lot of factors that can just as easily EXTEND those minimums to where they become problematic. There are also maximums, but any time you're working a project to where it becomes critical to monitor the time between one step and the next...you better have LOTS of experience and knowledge of what you are doing. This applies not only to allowing filler to set properly, but also when to "skin-scratch" the filler to allow it to release any trapped reactants that would be otherwise trapped in the filler. Do this too early and you'll literally peel the filler off the car, do it too late and it won't scratch and you'll gum up the first couple sheets of sandpaper until you get past the "skin". Try to apply primer on top of filler that hasn't had time to cure and "de-gas" and it may cause the primer to craze, blush or even trap the reactants in the filler which will end up shrinking later...and you'll have a nice "lilly-pad" in the middle of your paint job. Itallics mine. Underlined mentioned below. Body filler exposed to the air, whether it is on the outside of the vehicle or on the inside i.e. the back side of the metal, is literally like putting a salty sponge on bare metal. IT WILL RUST!!! This is not an Urban Legend, it happens, it's been documentd and will continue to happen as long as people think the holes are necessary to make the filler "grip better". I mentioned the problems with short-cutting time frames above, and while I differ with the time periods that Carl mentioned, if you have the room and can keep the car moisture free and temperature stable....there is nothing wrong with waiting that long. In fact, I can readily see why they would choose to wait that amount of time, at the rates they're getting, they do NOT want to have to get a job back for re-work. However, from my experience, proper maintenance of a dry environment, and stable temperature; most products need only a couple of weeks or so to fully de-gas. You must take proper precautions and properly protect the surfaces so you're not complicating the issue. This is why you'll see Infra-Red Lamps being used...not for powder coating, but to ensure the panel/filler/primer/sealer/epoxy doesn't cool down too rapidly. The basic point is: ALLOW TIME FOR THE MATERIALS TO FINISH THEIR CURING PERIOD. Read the instructions!! Glazing Putty, aka "Icing", is different from "Red Cap". Red Cap was a slightly different formulation of basic red oxide primer, in a thickened paste. Red Cap required very long and temperature stable curing periods before you could sand it. You typically applied this OVER primer to smooth out the last of your filler work scratches and minor imperfections. I would wager that the larger portion of "lilly-pads" visible out there are due to too hasty sanding of Red Cap than Body Filler not having had time to cure. Red Cap was basically designed to be wet-sanded and to smooth out the very top of the primer. Icing on the other hand, is basically a different formulation of body filler. Typically it has less talc and more of the polyester filler, which gives it a runny consistency more like honey, or syrup than filler. But, like filler is a polyester base that requires a peroxide catalyst to "cook" it. As Carl mentioned, it sands VERY easily, and generally flows very easily to 'self-level'. Don't use coarse grit sand paper with this stuff and there are people who would rather wet-sand it and allow for plenty of water drying time. The rep I talked to mentioned 180 grit, and my paint guy said 220/260. I've done both but in different applications, but not on the same job nor in the same time of year (temp/humidity WILL affect how quickly the filler / glazing sets). But, hopefully, I tap-danced my way out of trouble and re-emphasized the main points in Carl's post. Enrique
-
AFAIK, ATF - IS - Power Steering Fluid. Nowdays, they may have found a way to upcharge it for being in a smaller bottle with the Power Steering Fluid label. But I'm sure you'll get more replies. E
-
hahaha; Did you use soap? J/K you know; E
-
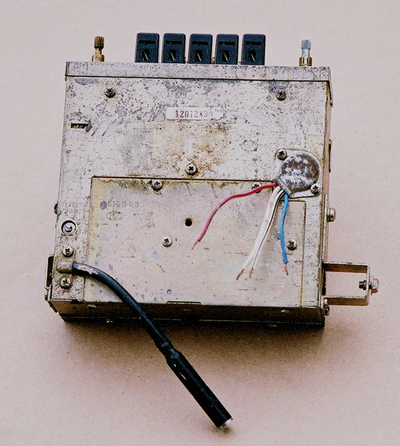
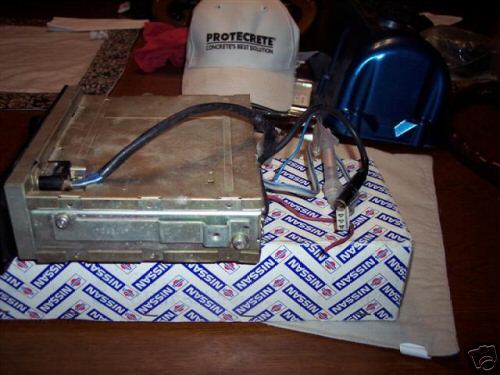
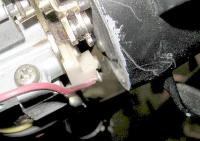
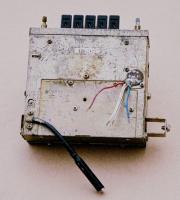
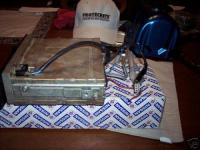
KirkE: In response to your question: The White and White/Blue wire won't show up on the car's schematic as they're for the speaker. Only one speaker for the early years. In the attached pictures the wires appear Gray and Gray/Black. Take a look at the attached picture, there you'll see two more wires a Red/Blue and a Blue. The Red/Blue is for the light that comes on with the Instrument Lights. The Blue is the power wire for the radio. It often also has a noise suppressor coil in an in-line fuse holder either with or without a fuse. See the second picture for what the noise suppresor would look like. The radio gets grounded through the chassis. Hope this helps E
-
Carl; 1. Most repair sites, Eastwood amongst them recommend using LEAD-FREE solder to avoid lead dust in the air: http://www.eastwoodco.com/jump.jsp?itemID=1494&itemType=CATEGORY&iMainCat=688&iSubCat=1494 This gets repeated in this Tech Tip: http://www.eastwoodco.com/jump.jsp?itemID=1430&itemType=CATEGORY&iMainCat=688&iSubCat=1430 2. The discussion between putting body filler directly onto metal as opposed to on top of epoxy primer has had various viewpoints. This is one test that says it may not be as clear cut as it seems: http://www.autobodystore.com/filler_&_epoxy.htm The discussion isn't just a difference of opinion. It is also what has been used and done for many years. Additionally, even sites such as Eastwood give Filler onto Metal as their suggestions, see the "Final Steps" instructions on this link: http://www.eastwoodco.com/jump.jsp?itemID=789&itemType=CATEGORY&iMainCat=688&iSubCat=789 Step #8 on this one says basically the same thing, Filler onto Metal: http://www.eastwoodco.com/jump.jsp?itemID=1494&itemType=CATEGORY&iMainCat=688&iSubCat=1494 The description for this product says it can be applied directly over metal, wth no mention of primer first: http://www.eastwoodco.com/jump.jsp?itemID=1700&itemType=PRODUCT Here is ONE thread from an auto body forum which addresses it directly: http://autobodystore.com/forum/showthread.php?t=2647 And yet another: http://autobodystore.com/forum/showthread.php?t=3839 The manufacturer of one major brand of body filler and one of the more popular brands as seen from Eastwood's page above, Evercoat has this in their FAQ Page, see question #3: http://www.evercoat.com/faq.aspx 3. Unprotected or poorly protected filler can absorb water, although it's biggest problem is that it will also trap any moisture that gets between it and the metal it's on. Here's a post which discusses this problematic characteristic, interestingly enough it also addresses the Epoxy/Primer First debate: http://autobodystore.com/forum/showthread.php?t=1701 Addressing the use of a "Metal" filler, here's the product available from Eastwood: http://www.eastwoodco.com/jump.jsp?itemID=110&itemType=PRODUCT Which is manufactured by Evercoat: http://www.evercoat.com/productDetail.aspx?pID=37 Who say it's ok directly for application directly to metal, but if you'll read carefully....it's "Aluminum filled body repair filler for metal surfaces.", that is, Body Filler with Aluminum Dust in it. But it does claim it's moisture proof and rust proof. 4. I know the metal used on the early Z's was not the highest grade nor had the best corrosion protection applied to it, but to claim it is permeable which then implies it is porous, is downright insulting. I'm still trying to find a credible source of information to either support or contradict that theory. The people I've spoken to have just asked me: "Just how rusty is this metal you're dealing with?" in a "Here's your sign!" tone of voice. If you're referring to the interstitial spaces between the molecules of Carbon and Iron, and the presence of other compounds introduced in the smelting, production of the steel and annealing from the pressure rollers to produce the sheet metal and the subsequent handling of such sheet metal introducing microscopic fizzures and pores into it, well please say so. In the meantime, I'm hoping this was just your attempt at humor as there are two very tall cylindrical water towers, less than 500 feet away from my house, that have been there for at least 30 years, and I figure the sheet metal they used to make them would have been subjected to much of the same handling as alluded to above. As such, by now they're bound to start springing leaks any second now...I better check my flood insurance, which might amuse my insurance agent as I'm at least 200 feet up from the Columbia River and 230 above sea level. :cheeky: 5. With the time periods you posted as to how long it takes body filler to set...ooops! I meant DRY, I'm surprised you didn't mention that when people posted about the amount of time it takes a body shop to do repairs and paint jobs. 120 to 180 days before they can continue the job? Do they charge you for storage and is that why their prices are so high? With time between steps in those numbers, well heck, no wonder you recommend lead. How many weeks do you think they allow for it to cool down? :cheeky: I guess when it comes to REALISTIC time estimates we should now begin expecting estimates in YEARS and not weeks. In the meantime in the 25 years that I've been doing body work, and after having spoken to others who've also been doing this type of work, I think I'll continue doing it the way I was taught since a couple of clients have reported no problems even after 20 years. Maybe it's because they're friends, or maybe it was done right. Then again, would they still be friends if it had been done wrong? E
-
Have you checked your battery? Right off the top of my head, what you're referring to sounds more like not enough current to support both turn signals and headlights. That could be as simple as a battery going dead, the cables going to the battery posts having corrosion build up between post and clamp, battery ground not making proper contact with body. Lastly a voltage regulator or fusible link that is beginning to fail. Try the easy things first, and then post your results. HTH E
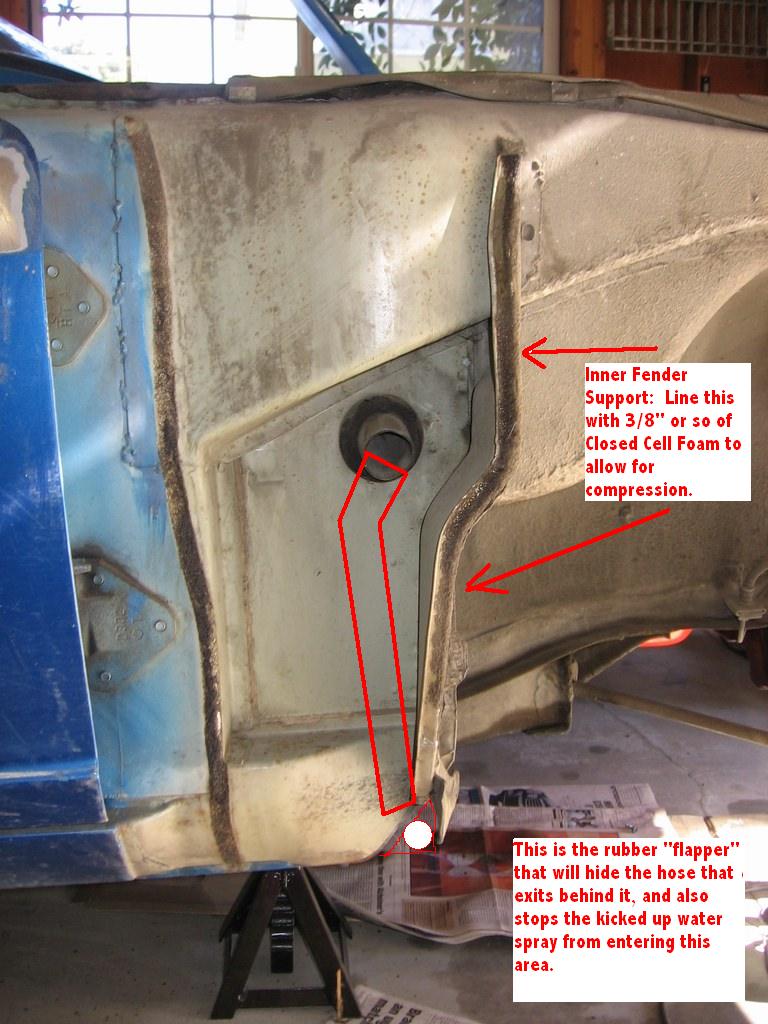
-
Steve: I added some text to your pictures to hopefully clarify what I wrote before. The top seam that I refer to is actually the pinch weld seam of the Fresh Air Vent Tube. It is also the edge that the Inner Fender Weatherstrip Seal is mounted to. If you remove that piece of rubber, be careful not to bend the clips too much as they may be brittle. Also, when you replace the weatherstrip, make sure that the flat side of the "bulb" is to the "seam" and that it bends or leans TOWARD the tire. This is so that when the water gets splashed by the tire, the flow won't force it's way past it, but rather will make the seal tighter. That top seam may or may not be completely pinched closed and caulking it's top edge prevents water from creeping into there as well as backing up the Inner Fender Weatherstrip. The inner fender support is the one closest to the wheel/tire, and on my car was removeable. It was held onto the body by 4 or 5 screws. The inner edge of the support that is in contact with the body is what I recommended you caulk, and the outer edge is what takes the closed cell foam to come into contact with your fender and can therefore compress. By caulking the inner edge you are stopping water from the wheel well from seeping into the area behind the support. It is this area between the front and rear inner fender supports that houses the cowl drain tube, and tends to trap water and debris between the fender and the rocker panel metal. Since you're doing the work of carrying the drain water out of the vehicle, you might as well as seal the rest of the area well enough that it doesn't have moisture creeping in. Those two "long runs" are supposed to be closed cell foam. This is to ensure that it can compress and seal, but also so that they won't impart undue pressure on the outer sheet metal of the fender and distort it. The "rule of thumb" to differentiate between foam and caulk might be difficult to state and opinions may differ. I used caulk on the metal edge of the body right above where the captive nuts for the bolts that hold the fender from all the way below the sugar scoops (mine were off), up and around the "nose" of the metal, to just in front of the access panel. I also used caulk at the upper end of the "seam" just in front of the windshield in order to "dam" up the water flow that might creep down into the upper part of the door and direct it to the drain hole between the metal edge mentioned previously and the "seam". Make sure that that drain hole, which should be right by the plastic bellows that direct air into the fresh air vent, is open and free of obstructions. You do NOT want to plug it. Foam got used wherever the metal supports touched body/fender. Those 4 rectangular pieces and the two long runs. Those all need to be able to compress and give. You want to use just enough foam that it's compressed slightly - not crushed - and not so much that it distorts the sheet metal due to it's bulk. I outlined the "drain" tube and where it would exit. Hopefully that will explain it better than trying to describe the opening behind the little flapper rubber. Speaking of that flapper rubber, if yours are rock hard or missing you can make your own out of semi-truck splash guards. It's basically 3/8" cracked cord rubber. If on the other hand, they've just acquired a bend to them that renders them ineffective, you can swap them side to side and the bend will be reversed. Hope this helps. Enrique

-
Hey Bill, have you considered taking a shower? That might get rid of the smell! E
-
Jar Jar Binks' Car!! (Apologies to any Gungans out there, or Naboo'ans! :stupid:)