EScanlon
Free Member
-
Joined
-
Last visited
Everything posted by EScanlon
-
One very important point that hasn't been brought up....RUST! Those electric box plugs have been plated with a sacrificial metal, put that in direct contact with the steel of the car, add in some moisture (and on the bottom of the car to boot) and you have the basics for an electrolytic battery. In short time there will be enough electron transfer between the two to have....RUST and lots of it. While you may not like the holes, in the long run it is far cheaper to replace the rubber plugs with more rubber plugs. The originals after all survived 30+ years. I doubt the metal ones will survive 30 MONTHS. 2¢ E
-
But there is an even better resource....the club's own Microfiche CD. The one on car-fiche may or may not be authorized by Nissan, but the club's IS and what's more it helps the club. So, shamelessly, buy the Club's CD and forget the on-line one. E E
-
Check your speaker wiring. That would also cause the radio to short and burn the fuse. Not sure on the radio bulb, I'll check and see what I can find out for you. E
-
Cute, took a few tries, but 84.5 is my first "score" (i.e. all the way through).
-
At the prices hubcaps are starting to go....this isn't too bad of a deal, especially if half the other claims are true. E
-
Give A7DZ a PM and he may very well have what you are looking for. He's in the last stages of re-building major sections of his car. E
-
OUCH! Well, necessity IS the mother of invention...sometimes it IS the parent's fault. Ouch, ouch ouch!
-
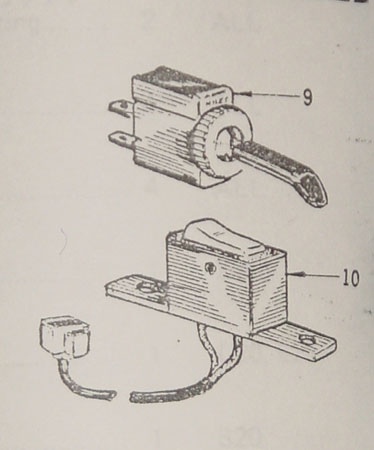
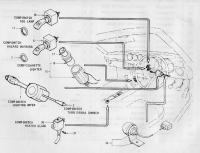
1st photo: T connector is the connection point for an in-line fuse holder to fuse an Electric Fuel Pump (which your car did NOT come with). The location of that pump would be back by the gas tank, and would likely only have been installed if your car demonstrated vapor lock problems some time in the past (this was one of the repairs the dealers were advised to try). The 2 in-line fuse holders: One is more than likely for the Heater Blower motor and the other is more than likely for the radio. Open them up, if there is a funny "fuse" with copper wire wrapped around it inside, that's the one for the radio. That "fuse" is an electronic noise suppressor. 2nd photo: The only R/B wire I find in the schematics as being anywhere near that area is the one going to the Reverse Switch, but that would be inside the tranny tunnel. I'll have to keep looking for that one. The Blue wire ~might~ be the other side of the other blue wire in the 3rd photo. There are several blue wires in that area, some of which weren't used. In the 3rd photo, for example the blue wire you're showing is only for the A/C portion of the circuitry, which you may or may not have had installed. Most cars simply do NOT use this at all. The Black is part of the ground for the open wire resistor in the Heater Blower housing, that should be grounded to the dash or to the dash support. The Red wire should receive power from one of the Blue fuses in picture one. Anyone out there with a Series I - 11/70 build please chime in. E
-
Your first car being a 280Z, and with your stated preference for fast moving objects (per your profile) is like handing a loaded 357 Magnum to a first time shooter. Not only do you want to go out and see what it can do, you're itching to "let 'er rip!" But, and you'll hear this from others, hot-rodding on the streets is a sure fire way of (and I'll just mention some of the more basic problems without going into the name-calling): Getting very expensive tickets. It might only be for 35 in a 25, or 60 in a 35, but since you're male and under 25, the increase in your insurance premium over the next few years will be more than 50 times your fine. The cops will get to know you and your car - on sight! They will literally be waiting for you to slip...just a tiny bit...and wham, they'll be on your case. Then, if your car is still rolling at 1 yard per year through that Stop sign...blammo...another ticket. The cops will clamp down on you so hard, you'll eventually sell the car JUST to get some relief. If you think this might be exageration, it isn't. The Z is a sports car. It LOOKS fast, and it CAN go fast. If you as the driver don't take a major role in curtailing what YOU do, you'll find yourself....with a ticket. You'll find that many of us tell you the same thing, and you'll think that we're just a bunch of old fogeys who don't want you to have fun. That's not the case at all. You'll find that we DO want you to have fun, but what we're trying to do is tell you what problems to avoid....because we screwed up when we were YOUR age...and in some cases are still paying for it. So all that aside, here's some techniques for SAFE driving: Arrange your car's side mirrors so that you can see behind you the two lanes to each side of the car. With the internal mirror have the extreme most side edges overlap a bit of the side mirrors if possible, or leave the smallest possible "blind" spot, that is a sliver of space, where you might not be able to see a very THIN person. More than that, and you have the possibility of not knowing that there's a bicycle in that spot and you're about to make a lane change. If you find that you MUST use a cell phone, use a hands-free ear piece. Many countries are starting to pass laws banning non-hands free use of the cell phone, the U.S. is starting to catch on. When you drive in traffic, don't just focus on the car in front of you. Keep in mind what the guy in front of him is doing. If possible, look two or even 3 cars ahead to be forewarned of a problem. Try to keep a mental image of the 8 positions around you, and note what is happening. Those 8 are of course the 4 points of Front, Rear, and 2 sides, then add in the 4 diagonal corners. It really isn't that hard to do, and if you ever played Diablo or Doom or any one of the thousands of video games out there, it will be a piece of cake. Knowing that there is an open space directly to your side, or immediately behind you can provide you with a handy escape route. Lastly, remember that for most SUV's out there....you barely come up to the top edge of their door and on some of the more elevated ones...the BOTTOM! This simply means one thing...drive as if they CAN NOT see you, because they probably can BARELY see you, and their attitude will be that YOU will veer around them...until they crunch you. These are all termed "defensive driving" techniques. Last note, check and see if your local car club or even the local speedway has nights when you can come in and do some bracket racing at the local drag-strip. Portland International Raceway has distinct nights for Drag Racing, (with burn-outs etc.) as well as street car bracket racing. They also sponsor "track days" for car clubs to come in and race (per their rules) around the actual track that the pro's use. Keep it safe for years of enjoyment. E
-
And he missed the newspaper!
-
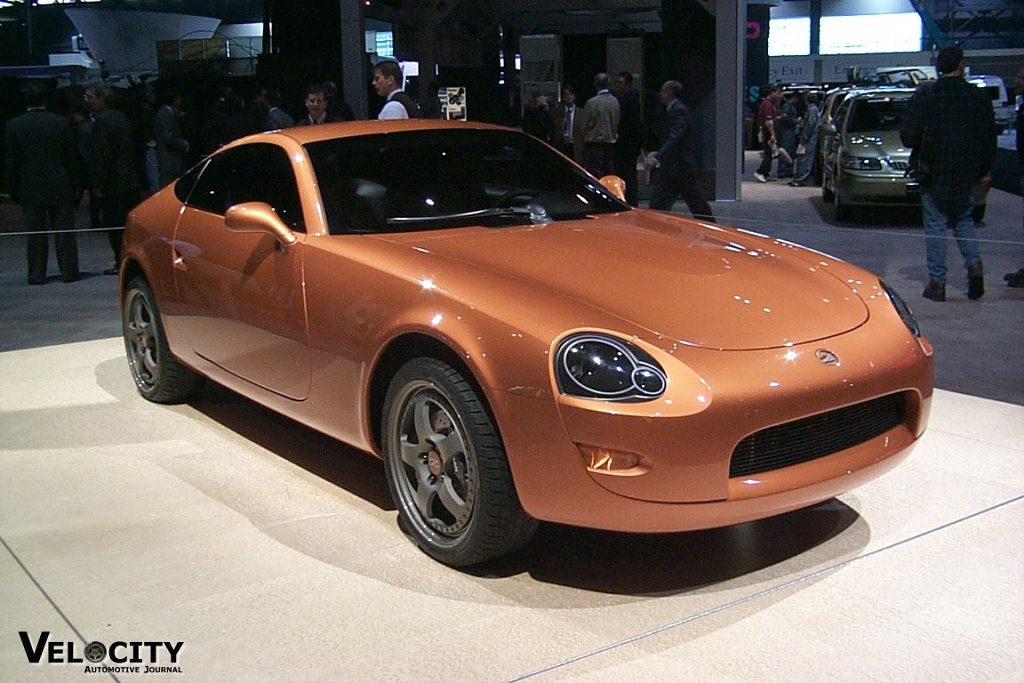
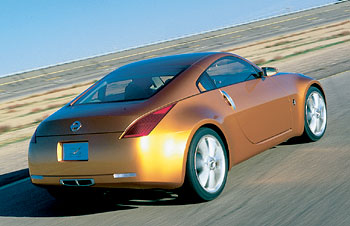
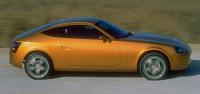
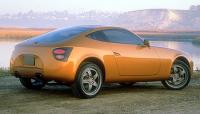
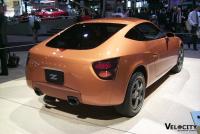
rTake a look at these photos. This is what was originally touted as the upcoming 350Z back then. Then we got the "toad". Which you may argue isn't a toad because of it's agility, speed, and overall excellent fulfillment of a modern sports car--and to some people that is exactly what it does. And you can argue that it looks too much like other car(s) and has so little in common with the original Z that it should have been marketed under it's own marketing campaign instead of linking it to the original Z. And there you would begin to scratch the surface of what has every S30 enthusiast, who voices an opinion about this, up in arms over this. The Concept Z and the 350 do share enough common traits to be able to discern the lineage. The Concept Z also shared enough traits with the original 240/260/280 S30 cars that it can still be noted. However, in the transition from Concept Z to 350, too many of the traits that allowed the Concept Z to claim the S30 as it's ancestor....were deleted or diluted...to the point that the S30 and the 350 don't appear to be from the same family. The new Skyline however.... E


-
In the spirit of friendship: The enlarged highlight of your post is most telling. The other bold items paint the rest of the story. Your two cars; SUV & BMW Presumably: your wife's. Again presumably: a car for the kids or a spot for them to play in. Solution: That the kids have a car already puts them in the privileged status at school...have them park on the street or on the side of the house. Then park your Z in the last space. Or park the SUV in front of the door for the Z if you absolutely must let the kids park in the garage. Friendly support comments: Keep the Z a few years. While there are other cars out there that are highly enjoyable, even desireable, like an old comfortable and good pair of blue jeans that you simply refuse to throw away...to everyone's chagrin...the Z will keep you happier for MORE miles of enjoyable motoring, than those other cars that keep you worried that; someone will steal it, that it will get crunched and lose value, that you have to park out in BFE because of the nimrods out there....Do you get the drift of this? Aside comments: As far as everyone's "buddy" Burt; while he's technically correct about your having "restored" your car, since you did not revert it to the "original" condition as manufactured (Webster: Restore-(3)to bring back to or put back into a former or original state.); he's also wrong because in another definition (W:(2)to put back into existence or use) you did restore it. What you actually did was REVIVE the car...per Webster-(1)to restore to consciousness or life:...flourishing again. (2) to restore from ...inactive or unused state. Definitions which use RESTORE as the operative verb. Lastly: But all that aside, the car looks great, it is obviously a well cared for and meticulously attended to vehicle. It is patently obvious that you've invested a lot of skull sweat and body fluids into putting this one together. IMO in a few years, if you sell the car, you'll be back here on this site asking the biggest one of us to do you a favor and come by and give you a swift kick in the rear....for having sold it...and wondering why we didn't pound some sense into you. Well all these posts are just that...an attempt at getting you to see that the grass just looks greener...You get the drift? Even Carl Beck has chimed in with his experience with some of the "exotics"...as well as others. But if in fact you are hankering for something to DO, then ... Sadly the auction has been proceeding well, it looks as if the reserve has been met and you may be faced with selling it to some kid with money who'll rice or race it. Hopefully that doesn't happen. E
-
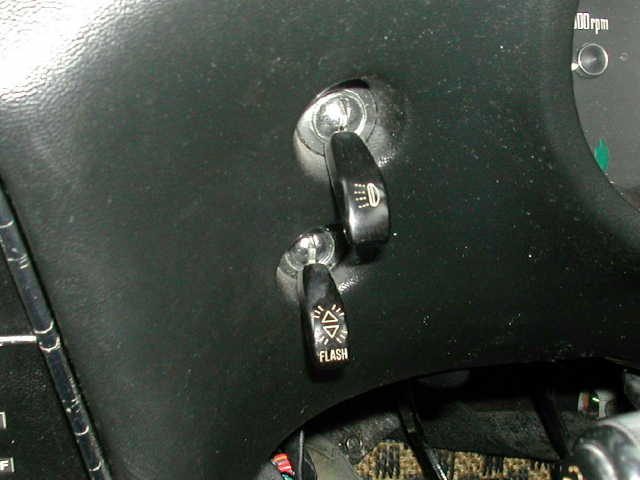
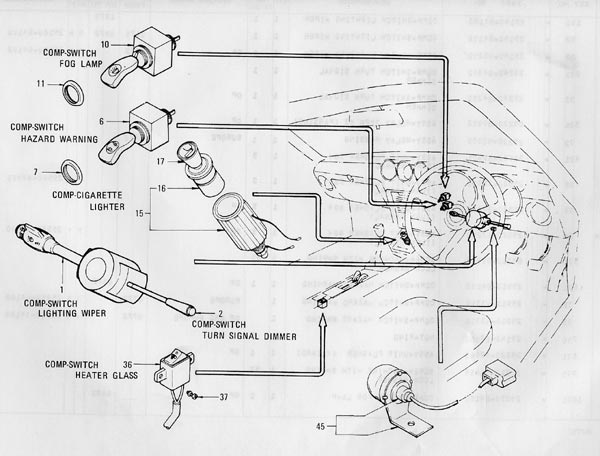
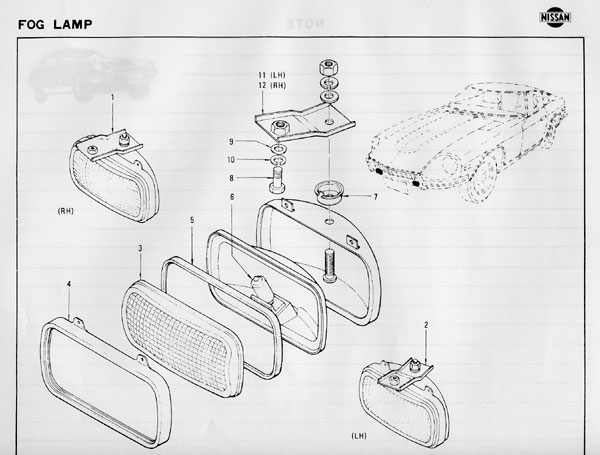
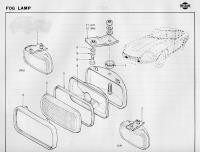
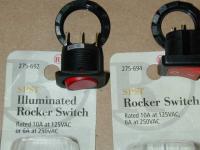
This came from the Mail List some time back and is due to be included at Z Home's articles. I've added a couple of notes and am posting it here due to it's relevance to recent discussions. Going through some old e-mails and noticed this one. Saw one answer, but felt that there was a bit more information that should be included. Jean-Pierre Lemonde wrote: Question: The 240Z was pre-wired for fog lights. Anybody knows where the wires end up in the car and ultimately where would be the switch? Answer: The 240’s had the fog lamp wires taped with blue vinyl tape to the main LIGHT wiring harness, in front of the radiator. You should find two sets of wires right by the wring for the horns. The colors for these wires are: RED and BLACK. They are wired in parallel so if you only hook up one fog lamp you definitely should insulate the other pair from ground or each other. Inside the cabin, by the fuse box, you’ll find a 2 wire connector that has spade connectors arranged in a “Tâ€. That is, one spade will be “horizontal†while its pair will be perpendicular to it. In the cabin however, the wiring color CAN be slightly different than the Red and the Black at the lamps. The schematic shows it to be a RED wire and a RED/GREEN wire, but I have seen this be a GREEN/WHITE wire instead. Since the Fog Lamp circuitry is actually receiving power from the Parking Lamp circuit (As well as the instrument lamps, although it’s connected up ahead of the rheostat and inst. lamps.) all you need to power the Fog Lamps is a Switch, or simply join the two wires at the “T†connector by the fuse box. So a simple SPST switch is all you need. You CAN use a lighted switch, but you must provide a ground for the bulb in the switch. In the Series I cars, the true OEM Fog Lamp Switch was located above the Hazard Switch on the Dash. To my knowledge no U.S. or Canadian vehicles were shipped or received with the Switch in place. As a result, the OEM Fog Lamp Switch is but a mere vague memory to most Z fans in North America. The OEM Switch can be seen in one of the pictures below. Kind of like the Independent Side Marker Lamp circuitry that was used in Japan. This was circuitry to light up the traffic side of the vehicle in areas where no street lighting was available. It allowed independent lighting of either the Left or Right sides of the vehicle, both front and rear, via a small 3W bulb. Note this wasn't using the Side Marker LAMP, but a separate bulb in the Front and Rear Light housings. IIRC Japan did NOT have the Side Marker Lamps required in the U.S. after 1968 or so. But, the location for that Ind. Side Marker Lamp Switch is on the Series I console. Just to the right of the Hatch Window Defrost Switch. If you’ve ever seen an EARLY Defrost Switch, you’ll recall that it’s NOT lighted. If you were to put two of those unlighted switches in the same housing side by side, you’d have the Ind. Marker Lamp Switch. But I digress; the reason for mentioning the Ind. Side Marker Lamp Switch is that it’s location on the console is PERFECT for an aftermarket Fog Lamp Switch. Especially since finding a Toggle Style switch that blends nicely with the Hazard Flasher Toggle AND fits in the hole is such an aggravation. (Some folks have just used a SECOND Hazard Switch in order to match the first.) The only problem is that most Fog Lamp Switches that arrive with your freshly bought pair of Fog Lamps are lighted and are of the NARROW type leaving a lot of space on the sides of the switch. So now you need to fill that space, or find a different switch. After a LONG and tedious search at my local Radio Shack, I found 3 switches that fill that hole very nicely. I’ll give you the numbers so that you don’t bug the hell out of your local Radio Shack help scrounging through their switch drawer. Radio Shack Part Number 274-731; this one is a direct fit and it has a Black Rounded Toggle with an LED in it. It is essentially a copy of 275-692 except that 692 is for 125VAC and has a translucent Red toggle (more on this later). Also, 692 is a threaded style while this one is a snap in mount. However, for my vehicle, I didn’t care for the lone LED dot switch next to the fully Lighted Defog Switch. But, the switch is a direct fit, 12V and Lighted. The “frame†around the toggle is squared with rounded corners. The toggle button is a round rocker style. It “snaps†into the surrounding plastic/metal that you mount it onto. You can connect to it with standard Spade connectors. For many this will be the ideal switch to use without further modification other than supplying a ground for the LED. The next two switches are 125VAC, which simply means that they’re rated for a much higher voltage than you’ll be submitting them to. If you use the Illuminated style in 125VAC, the light won’t work with 12V. But if you cannibalize a 12V Lamp from a V Switch, you can make it work nicely. This involves opening both switches out and swapping out the 125VAC lamp with the 12VDC lamp, not terribly difficult but it does deal with small pieces. Take your time disassembling so you can see where everything goes. Radio Shack Part Number 274-694: This one has a Square Frame and a Square Toggle. The Toggle is cast in Red plastic with White “O†and “I†painted on its face. It is a “threaded†mount style, which means that you’ll be tightening a “nut†on its back side to mount it. Connections are Solder Style. This is yet another switch that can be used without modification. It is NOT lighted but it does have a Red toggle which will blend nicely with the Amber Rear Window Defog Switch. However, for my tastes, I wanted something that lit up like the Rear Wind. Defog Switch, but also didn't clash with the rest of the console and switches. That's when I found the next one: Radio Shack Part Number 274-692: This one is also very similar to the 12V switch (275-731) except that it has a rounded Red TRANSLUCENT Plastic Toggle Switch that is illuminated from inside the switch. It is a Threaded Mount, and uses the narrower Spade Lug Connectors. It is however a 125VAC switch. To convert it to 12V you will have to cannibalize a 12V Lighted Switch. But once you do so, the match to the LIGHTED Hatch Defrost Switch is much more appealing. This is the one I used on my car. Click the link below to see the final picture. All of these switches FILL the space to the right of the Hatch Defrost Switch that's for the Ind. Side Marker Switch. Perfect if you don’t have the filler plug. If you DO have the filler plug....DO NOT THROW IT AWAY. There are several people who are in need of just that plug. Trust me, either keep it or sell it. To see a picture of the installed switch in my car, follow this link: http://www.classiczcars.com/photopost/showphoto.php?photo=2596&cat=500&ppuser=1490 Hope this helps. Enrique This post has been promoted to an article

-
Randy: That's as much as the HIGH beam on the headlights...EACH. IIRC, the MSA kit will come with a relay and switches. Don't know about the wiring though. So take a note from the boys in the military and wire it to "FAIL-SAFE". Use the car's existing wiring to power a relay, and let the relay power the Fog Lamps. Then all you need inside the car is a switch connected to the car's Fog Lamp Circuit connector. Here are a couple of other threads with the Fog Lamp circuitry and OEM switch pics etc. http://www.classiczcars.com/forums/showthread.php?t=4522&highlight=fog+lamp http://www.classiczcars.com/forums/showthread.php?t=7381&highlight=fog+lamp E
-
Anti-freeze in the proper mix (50%/50%) in the cooling system and Winter Washer Fluid in the W/Washer tank...or drained. As Jared pointed out a Full tank of gas, and a small bottle of HEET wouldn't hurt. Oil freshly changed (so no moisture in case) and tires up to full pressure. Just my 2¢ E
-
Get a AAA Plus membership and a cell phone. 2¢ E
-
Randy: Make sure you run low wattage lamps...i.e. not those 100 W each H-4 monsters. If on the other hand you DO want the higher watt lamps, use the circuitry to power a Relay with it's own direct connection to the battery. Use only one of the connectors up front, and make sure you insulate the other pair. Remember, you're dealing with 35+ year old wiring which wasn't a heavy gauge THEN, and is now old and corroded anywhere it's exposed to the atmosphere. (Aside) This has been mentioned time and time again, the circuitry in the Z was NOT designed with high current items in mind. Additionally, the wiring they used BACK THEN, was at best...BARELY adequate to the task...THEN. Add to that that almost every exposed piece of wire has corrosion not only in the exposed portion but also anywhere from 1/2 to a couple of inches of the INSULATED portion of the wire adjacent to the exposed part and you can see how problems can readily occur. Where today you don't think anything of plugging in your power inverter/ amplifier/ accessory into the power outlet of your new vehicle at a whopping 10 amp (or more) max draw, that same 10 amps is the FUSED limit of 4 of the 10 fuses in the car. The other 6 are fused at 20 Amps, but NONE of the fuses nor the car's circuitry should be run at it's max amperage for an extended period of time. (Can you say---meltdown? And it HAS happened.) So, I re-iterate, make sure your changes / corrections / additions to the car's electrical system take the system's age and oroginal design parameters into consideration. FWIW E
-
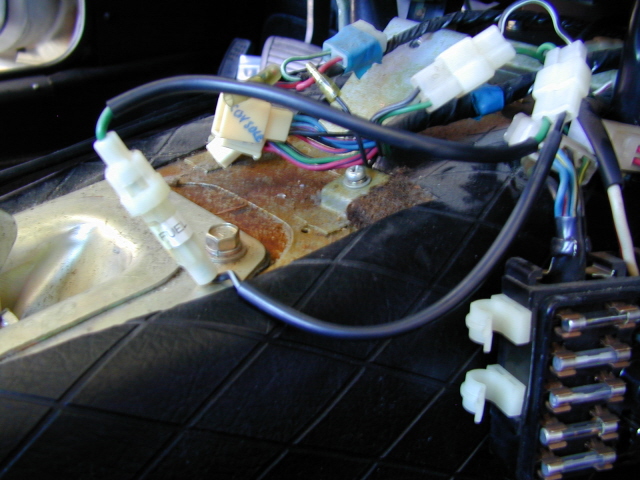
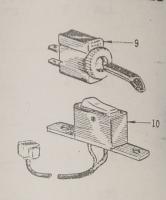
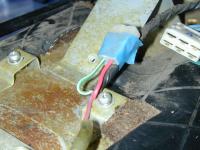
At the front of the radiator you'll find two pairs of wires both Red and Black. Typically they're taped to the harness with Blue electric tape. Those are the connections for the Fog Lamps in parallel (that means they are both powered off the same circuit, but not dependent on one another to work). Inside the vehicle, typically behind the Fuse Box or Hazard Switch, (depending on whether the bundle has been moved or not) you'll find two sets of 2-wire connectors. In my car they were connected to each other even though neither circuit was operational. The first circuit is for the Fuel Pump (Electric) and it's pair of wires are Green and Black/White. You can see the in-line fuse holder in the attached pic. If you look closer in the pic, above and to the right of the connector with masking tape (labeled "console") you'll see another 2-wire connector with Red and Green/White wires going to it that has been taped with the Blue electrical tape mentioned. (See second pic.) That is the connector for the SWITCH and (in-line fuse holder if you run large wattage lamps). The wiring schematic calls out for a Red and a Red/Green, but the Red/Green connects to the Green/White wire that feeds the Side Marker Lamps and Instrument Lamps, so they may have changed the color in production. The Fog Lamps, being on the same circuit as the Side Marker Lamps operate ONLY when the Light Switch (on the Comb Switch) is at least on Parking Lamp mode. If you wanted them on in lieu of the car's parking lamps you would need to wire them separately. Take note however, that all you need to do is close the connection between the Red and the Green/White (or Red/Green) to have power at the bullet connectors at the front of the car. FWIW E This post has been promoted to an article

-
Steve: Arne is spot on, and Jim's car has second Hazard toggle in that location (if memory serves as to what I saw). That indent was to be used for the Fog Lamp Switch, which was an OEM JDM option tht was never brought into the U.S. (At least no pictures or switches have been located in the U.S. yet.). Even in Japan it was a rare option. The Fog Lamp switch has a toggle identical to the Hazard Lamp Toggle, but a different emblem on it. and connects directly to the Fog Lamp circuitry that is built in to the car's wiring harness (With an in-line fuse holder). The "optional" parking lamps and their switch-pair were a JDM option not brought to the U.S., but may have also been sent to countries with a requirement to illuminate the traffic side of the vehicle at night. This has been discussed and verified before. E
-
YIKES!! Marty is totally correct on this one. I'll take my lumps for not having re-terated that just being in an open air environment with lots of air circulating is NOT enough. You simply MUST use an organic paint filter mask...it may cost $25 or so, but it will definitely be MUCH cheaper than the headaches, dizziness, and vertigo you can get from only using a dust mask (voice of experience here, which makes my omission even more embarrasing). E
-
Sorry for the delay in replying. The Spray Nozzle I'm referring to is a simple Air Blower that attaches to the end of your hose from your air compressor with a subtle difference...it's had a tube inserted at the end of the nozzle and a pvc tube attached to it. The end of the pvc tube is put into the paint / liquid you want (a fishing weight works real well) to keep it submerged. Then releasing the air that allows the air rushing by it to suck liquid out (venturi principle) and then blast / atomize it thereby spraying it onto the surface you aim this at. Harbor Freight sells a very inexpensive air blower already prepped for this, P/N 37346 SYPHON SPRAY BLOW GUN it even includes the pvc hose, all you need to do is put a connector on it. Enrique
-
Traducciones tecnicas, aunque con que me paguen... Tipicamente de Inglés al Español, aunque tambien al revés. Aunque llevo 22+ años aquÃ, mi familia siempre ha sido bilingue. Yo tambien hablo Frances, y suficiente Portugués para meterme en lios. Let us know if that wiring set-up works. I haven't heard of anyone being able to get a later tach to work on an earlier dash harness, and it would be great to pin that down for folks here. Enrique
-
EXCELLENT! Nice job, and excellent reference on the replacement gasket pad. FYI, when you re-insert your heater core, wrap some closed cell foam on the sides where it comes into contact with the housing. That will not only "seal" it but will also prefent it from rattling. I found that the self-adhesive foam used for Pick-Up Camper Shells, where they contact the pick-up bed works best, plus you can also fin it in various widths and thicknesses. Additionally it also works for the "Room" flaps ( the flap openings at the bottom of the housing, below the heater core), although your vinyl/foam idea may be better. When you mount it into the body, use Plumber's Putty between the top opening in the housing and the Fresh Air Intake Vent. It has several features that work very well. It stays pliant for years, won't smell like caulking or silicone, and is unaffected by heat. Good Job. Enrique
-
You need to check the connector for your tach AT the dash harness. If the dash harness has a 4 wire connector with 4 wires: Green; Green/White; Black/White and Black, then you MUST use the 4 wire Tach. The 3 wire Tach is a later model tach and will not work with your dash. The later model tach used different circuitry for the connection to the coil. Unfortunately, the only diagram that shows that 3-wire tach that I have, shows it to be connected to an 8-wire connector to connect to the wiring harness. The Yellow and Green wires you mention as being next to the coil don't show up in any of my schematic drawings. Enrique
-
Except if it makes Alfapup get a hernia laughing, the rest of us will be forever waiting to read about it.....