EScanlon
Free Member
-
Joined
-
Last visited
Everything posted by EScanlon
-
Excellent! And thanks! You'll be getting it back, to use as a spare or... E
-
Whether it's Arne's or Marty's, or both, the intent is to troubleshoot the operation (feeding a signal is not a problem for Gary) while comparing to one that is working, then identify the bad / failing / potentially bad components and then replace with current / fresh / updated parts in order to effect a sound repair and a procedure for repairing / updating other items. Those that are involved in this initial phase will more than likely be repaired and returned, I'm venturing to say free or very cheaply for the sake of research. Later ones would have that service done for a fee...to offset costs etc. I'm not looking for "It's broke, and I don't know what broke!" samples, but rather as Marty posted "The tach ...as normal till about 5500 to 5800, then it falls to practically zero. When you shift ...again as normal. ... I can't find anything that appears to be wrong." Since I'm looking to fund the research and repair out of change found in my other cars, I can't afford to buy them from folks, nor pay for shipping to and back (sorry, this is a very thin shoe-string). I also don't need 30+ samples either. Gary tells me that he only needs one or two that are failing as described, a good one (my spare) and the schematic and his shop. Gary has designed, built and sold some very high-end sound amplifiers and other electronic gizmo's, so I trust his feelings on the subject. The end result for us as a club, is to have a reliable REPAIR and UPGRADE procedure, which we can then have an electronic technician read and use to repair the tach's we send to him. FWIW E
-
In my best Sgt Shultz: "Nutting, I know NUTT-ING!!" As far as your tach, from talking to the electronic expert (who does work off schematic plans) after 30+ years a heat related failure of a diode or capacitor is not only NOT unusual, it's almost to be expected. So, let's canvas around to find you a proper replacement. Yours is a "4-Wire" isn't it? If it is a 4-Wire, instead of pitching the bad one, can I trouble you to send it to me? I've been looking for one with the exact symptoms you've described so that my friend can get in there and help me (us) identify a proper replacement and repair. I have my spare tach, which is in good working condition, the schematic, now I need one that is failing /has failed as yours is. With those 3 items, Gary (not beandip) says he can trouble shoot and help make more reliable. E
-
I think the problem may be more in the Ignition Switch itself than anywhere else. That clicking you are hearing is the Accessory Relay, which clicks on when power is applied to it via the Ignition Switch being in the RUN position. From what you posted, it may be that the Electric Ignition Switch (mounted behind the Steering Column Lock mechanism) has loosened up and the switch doesn't rotate far enough to allow the START contacts to actually make contact. Hence, no juice to the Starter. To check if this is the case, is relatively simple. Remove the Steering Column Shroud (AKA Clamshell), then remove the electrical connection to the switch. That makes it easier to remove the switch from the lock. Once the switch is off, re-connect the wiring to it and with a flat blade screwdriver turn the switch CLOCKWISE to the 3rd click stop. That should engage the starter so be ready for that. As you do this, take a look at the brown bake-lite compared to the gray pot metal and see if they shift as you turn the slotted center piece. If it does AND your starter does not engage, unless you force the switch, that's your problem. You can try crimping the metal down tighter onto the bakelite, which might work for a while, or try gluing it down with JB Weld or some other strong glue. The important thing is to remember that the internal contacts of the switch MAY be worn down below useable limits. Datsun used the same switch in various models, other than the Z, so finding a replacement at a boneyard or even the dealer should not be a problem. Use your microfiche to find the part number and hit your parts counter guy with it and you'll have better luck. FWIW E
-
Two items: --Check the Passenger's Seat Sensor that ties into the Seat Belt system. If that switch under the lower seat cushion is closed, the system will register as if an occupant is in the seat and will insist on the seat belt being used. --Check your Door Switches that connect to the Dome Lamp. The Z also had a buzzer to remind you that you left the Ignition Key in the lock with the door being open. If your Door Switch isn't clearing that, then it will buzz. HTH E
-
I do all my own bodywork, interior and electrical, and farm out the mechanical to a professional. But that's due to a job I held after college due to money crunch in 82, and have kept at it over the years (averaging one to two cars a year). Doing the mechanical work is entirely possible by you and your son and you'll find a bunch of guys here knowledgeable enough to advise you on keeping her stock, or pursuing a highly souped up engine / chassis. If you're looking to insert a V8 or something, then the guys at HybridZ.org are more conversant with that. As far as the exterior and interior as well as the electrical, I can't think of another site better than us here. This isn't to brag, it's a simple statement of fact. Since your intent appears to be one of getting a car that you and your son can enjoy soon, and effect some of the customizations / modifications together, then I suggest you look to spending more like $3,000-$5,000 for a basic well-kept and maintained car. This range will be more towards the "drive and enjoy immediately and only require refreshing of parts" vehicle; as opposed to spending $500 to $2,500 which will be the "bring a flat bed trailer and don't drive until you've made structural repairs" car. You could also opt for the $6,000 to $10,000 range which gets you into the "ready to drive to a car show" stage, or go whole hog and spend $10,000 to $25,000 and more, for the "you won't be driving this one, you'll need an enclosed trailer to take to Concours Auto Shows...climate controlled garage required" vehicle. But DO remember one thing, if you buy a $500 back-yard forgotten heap, it will take $20,000 and MORE to get it to be a $8,000 car...and I'm sure other's will chime in that I'm being unduly generous in that final price. FWIW Enrique
-
:hurt: :hurt: Geez! :hurt: :hurt: I offer a friendly libation and it's being touted as Dr. Jekyll's brew!:disappoin That's ok, more Blue Agave for me... or Bacardi Limon Mojitos! :love: Arne, don't forget that you can't be a proper PNW Redneck without one or more car ports! They're on sale at Costco! E
-
Do post WHERE you are. A $750 price tag in the North EAST would be a tell tale sign of a junker, whereas in the South West, it would NOT necessarily be. Also, keep in mind that the less you pay for the car, generally involves a LOT of money to get it up to "standards" (those being yours), whereas paying a bit more for an already refreshed car will allow you to enjoy it MORE sooner. 2¢ E
-
Arne; When we next get together I'll buy you a drink! It was just too good to pass up. Even for a slapped together bogus site it's better than some of the "real" sites out there. I think you caught everyone's little "digs" at each other perfectly. That's why I had to share! Besides all that Arne, when are you going to get a Roadster? You know that's a requirement in the "Too Many Z's" Club of the PNW. Not sure of the requirements for the ANE, we'll have to ask 2ManyZ's about those, and hls30.com for the requirements of the ASE chapter. Then maybe Victor Laury can post the ones for PSW (or LA since it's it's own country). :cheeky: E
-
New Mid-Oregon Z Center: http://home.comcast.net/~1971.240z/szs.html Check out their range of services and this month's special! E
-
Heck YEAH! I would GLADLY show her any and all of my body working skills --- to be done on your Z of course --- via the Braille method. E
-
Judi: There is a 73 Z for sale here in Oregon that is truly worth a look. Unless your heart is set on a 280. This car is a single owner, always garaged 1973 240 Z with A/C , original paing, interior, paint and includes original wheels, hub caps, carburatords (currently has Webers with K/N filters). Owner has the original window sales sticker, rear bumper, front bra, shop manual, it also has an updated fuse block (spade fuses) and a host of other items. Contact: Kurt George via e-mail : kg1924 AT juno DOT com Replace AT / DOT with @ and . and remove spaces. (This is to prevent the robot site scanners from collecting the address) Feel free to use my name. Enrique
-
Victor, did you take any like you did LAST year? Those are the real "droolers"! E
-
AFAIK; it is strictly a cosmetic difference. The only time I had one of the newer style emblems in hand was when I became aware of it (Pre-microfiche CD days), and thankfully Troy from Too Intense Restoration was willing to exchange it. E
-
Arne: If being "Period Correct" is key, you could also use the standard "Z-Mag" that just about everyone has. You know the one I mean, (I can't find a pic right off), 5 "spokes", oval cutouts between, flat dish in center, with or without caps (press-in or screw on). Polished up, they really do look sharp. E
-
71053 here
-
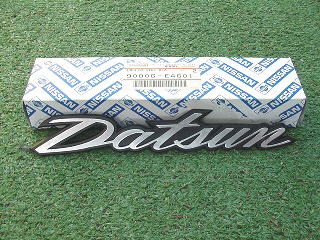
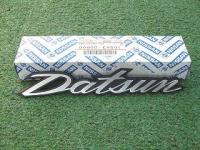
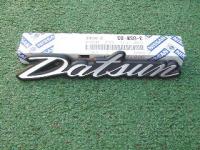
FYI: Your car being a 72 takes a Rear Deck "Datsun" Emblem just as shown in the picture. It has squared off ends on the end of the curved line for the capital "D" and the cross piece on the lower case "t" as the most noticeable difference to the style in use for the later 73 + cars. That latter emblem has rounded ends. Magnify these photos to make out the details. E
-
Looks excellent! If you still want to paint with POR, don't waste time and effort with a brush, use an air blower with a venturi at the tip and a hose into the POR can. It's called a Spray Nozzle and it will speed up your POR painting by a factor of at least 100. E
-
Off the top of my head; check that there isn't a cross connection between the Dome Lamp fuse and the Parking Lamp fuse (third and fourth fuses down on the right side of the fuse box). Aside from that check the Hazard Switch, both circuits mix there. E
-
Not to hijack, but could you explain this to us "Yanks". E
-
:cheeky: You mentioned ONE "of the plugS", so depending on whether it is one or two: http://kalecoauto.com/index.php?main_page=product_info&cPath=1&products_id=8 http://kalecoauto.com/index.php?main_page=product_info&cPath=1&products_id=2 E :cheeky:
-
Unless, of course, you installed the Engine Oil Bypass Kit from Kale. http://kalecoauto.com/index.php?main_page=product_info&cPath=1&products_id=8 In which case, you need to pull the distributor to check it.:cheeky: E
-
Did anyone notice that the engine is mounted ON AN ENGINE STAND? If his heater were to work, then the Aliens have wired it up. E
-
I was referencing OLD memory, and just glanced at an old wiring schematic, so it just goes to show that even memory can play tricks on you. E http://www.indepthinfo.com/wire-switch/light-switch.shtml
-
Unfortunately, if "common sense" were indeed, in FACT...COMMON, it would be called INSTINCT. E