EScanlon
Free Member
-
Joined
-
Last visited
Everything posted by EScanlon
-
Other than the standard "hamburger" Datsun hood emblem, there wasn't anything that resembles a gun sight. Why not post a picture? It would help us envision what you are talking about, and might make Bill jealous. As far as the 8-track, don't just discard it. Believe it or not, if it's operational, you might be able to sell it. 2¢ E
-
Or Why some people should NOT be allowed cell phones! http://view.break.com/148292
-
Tomohawk: Are you sure you saw the same video the rest of us did? Whether it was staged or not, if we follow the premise of the film it's a fair representation of the anger and fear of having a large king cab pick-up throbbing behind a small car, accelerating hard, braking late and generally making obvious threatening moves. (Anyone driven their Z in traffic lately? Or how about a Roadster?) The BMW effects a left turn, and the pick up does too, zooming up at a high rate of acceleration, in my view and supported by the dialogue, to intimidate the driver of the BMW. When the BMW driver effects a U-turn to get away, the pick-up driver uses that as a reason to pump his and his companion's anger up. The pick up driver then follows obviously to "teach this boy a lesson". When the dead end is reached and the p-u driver pulls out a BAT, his intent is to intimidate...and let's not forget that he has two other idiots with him. You call that "basically no reason"? After all that happened, once the hick took one step towards me with the bat, I'd have done more than just point the gun and take the hick's keys...I'd have taken their truck and left it with the engine running in a bad part of town. 2¢ E
-
Those brackets appear to mirror the OEM ones, that would make them fit the 5-1/4" speaker. As far as mounting, the speaker mounts behind the bracket, and as Bart pointed out doesn't allow for much projection there. E
-
Carol: The best process will be decided more by your budget than anything else. What one person would consider absolutely necessary someone else might feel is only on a case by case basis. If you have unlimited funds, then ... complete disassembly, dipping the shell in an acid bath to remove all the old paint and sealants, then dipping it in again but to pickle the metal to avoid future rust, reolacing all old rubber, and most plastic, vinyl and even glass...... this would be just the beginning. You can see how laborious and expensive it can quickly become. Conversely, you might have some simple surface rust issues that were compounded when the rust crept under the paint ... OR ... the rust inside the car has finally eaten it's way through the metal and has caused the paint to bubble. Either one of these repairs can be done and the cost / quality will be strongly affected by how much and how long you want to work at it. As David pointed out, take some pictures and post them. That is the best beginning step towards doing it right. Enrique
-
Tomohawk, you're muddling the issue. The Rear Defog switch DOES have a light..on the lower section of the center console...as evidenced by Stephen's picture. What it didn't have was an INTERNAL light inside the switch housing, as the Hazard Light Switch does. As to why it had one and not the other, well you could argue it either way. The Hazard Switch is normally only required when you're parked on the side of the road or in the breakdown lane. When that happens, you might flick on the hazards and remove your key ... shutting down most lights (except for Headlamps and Brake). I'd be willing to bet that the light inside the Hazard Switch is a very small light either LED or BULB, but in the 2-3 watt range...just enough to light up but not enough to really draw amperage. The Rear Defog and the Seat Belt lamps are OPERATIONAL indicators that would be needed when the car was being operated...and as such would need to be big and bright. E
-
One other suggestion, take off the aluminum sills until you are DONE with the interior. You still have the seats, dash and a few other items that can ding that soft aluminum very easily...not what you want, as they'll get scuffed up soon enough anyhow. Same thing goes for the fuse box, mount it AFTER the dash is in place, otherwise as you put it in position it's likely to take a hit from the support legs. E
-
Looking nice Mike. Don't forget to get a small tub of Plumber's Putty to use to make the "gasket" for the Fresh Air Vent and Blower Housing where it mounts and "connects" to the Cowl Bucket Vent Opening. It will seal, stay pliant, and not get affected by heat or moisture and best of all... doesn't smell. E
-
Kick panels are on the sides of the foot area. That's just a standard term. E
-
The cautions regarding tape etc. still apply though! Be careful, she looks too good to scratch it... E
-
Bill; Take a look at the original pic, and you'll see that it only applies to the 260 and later dashes. E
-
The Front Bumper is the one you'll need to be careful with. That's the one that can be a real bear if you're not careful, and the suggestion to have a helper is a good one. The Rear one, is made from 3 pieces and as such, you can assemble it on the car. The Two cap screws that hold each bumper side extension can be left slightly loose. This allows you to spread the ends out and minimize the risk of scratching the body as you align and mount it. Once you have the bolts started on the bumper bracket to the body, then follow up with the side piece bolts (don't forget the rubber sleeves or in their place, rubber washers). Then it's just a matter of slowly snugging the mounting bolts down and aligning the bumper to the body. Once you've got it centered and aligned, then tighten the side pieces to the center piece. If you are also installing the rubber guard strips, then the only one or two you leave lose are the ones right on top of the center piece. Tighten them down once you've mounted the bumper. FWIW E
-
The radio bracket is visible in both dashes on the zhome picture.
-
Arne makes a good point, I was going off memory (it's been a few years since I disassembled a Series I car) and since the picture posted by moonpup is from a 73.... I recalled that my car had the bracket on the dash I installed, but wasn't sure on the dash I removed. NWCubsman's also had the bracket so, to make sure I couldn't for a fact state that he SHOULD have that bracket. Thanks for the confirmation Arne. Phil, any chance you could take a digital pic of the radio opening as you look at it from the center console? E
-
Mike here's also another option: They're called Jack or Well nuts, basicaly a rubber rivet with a nut inside. The additional factor of sealing the wheel well from the engine compartment as well as providing a rubber surface to cushion the tray: Also look at the top of the second document. Those are the "nut-zerts" (may have been the trade name way back when). Basically the upper portion of the rivet collapses and grips the sheet metal, leaving the lower portion of the rivet tube for the nut. We used to use these all the time to mount mirrors. E 63jacknut.pdf 64rivet.pdf
-
In the FWIW dept. I think a7dz's solution to be the best solution for you with only a minor modification. Jon's would involve cutting, metal fabrication and welding and re-painting to effect, which at the stage of your restoration may be several steps backward. Jim's is ideal in that it uses a basically stock tray, that instead of being welded in place is bolted in place. Where he welded the nuts to secure it to the back side of the fender, you could use nut-serts. Nut-serts are like a rivet with a nut on the end. That way you would get the advantage of the removeable tray without the disadvantage of having to re-build your fender well. 2¢ E
-
Hey Mike, there's this HUGE smudge on that windshield....and with everything else looking so nice, let me swap you one of mine.....it's pretty much ok, except for just one or two sand pits....but NO SMUDGES!!! Looking good Jedi! E
-
If you check his other auctions he has 3 of these boxes, and two other boxes of two other models. Well, counterfeit boxes without product to what? Make someone's Transformer collection LOOK better? Or to blatantly fool a less knowledgeable collector? At least he's being up front about the boxes being repro's, but who is to say that someone won't be selling a Transformer (all beat up because their kid stopped playing with it) in a "pristine" package (that's fake) to an unsuspecting buyer? Just goes to prove....caveat emptor. E
-
Ok, next item. It sounds as though you have an early 71, which means the dash is just a bit different in appearance and construction. I'll check my old dash and see what I can post. E
-
Fifteen bucks for just the PACKAGING!? Apparently those Transformer fans are not only picky but not too astute if they're paying $15 for an EMPTY box. And a FAKE one at that! I'll be right back, let me go check the trash.... E
-
This is a very good write-up by Dogma420: http://www.classiczcars.com/forums/showthread.php?t=19034 E
-
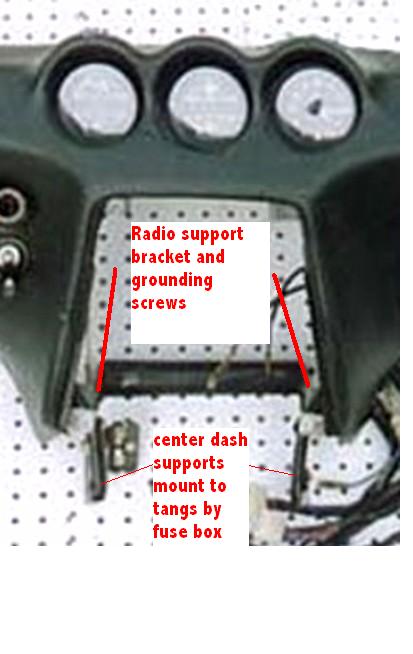
THAT'S IT EXACTLY! When you look at that bracket from the side you'll see two holes in the bracket that will line up with the side screws on the radio. The radio gets grounded by those screws by the way. E

-
Sorry guys, his radio requires the "U" shaped bracket that goes around the whole sides and back of the car. Chris: The two tangs (one not seen) on the left side of your picture, on either side of the fuse box support, are for the forward legs of the dash. Directly behind the fuse box support you can see the Heater Plenum support. Those on the firewall are for the heater box / fresh air vent / motor. The diagram posted by Mike, showing the 73 support bracket is one that is welded to the dash's frame and used to help support the dash frame, not the radio. Phil; Look on the side of the dash's center console towards the accelerator pedal / heater water valve. Right in front of the support for the front leg of the heater plenum, you should see a brace coming back from the dash. THAT'S the support for the radio. It is very similar to the one shown in Mike's diagram, except that it is much longer (deeper). It actually ends just in front of the heater plenum. This bracket is usually mounted to the sides of the legs on the dash, that mount to the support tangs on either side of the fuse box. I'll have to see if I have one lying around, or if I have a picture. E
-
Here's another beautiful example...
-
I saw an interview of his, where he stated that "If I can pass on the torch of animal conservation to my children and to others, then I'll gladly step aside and let them carry on." If the response the world over is indicative of how much he enlightened everyone as to his cause, then he'll be well honored as he goes off into the ether...His Honor Guard will be the thousands of torches he lit here on Earth. E