EScanlon
Free Member
-
Joined
-
Last visited
Everything posted by EScanlon
-
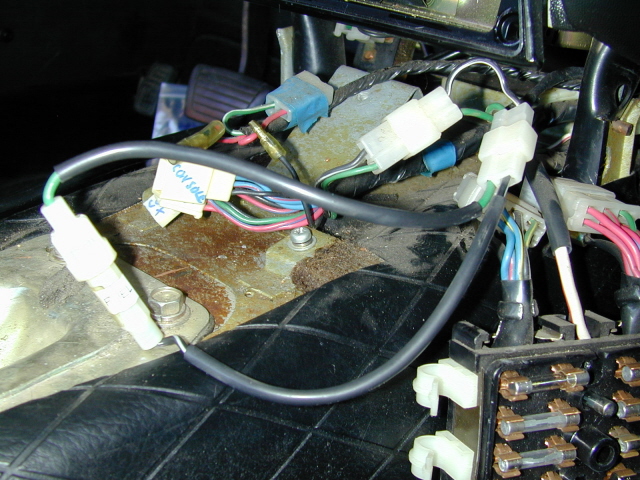
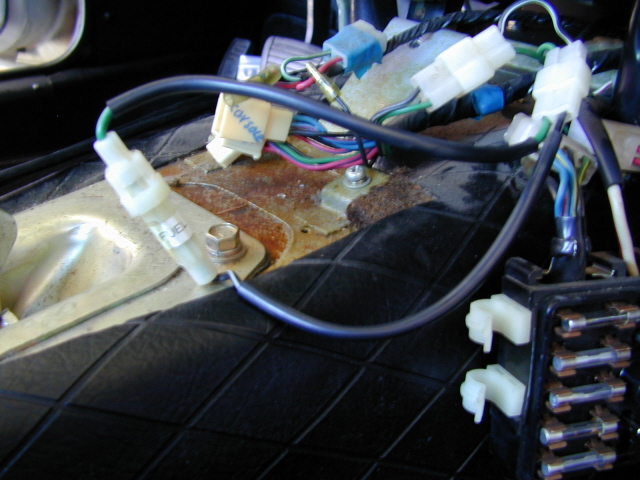
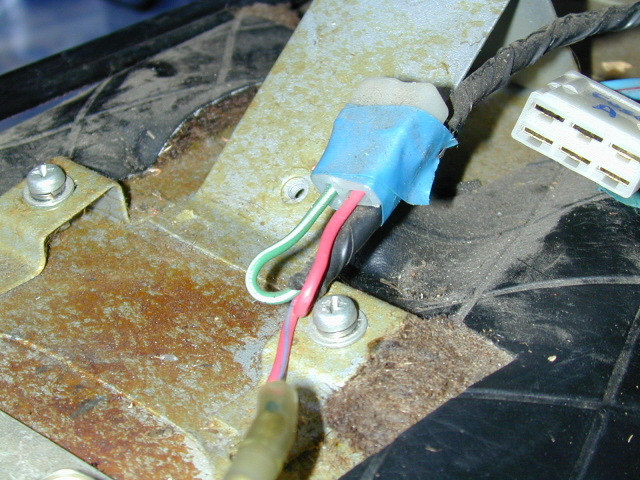
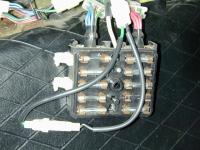
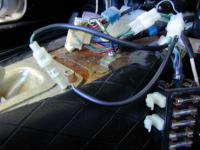
That's Picture #4, and I included it ONLY to show how people would find it. It has nothing to do with the Fuel Pump. It was a point of interest picture only. And ONLY because we were in the same area and the connector was immediately to the side of the Fuel Pump Fuse. Don't read more into it than that. Male/Female Connector labels can get confusing when you're referring to the METAL or to the PLASTIC. Typically SPADE connectors are mounted such that the MALE METAL spade ends up MOUNTED in the FEMALE PLASTIC connector and viceversa. So take a look at pictures 2 and 3 and you'll see that the In-Line Fuse Holder is connected to a Female Plastic housing that holds two Male Spade connectors. Since you do NOT currently have the fuse holder connected and in the circuitry (because you connected to the light circuit), you would have a Male Plastic Connector holding two Female Metal Spade connectors in it. Hopefully this clarifies rather than creating more confusion. That you don't have the white fuse holders is because you didn't have the Fuel Pump Relay Fuse mounted at a dealer back in the day. I mention what it's for for those people that have the white clips and don't know what they're for. As far as locating that connector, it should be right behind the Fuse Box, and should be easily located. At worst, you might have to move the fuse box by unscrewing it from the hump bracket, but that should really be all it should take. E
-
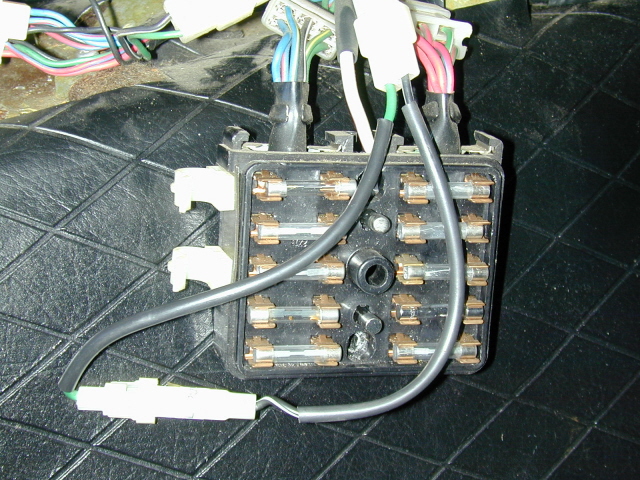
I was visiting NWCubsman to help him remove the dash from his car, and we discovered something of direct impact on this thread. Take a look at the pictures below; in them you'll see a Fuse Holder with a Green and a Black/White wire going to it. That is the OEM Fuse Holder for the Fuel Pump. The White Clips on the side of the Fuse Box is where it is clipped onto. As an aside, if you look at the last picture, you'll see a 2 wire connector that's taped to the harness with blue tape. Take a look at the colors of the wires. They are Red and Green/White. That is the connector that goes to the Fog Lamp Switch, and presumably a fuse could also be installed there, but none of the schematics show an inline fuse for the fog lamp. All you need to do is to insert a switch here to control the Fog Lamps plugged into the original wiring connectors up at the front of the car. FWIW E


-
Probably the biggest reason people might chose to not put the antenna all the way up, is simply to protect the antenna from being hit or broken off. There are also some FM and AM stations that come in better when you don't have the antenna up all the way. I've found that one station that I listen to near my house comes in great with about 12" of antenna, then as I travel from one side of town to the other, I have to extend the antenna fully, then again retract it to about 20" as I go through "the tunnel" and the Zoo's Hill. Others may have other reasons, but I believe these are the main ones. As low as these cars sit, I'd hate to have a full mast of antenna while sitting in downtown traffic with all the bicyclists or pedestrians trying to walk around the car. I bet it would snag one or two before being snapped off. 2¢ E
-
Richard, you need to have that door skin either brazed or welded. Unfortunately both of these require heat, which will burn the paint, and therefore require some level of bodywork. Depending on the skill of the welder and the extent of the damage is what will really determine how difficult/extensive the repair becomes. But it is the only real way to fix it. I wouldn't recommend JBWeld or other Epoxy / Adhesive / Glue as the problem stems from the shock/stress/vibration of closing the door. Any of those adhesive/epoxies will just eventually crack and fall off. This problem is quite common and most of the time, I've noticed people aren't aware of it, until something such as this happens. Door skins are typically crimped all around the edge of the door frame....EXCEPT at the leading edge in front of the window slot, and at the back edge just behind the window slot. It's welded /brazed at both of these spots. The paint "shrinking" or cracking is more than likely evidence of the stress cracks the metal is experiencing, and/ or poor preparation from the prior paint. But I would seriously doubt that this is the reason for that metal cracking. If anything it's an incidental "also" ocurrence and not related. FWIW E
-
The problem with wiring a new "Fully Automatic" antenna with the old Manual wiring, is that the Full requires a source of constant power and a secondary connection to the radio to sense when it's turned on. They are simple plug and play with new stereos although you do need to run wiring for them all the way to the back, not only extending the "Blue" wire but also their +12v power lead. They will operate in their Fully Automatic Mode, i.e. Radio goes ON, Antenna goes FULL UP. Radio OFF, Antenna goes FULL DOWN. There is no stopping part-way up or down in the Fully Automatic Mode. To make a Fully Automatic Antenna function AS IF it were the older MANUAL antenna, you need to "fool" the wiring. These antennas operate via a DPDT Relay mounted on the antenna proper. When the Blue (typically) wire receives +12v, it closes the relay and provides power to the motor to raise the antenna. When the power is then shut off (the Blue is powered down) the relay then opens and still allows power to the antenna, but only to retract it. The motor in these antennas simply inverted the wiring, and hence the motor's polarity to go up/down. But there is where the problem lies. The old style manual antenna's motor has two different + wires. One to raise it, and another to lower it, while maintaining a comon - ground. The switch at the radio is a simple momentary SPDT switch. That is, a Single Pole, Double Throw. The switch either sends +12v along the Blue/Red or the Blue/White and the motor operates accordingly. It does not switch the ground as a Fully Automatic antenna does to it's motor. To make the Fully Automatic antenna work with the ORIGINAL wiring (i.e. one pair of wires going to the antenna), the problem lies in making it operate as the original antenna did. Since the motor now has a relay, you must connect it in the following manner. Take the RED +12v wire the antenna requires for constant power and connect it to the Blue/Red wire at the original antenna connector. Take the BLUE "Power Sensing" wire and connect it to the Blue/White wire. At the Antenna Switch mounted on the Radio Face Plate. You need to replace the switch with a momentary DPDT Center OFF switch. This switch will have a toggle or a slide (as the original does) and will normally rest in the middle. When you toggle in either direction it will connect and because it is Momentary Contact will snap back to the center (off) position when released. This is the "fooling" mechanism for the relay at the antenna. A DPDT switch has 6 wire connections, 3 pairs arranged as follows: A1 - A2 B1 - B2 C1 - C2 To "fool" the Fully Automatic Antenna into allowing us to raise the antenna only PART way up, then we must both provide +12v through it's Red wire AND it's Blue wire and be able to kill power at the point we want the antenna to stay. Conversely, when we want the antenna to go down, we want it to receive power only as long as we let it....but ONLY through the Red wire. The ORIGINAL switch at the radio receives it's +12v via the BLUE wire and then either sends it out via the Blue/Red or Blue/White. Take the BLUE wire and connect it to BOTH "B" terminals of the NEW DPDT switch. Take the Blue/Red wire and connect it BOTH of the terminals along the same side, that is, A1 and B1 or A2 and B2. Take the Blue/White wire and connect it to EITHER the other A or the other B terminal. Which one you pick will determine in which direction the switch will raise the antenna, so take that into consideration. Usually, in Toggle switches, if you toggle down it's the Upper contacts that are connected and vice versa. That's it. To raise the antenna, toggle the DPDT switch and it will provide power along BOTH the Blue/White AND the Blue/Red wire, which is what a Fully Automatic antenna wants to RAISE the antenna. When you release the DPDT switch, it clicks back to it's CENTER OFF position, cutting power to both wires and thereby stops the antenna at whatever position you released the switch at. If you toggle the switch in the opposite direction, you only provide power along the Blue/Red wire and hence only that power that the antenna would receive when it's power sensing Blue Wire has been disconnected....as if you'd shut down the radio. Again, when you release the toggle, it cuts power to the antenna, and it stops. Hope this helps. Enrique
-
Don't know if the 78 has the inline fuse as the 73 + cars did, but that's one place to start. The other, is are you sure you have the polarity of the pump connected properly? Check to make sure that, as simple as this sounds, that that isn't the case. Some motors will not accept reversed voltage. FWIW E
-
I would first want to look at that "outer skin (that) has started to split from the top of the door". Depending on how severe that split is, that may be the reason for the rattling. Especially when you comment "Now I understand why the outside rubber window sweeper is not close to the window." In my opinion, this is probably the biggest cause of your window rattling. If the outer window squeege doesn't touch the glass, then chances are that the pressure roller is BARELY touching it, IF it is touching it. You need to have that checked soon, because if it's the metal cracking at the front, is it also cracking at the back? Unfortunately, the door skin is both crimped and brazed or welded to the door frame. Depending on how severe the cracking/tearing of the metal has progressed, it may be a relatively minor fix or it may require .... welding/brazing and then bodywork and then paint. As far as the Pressure Roller that Will mentions, there are actually TWO locations that you can insert one in. Cars sold in Japan actually had two of the rollers, we only received the one. If you add the one, it will actually provide more control of the pane and less rattling due to vibrations. But only AFTER you fix the metal cracking. They mount below the outer chrome trim squeege, you'll readily see two "notches" in the upper edge of the door skin. U.S. Cars only received the rearmost roller, whereas JDM received one in each. FWIW Enrique
-
And by all means get the Electric Fuel Pump onto the circuit it belongs to and not with the lights, which due to the inherent resistance in the wiring, AND the A/C, AND the lights themselves, are undoubtedly causing the alternator to work overtime as Will has pointed out. Look behind the Fuse Box, and locate a 2 wire connector with a Green and Black with a White Stripe pair of wires. That's where you can plug in a 20 amp fuse and have power at the terminals for the factory wiring for the fuel pump. This will power the fuel pump once the engine starts and run it off the ignition switch (that's why it needs it's own fuse). Then take her out for a spin and check mileage. But Arne's point may be very valid. There is a valve at the front of the engine compartment that regulates how easily the "overflow" of fuel is allowed to return to the gas tank, but as far as I know, this is not adjustable. Is this "vapor lock" an ACTUAL problem, or a perceived / read about problem? I can understand that Las Vegas gets VERY warm, (read that HOT!), BUT dual fuel pumps seems like something needs to be addressed. You might be, literally, pouring fuel down the drain. 2¢ E
-
Believe me, we share your pain, as it is the same pain we have. A7DZ has been aflicted for 33 years, and he still bears up under the weight. I think he put his paycheck in the center console ONE time....and you see the ensuing photograph. I believe Will has considered (or maybe has already) buying SEPARATE buildings in which to store his beauties. He's the smarter one of us by far, keep them apart, they can't share, commiserate and plot against you. I took a hint from his book, and bought some carports. Thankfully, I can hide them on my property such that they aren't TOO noticeable. Otherwise, I'm sure the neighbors would comment. Keep up the good work, the reward is more than worth it. Tell each one that she's beautiful, and heap praise as needed. Enrique
-
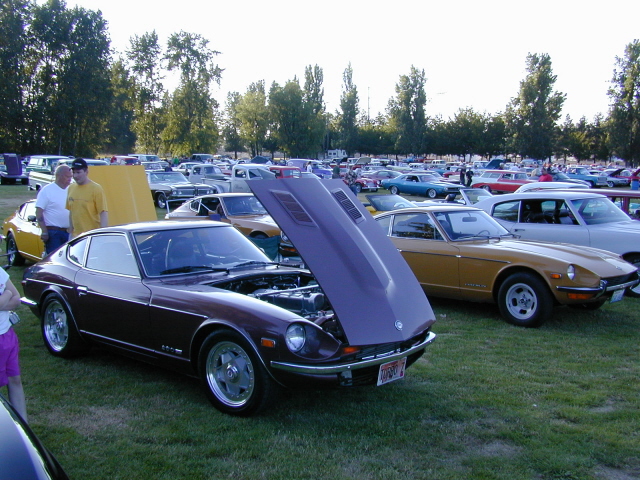
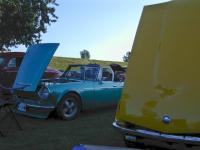
Unfortunately, that picture was taken with the sun setting just to the left of what is visible. I cropped out part of the picture and "lightened" it to make the details of the car more noticeable. Unfortunately, I'm no PhotoShop expert and between that and reducing the size of the photo..... E
-
To answer the question in the title of your original post: "how to kill the ghost of bad luck? ", here is what is actually happening. You've put your wallet or checkbook in the console area of the car. The car can SENSE money is in your wallet or in your checkbook. This is a little known, but widely acknowledged OEM feature. If you get the car completely re-done and it is absolutely beautiful and every possible part that SHOULD have been replaced, gets replaced, the car will operate beautifully and flawlessly. Put your wallet/checkbook ON the console and....within 50 miles or 75 kilometers (depending on your speedometer), you'll discover something that needs replacing. This isn't bad luck. The car can sense if you have money or money available to you and, like a very high maintenance woman.....will find ways of getting you to spend it on her. Thankfully, this money sensor doesn't work very well in the passenger seat bottom. Everywhere else in the car....it's accurate to $1. So, the trick is to 1) NEVER EVER carry cash in the car. 2) If you find it absolutely necessary to carry some form of money tendering item....put it on the passenger seat. Some people go as far as putting it into a fake woman's purse, to throw the money sensor off, but that may be a bit extreme. 3) If you ever think that this isn't true....test it. Put a SINGLE Hundred Dollar Bill on the console. This will limit repairs/replacements to under One Thousand Dollars, but you will have confirmed that it is in fact....working. 4) Don't try to tease the monster by putting smaller denomination bills. It has an exponential multiplication factor for anything less than Hundred Dollar Bills and you may have to secure a second mortgage. 5) If you feel like you want to commit financial hara-kiri, put more than one hundred dollars on the console. This has not been tried often, and the few times that it has happened.....well, the results are long and protracted. Word from those that have seen the effects of this is that you DO NOT want to do it. But having let the monster smell the $, you have only one recourse....appease it. Buy the replacement parts and once they all get installed on the car....take her out, wash and wax her, tell her she's lovely and you would NEVER look at or spend money on another one, but most importantly, NEVER EVER let her see your wallet. Others will no doubt chime in with their horror stories. This may not be a subject for Ian's ears, nor anyone who doesn't believe this to be true. FWIW E
-
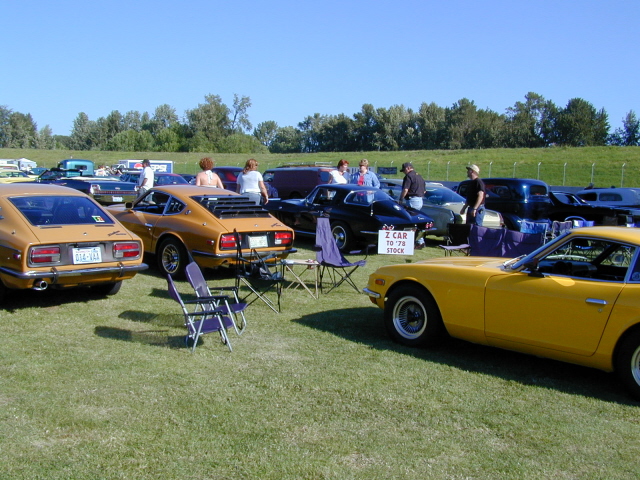
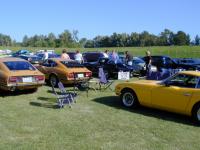
Thank you for the comments. In all fairness and honesty, where mine has some interesting items, the one in the Leftmost picture, in the foreground, has more .... hmm... items to brag about and also hidden features that I can't mention to make a trip worthwhile. Let's just say that we don't call it "Arrest Me Yellow" or "Honest Officer, I have no idea how that mile long scratch mark got there! Sleeper" for nothing. It's upcoming improvement....Personalized Frito Lay Beandip Knock Off Emblems! (BUT they're a surprise so don't say anything!) E
-
Might this be the year we finally see a group of us getting together? Wednesday Afternoons 4pm to dark + at Portland International Raceway. Sponsored by Beaches restaurant in Vancouver, over 700 vehicles of all makes / years as long as it's a classic or "cool" (they define it...). $5.00 at the gate and the proceeds go to underpriviledged children in the area. We recently had 4 Z's and 2 Roadster's attend. We're hoping for more. Enrique Scanlon


-
Arne; He didn't mention if he was checking each wire's voltage to ground, so I presumed he was checking them against each other, that being the "obvious" test. Not too many people would know to check each wire against ground, as that is a bit more advanced electrical knowledge. That's why I presumed that he'd have continuous power. But...you may be right, in which case he has some SERIOUS wiring issues. E
-
The Ballast Resistor was used ONLY to reduce the voltage to the points inside the distributor while the car was running. When the car was being started the resistor was bypassed completely, and 12v was fed directly to the tach and then the coil. In the schematic you posted, simply connect the Green/White wire to the Black/White wire on each side of the Ballast Resistor to each other. Tape it off and you're done. E
-
I think that one of the main reasons you would see a Street Rod Event be able to charge $150 vs the $30 you were charging is that there are far more "American Steel" vehicles that can be modified and still classify in a Street Rod Event. Additionally, there are hundreds of models to choose from to do your modification. Then consider how easy it is to find a vehicle that you can modify AND find parts for it. Simply put, there are literally THOUSANDS of potential vehicles and just as many potential rodders out there for EACH Datsun/Nissan owner. They have many times the vendors that supply them, they also have parts for any kind of restoration from bone stock to wild way out mod. There are also many vendors that supply "economy" items specifically geared for those that are just getting started, or are working with a smaller budget. Something that the Z's and Datsun's in general do NOT have. There are currently only TWO known large houses of parts, Victoria British (now Black Dragon or something like that) and MotorSports. Compare that with JC Whitney, and COMBINE both catalogs and see who comes up short. Yes there are other smaller vendors, but there just aren't that many cars to properly support that many vendors providing custom parts. Heck, Sport Z magazine is going under....for lack of being able to discharge debt. Let's face it, the Datsun/Nissan crowd is in the minority when compared to vehicles that can qualify for a Street Rod Event. So comparing what you can charge for a Street Rod Event with the Canby Show is like comparing an Eagles Concert with your local High School marching band playing at the Friday Night football game. Both are bound to be enjoyable, however, guess which one will draw more people? And by simple concatenation, which one can charge more for entrance fees? In fact, the $150 may be that amount simply to act as a sifting screen and keep out many vehicles who may be a "Street Rod" but aren't Trailer/Garage Queens, nor have owners who can afford to dump $1,000 a month into their vehicle. The $30 registration fee no later than 30 days BEFORE the show did exactly that...it limited registration to 1) Club Members; 2) People with plenty of disposable income; 3) People who didn't know you did NOT have to pre-register. This latter group of people found themselves hopelessly matched against vehicles that should have been in a different class. There were people at the show who have publicly asserted that they could dump "several hundred" into their car monthly....and not be worried about it...IF it helped them win one of the awards (names withheld). That pretty much turns it into a rich person's game. This being the Pacific North West, and the show coming at the same time frame as the Rose Festival...any bets that it could also have been rained out? What then, refunds? Probably not, so you'd be out the $30 bucks. $20 on the day of the show for "People's Choice" turns out to be almost as slim odds as the lottery. Except they only charge a dollar and their pay out is bigger. But, then the Registered cars were not excluded from People's Choice, so your odds went down again. Putting your Daily Driver, or your Weekend Pleasure Cruiser up against vehicles that are shown with mirrors under the frame, or have been professionally detailed before the show....take a wild guess as to which one would win in ANY class. The average owner/daily driver simply can't hope to compete fairly against someone who can throw money at any problem until it's resolved. Enact slimmer categories and label them "Top Class" or some such label and charge $25....for the trailer queens, the rich boy toy's, and the restored by other's categories....yes 30 days in advance and give Trophies to them. That's what they are mostly after. Enact slightly broader categories while keeping them focused, Stock 240, Stock 260, etc. Modified 240, that people can enter on the day of the show for $15. Let the driver select which one he wants to compete in. Charge $5 more for each ADDITIONAL category. These Categories win 5"x7" Certificates, as they used to do at Blue Lake years ago. Have two People's Choice awards, one for the pre-registered vehicles and one for the ones that registered the day of the show. Heck, have one certificate awarded within each category by vote of those who participated in that category only, or have them be their own judges while excluding their car. These are all ideas to bring it back down to more of a grass roots level. Putting it simply, if I knew Jay Leno was going to bring a Z he owned to compete in a show that I was hoping to show at....well I can tell you that his car is bound to win...even though he drives his. FWIW my 2¢ E
-
Arne, he also has them mounted upside down! E
-
I just saw a beautiful 73 for sale... in Oregon. Excellent example and the gentleman selling it is the original owner. Granted, completely cross country (diagonally) may be the L O N G way to find a Z, but..... E
-
Dang!!!! Boy, the rest of us really got the short end of the stick! Just think of all the "OEM"* options we missed out on! (* OEM here means Only Enhanced Memory....read that as "What have you been smoking?") I wonder if the foot pedals had the Shitzu "Magic-Finger" massage pads or if that was a later model.... While customizing and modifications all run the gamut from "Wow!" to "Yikes!", to claim them as OEM .... well that takes a LOT of chutzpah! E
-
Yes, that is the resistor I was referring to. You don't need it with the electronic ignition. Simply connect the wiring at each end (one Green/White wire and a Black/White wire) together. By eliminating the resistor you are basically providing 12v to the dizzy at all times not just when you're starting the engine. It's original purpose was to reduce the voltage to the coil and points to 6v or so when the car was RUNNING (while providing 12v at START) in an effort to reduce pitting of the points. With the Electronic ignition, you may actually be causing it to not operate properly because you're "starving" the circuit. FWIW E
-
Now THAT'S a dash that's had a cover applied....ever seen more bulbous "eyebrows"? Looks more like a boxer after a 15 round fight. Hatch is wrong, no vents. Interesting fuse area cover, I wonder what "oem" option THAT was? Anyone know what those items are above the window crank handles? Will said it best....."don't look, just run!!!!" E
-
Somebody got you the "optional" Temperature / Tach combo? Honestly, this one is new to me. But the reason's may be due more to the age of the vehicle and it's components than anything else. Temperature can increase resistance in wiring and therefore affect electronic items. I presume you've already eliminated the resistor at the coil. You are dealing with the E12-80 Electronic Dizzy Module, I presume. I don't know, anyone else? E
-
This car has undoubtedly received some very careful TLC, but there are a few nagging points which the seller has NOT mentioned. Is that a dash cap? Sure seems odd that a 71 with Hatch Vents would have the indent for the Flasher Label, and that the "eyebrows" for the center instruments would NOT be crisp. These have a suspicious "rounded" edge to them. Then again the grain of the dash....? In the picture showing the resonator, what is that crud on the differential? While we're at it, the picture showing the front radiator support, that's some suspicious looking Texas "mud" on the lower edge. I presume that Chris is referencing the split rug in the rear as being incorrect due to it being split, since presumably a vehicle with the hatch vents would have had plastic lid tool boxes in front of the rear deck, but I think there has been at least ONE vehicle discussed on this site that has had that anomalie (i.e. deck tool boxes with hatch vents and IIRC, a side vent on one side only). In either case the missing luggage straps may have been an affectation of the owner when the car was refurbished. But, all that being said, the car is a beautiful example of having been cared for and having been patiently refurbished. Personally, I'd love to see it going for over $25k....that increases ALL other car's value. 2¢ E
-
Congratulations on #3....boy are you going to "love" when they all become teen-agers..... So, with that in mind, remember today's experience, that is "hard assed chair with no beer, Z, football, golf, Xbox, racing or baseball" and be sure to rib the new baby girl about it. With Regards to Mary, here's a bunch of positive energy going your way, and hopefully others will join in and help make her stay in the hospital as short as possible. Whether it's prayer, good thoughts, directed thoughts, whatever, send a few in Mary's direction. E
-
From my experience, the reason for the rubber cushion between the bumper and the body is to protect the paint from the vibration between the two metal pieces, as well as scratching as you locate and mount the bumper(s). A simple piece of rubber is all that is needed to perform that duty. However, if you've ever tried to put a bumper on, then you know how difficult it is to get your fingers up in between the fender (front or rear) and the side mount of the bumper. That, IMO, is why Nissan made these "wrap-around" rubber washer/gaskets. That way you can put them on the tab and not have them fall off as you locate the bumper and, inevitably, touch the fender with the tab. From a strictly "original look" point of view, the reproduction parts will LOOK correct, and perform as they are needed to perform. Additionally, they will simplify a task that requires you have 4 arms and eyes on the end of stalks to avoid scratching your paint. From a "will-it-work" or "or-equivalent" point of view, the rubber gaskets, washers, etc. that provide a CUSHION between those two metal pieces will work. Granted, you'll have to be extremely careful in mounting the bumper, and be able to get your fingers way up in there to put between the two pieces. FWIW E