


EScanlon
Free Member
-
Joined
-
Last visited
Everything posted by EScanlon
-
Here are two threads that might help: http://www.classiczcars.com/forums/showthread.php?t=4607&highlight=hood+adjustment http://www.classiczcars.com/forums/showthread.php?t=2045&highlight=hood+adjustment Although the second involves a front end smack, the adjustments are sound. Hope it helps. Enrique
-
Having worked on cars in the Midwest and specifically Michigan (which salts HEAVILY), I can attest to the damage a car will get in a very short time. My wife and I owned an 84 Sunbird (Pontiac) which she bought new off the lot and had it Ziebarted. By 89 it was already showing the beginnings of rust through in the rear and front doglegs. As a result, I stand by what I said and David pointed out, older vehicles are in fact, a RARITY on the East Coast. That rarity ALONE, is what helps drive the prices up. Add to that the expense (as David pointed out) of "importing" from another climate and you can actually feel that "upcharge" I spoke of. That the car is not worth the same amount on the West Coast does not degrade it's value on the East Coast. It's kind of dumb to buy where it's more expensive to an area where it's less. The value of that car is what that car will bring at the time of sale WHERE it gets sold. So discussions as to what that car would bring IF it were on the West Coast only serve as further additions to the "We agree to disagree." file. You can't sell ice in the Arctic and you can't GET it in the Sahara. David, as far as your evaluation of the car. You must agree that there are a lot more people out there who know little to nothing about the trouble spots the Z can have. Many of these people state the cars as being "nearly rust-free" but in fact have floor boards being held together by the tar paper. If you feel you were defamed by the statements given, then chalk that up to not knowing WHO the seller was, and most importantly, whether or not they would actually know anything about the Z. I hope you DO get your asking price. Any transaction that maintains or improves the "value" of my car is welcome. 2¢ Enrique
-
True, it is a skill but I have done it on other plastics. I'm into R/C Boats, Planes and Back Yard Racers, and I've used it with the Trim Tool which gives you a very small and localized hot plate to afix and then iron smooth. Instead of using a hot air gun or the larger iron, you end up with a hot plate about 1" long by 3/8" wide with a small bevel to the face. I've successfully bonded trim up to and just touching the canopies on planes and boats and haven't melted nor distorted. Now I can't claim as many planes or boats as Z's in what I've done, so I'll try it and advise. Enrique
-
While I agree with the suggestions so far, I would recommend you first get used to the car so you KNOW what it is currently doing / not doing, then begin repairs that are needed and not try to catch up on the cars maintenance log.
-
Andrew: You blew her off because it was going to rain?!!!!!!! I wholeheartedly agree with your restrospective view and raise you to :stupid: ============:stupid: COMPLETE BONEHEAD! :stupid: ============:stupid: Geez man, get out from underneath the car everyonce in a while. You can always re-wax your car and it won't be mad at you. Besides, so WHAT that it would have gotten wet, dirty, etc., you had a female willing to drive out to see YOU, then you cop out because your car might get wet? Sorry, but that's one real lame excuse. What's next? A run in your sock? If you really, REALLY think your car wax is good, then a simple old thunderstorm should not WASH off the wax!!! Sorry Andrew, not to berate the point, but this move qualifies you for the HALL OF SHAME!! Enrique
-
Use Sylvania #53(BP). These are a direct exchange for the ones in the car, I've heard that GE 1445 also works, but I can't confirm that as I used the Sylvania's. The BP denotes the "Bayonet Plug" afaik. The SKU Code from the back of the package is: 0 46135 33721 5 The leading 0 and trailing 5 are those very small numbers to the right and left of the SKU Bar lines. So omitting those (for different POS Scanner systems) the SKU would be : 46135 33721 I include it both ways, because it depends on your store having those numbers in their database (AFAIK). I installed these in my car and I am well pleased with the amount and adjustability of the light. The bulbs are bright enough that just one in the center gauge is enough to light up the face. (Granted, I had also repainted the inside of my cases with a Polar White paint.) As far as adjustability, the dimmer has them lit completely through their range without any significant flutter to the light given. But I agree, first do ONE bulb, and check, THEN go on to doing the others. It may be as simple as a fuse, or even a pulled ground. 2¢ Enrique
-
That you're getting water through the door onto the sill, tells me that your drain (weep) holes on the outside portion of the inner metal (where it comes into contact with the exterior skin) may be plugged. Another item to check is the gasket that is attached to the bottom edge of the door, and lastly, make sure that the top "whale tail" gasket at the top front of the door is in fact making contact with the car's body in order to seal there. Since I did my car, I've not found water where you mention. Enrique
-
The main reason I went with the shower curtain behind the interior door panel was that I wanted to be able to remove and replace easily and if necessary, CHEAPLY. IMO, the Dynamat, Brown Breadk, Q-Pad, etc, would be both thicker and much more expensive to work with. Then when you cut all the holes to leave the access holes for the window and lock mechanism open, you've really reduced it's effectiveness. Granted, an application of the material directly behind the speaker (if you have your speakers installed on the door panels --- shudder--) will do a lot to reduce the noise and vibration generated in the door plenum by the speaker. However, a LOT of the noise inside the car is due to the resonance of so much undampened sheet metal all over the car. The interior of the doors, the interior of the rear quarter panels, the floor pan, the roof, the hatch skin, these are all areas that will resonate and in turn generate noise and transmit whatever noise they absorb from the outside. For that reason, I used POR all over the inside of these panels, then I put a layer of Q-Pad over the inside of the outside sheet metal. This alone made a very significant improvement in the noise inside the car. Then all I needed was a vapor barrier to keep the moisture that was bound to collect inside the doors (from the window), away from the inside of my brand new door panels. That is where the shower curtain comes in. It is durable enough that it can be removed (I used 3M General Purpose Adhesive) from the door, and can be re-glued and put back on. As far as killing two birds with one stone, I think that to get the BEST of both worlds, you would need to address each one separately as I did. But then, that's MY opinion. Enrique
-
I concur with Carl, but I'll temper the price range with the famous "It's located on the EAST Coast" upcharge that seems to add 2-3k to what we would pay in California, Arizona, New Mexico, Nevada (dry states, little to no salt in winter). So, if you discount that upcharge...then it's a $500 to $1500 car. And that's about what I would expect to pay in the states mentioned. Not that I agree with that upcharge, but it seems to me that many people on the east coast tend to pay a bit more, because they do have lots of rain and snow and do use salt in the winter, so a car that's survived this far has been, in their estimation, "Babied". Just looking at the pictures of the car, a blind-a$$ guess-timate of the bodywork this car would need would be in the vicinity of $3-4,000 and that would not include a paint job. And I may be totally out of line with that guess. Anyone else? Enrique
-
DITTO! There are cheaper ways of taking risks, and also less tragic. There is a reason some things MUST be left to the experts i.e. those people that do it often, and have a reputation to maintain on their performance. Enrique
-
Personally, I recommend you start with SAFETY items. That means the brakes, then steering, then suspension, then critical rust, and not necessarily in that order. It all depends on the true condition of each item. If the brakes are "ok" but will need replacing down the line, then fine, address any known problems with the steering, or suspension or... As far as "souping up" the car to drive faster, harder.....in a car that needs safety issues dealt with....that's a short road to suicide. I always tell people that want to "fix up" their car to take care of Safety, then all Mechanical and finally Body. Some items are in all 3 categories, some are only in one. But the bottom line it is a real heart breaker to see a beautifully painted car....in the boneyard. 2¢ Enrique
-
From this I gather that it has the typical early horn button damage: i.e. cracked / broken inside center plastic cap. The one that the ring on the horn button grips to allow the horn button assy, to "float" over the center column. What is the condition of your OUTSIDE Vinyl. If it is acceptable, but just needs the inside fixed, you CAN do iit, with some 2 part epoxy / filler. Here in the U.S. we use JB Weld a lot. This is a product that mimics a real hard "ceramic" style metal filler. The two halves are black and off-white almost a pale yellow. When mixed they produce a gray toothpaste like putty. Using a pair or more "zip-ties", which are those nylon self-locking straps, insert the strap on the foam side of the plastic inside cup, and tighten them until all pieces are just almost aligned. You need to get some glue in and behind there, so don't yank down fast. You can then glue all the pieces, and if necessary, even rebuild sections of the missing plastic. The intent is to restore that cap. If trimming is necessary, you can do it afterwards with a high speed hand tool. (U.S. we use a Dremel Tool, a 40k rpm hand held drill / sander / grinder ) I believe another member posted a picture essay on the subject, and if so, use the two to make your repair. Enrique Scanlon
-
Hey, you got to admit that Bill doesn't look too bad in a dress. E
-
The basic rule of thumb, if my account is compromised, I'll CALL and get someone on a phone number that I selected and not on a URL on a message that they sent in the e-mail. This is something that's called Phishing. They tease you with a message that for all simple visual checks appears legitimate, even to the extent that the additional "legal" information down below will take you to the right place, BUT the account verification one takes you elsewhere. If you hover your mouse pointer over the link, and look in the status bar, you'll note that the destination listed is NOT what the e-mail says. And beware, because I've even seen some that are suspiciously close www.e-bay.com instead of www.ebay.com. The phishers have even taken on bank accounts, book clubs, and others. I've even received "account verification" on bank accounts that I closed over 10 years ago. The bottom line is as everyone else has pointed out, don't assume that the mail message is legit. If you have doubts CALL your institution to check. This way YOU choose the method of contact and not have it spoon fed (with poison). Enrique
-
I discovered the use of this box by just plain old trial and error. I was disassembling the whole motor / gear box etc to try to cure the slow wiper problem, and had started on the motor. I removed this part somewhat carelessly and discovered that it didn't go far or where I needed it to. I put it back on, but inadvertently in the wrong location. After I replaced the motor and linkages back, my wipers parked weird (can't recall how) so in reviewing what I did, I recalled this part. Took the motor out, and allowed the wires to "return" the cap to it's proper position and tightened down. That turned out (sheerly by luck) to be the proper place, so I put a (don't mess with) tag on it in my head. Wish I could help you more. You might look at the back of the picture Carl put up, and note the "notch" and the "lines" around the circumference. I'm not sure, but they may have a lot to do with locating the park position. Enrique
-
Here's a link on the wipers and park position: http://www.classiczcars.com/forums/showthread.php?t=14432&page=1&pp=15&highlight=wiper I also recall another one that discusses that you should actuate your wiper motors BEFORE you put on the wiper arms, specifically to avoid the cowl wipe/scratch movement. Found it: http://www.classiczcars.com/forums/showthread.php?t=2487&highlight=wiper Enrique
-
On the back of the gear housing (where piece #1 on Carl's pic connects to the shaft), there is a pie tin looking cup, held in place with a 2-3 screws. This cap, when loosened, determines the PARK position of the wipers. Since your wipers are moving through the WHOLE range of the windshield, but "parking" in the middle, it's that the parking position is not set right. Additionally, that spring that Carl refers to, I believe that it "triggers" the mechanism at even short distances. That is, when you "flick" the wiper, a movement of x inches is enough for the wiper to realize it must cycle through completely to park. You made a good point in identifying that your wipers DO in fact go to bottom and top, because if you had just moved the wiper arms onto new positions on the wiper shafts, you would have wiped half your cowl. 2¢ Enrique
-
The Fiberglass Resin, BY ITSELF, is not as strong as the JB Weld. The F. Resin is supposed to be used to impregnate fiberglass cloth or mat. It is the combination of the two that makes for it's strength. To cut up a bunch of little fibers to stick into the holes, I think would be more hazzle than the benefit derived. Additionally, the amount of mixed resin you'll use for BOTH sugar scoops would probably be less than a tablespoon or two. The amount of catalyzer required for such an amount would be LESS than a drop (if memory is correct). If you add more, you'll "cook" it much faster and hotter than is good for it and you might crystalize the resin. JB Weld on the other hand, uses equal parts of each of it's two parts. Making spot mixes much easier to do than with fiberglass. Additionally, it hardens to a substance that CAN be drilled and tapped with ease, whereas it is really tricky to tap fiberglass resin. Last major difference, is that catalyzed fiberglass resin can be very runny, in the vicinity of maple syrup or more fluid. This makes it critical that you keep your workpiece positioned to NOT let the resin flow out. JB Weld on the other hand ends up being the consistency of toothpaste or thereabouts and will hold a vertical edge much better. For the price of $5 you can usually find it in the hardware section, making it much cheaper than fiberglass. 2¢ Enrique
-
Those Hardened Steel Extractors will not work on your Fibreglass imbedded Bolts. Not only will the bolt NOT screw out (it's imbedded, and not screwed in) but by the time you drill out enough of the center to insert the extractor you might as well drill out the bolt. You must do as Ed said, drill out the old and imbed with epoxy, although I prefer the JB Weld. Enrique
-
Besides, don't forget that you've already used up your Mulligan on snow driving, or have you forgotten the incident last year with the girlfriend sideswiping your car. If you do it again, you go from having had your Mulligan to being a bonehead. :stupid: Enrique
-
Just remember to NOT use the Anti-Fog Rain-X for the inside of the windows. That stuff is like wiping motor oil mixed with super glue to your glass. It will NOT come off, and you can't get it to be completely clear. Enrique
-
Tomy; Is this your idea of a helpful response? A half baked idea without details and only possible and untried methods that end with a question? If so, please refrain from helping, or better yet, go try it out on YOUR car and tell us how it worked. Half baked solutions only help to muddle the discussion and split it off into a myriad of irrelevant points that have nothing to do with the original intent. I recall a saying one of my teachers had above the chalkboard: It is better to be silent and be considered a fool, than to open one's mouth ane remove all doubt. I'm donning my flame suit. Enrique
-
With as many cars out there that have incredibly obvious swirl marks in the paint job marring an otherwise nice shine, I'm not sure I would want that crap on my windshield distorting things. If you want to do this, then use Rain-X which SHEETS the water off and you don't have to use your wipers as much or as often. Trust me, with all the oil, rubber grime and other misted crap that gets on your windshield, WAX is definitely NOT what you want to do. Enrique
-
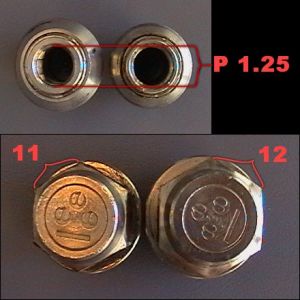 Also, the THREAD PITCH is what is denoted as 1.25 and not the diameter of the bolt the nut can accept. Enrique
 -
AFAIK nut heads are calibrated by the DIAMETER of the head accross the FLAT faces and not the length of the face. Or am I totally off base? Enrique