EScanlon
Free Member
-
Joined
-
Last visited
Everything posted by EScanlon
-
Two items: The earlier Z's didn't have an Ignition Relay, they had an Accessory Relay. It could be as simple as the old name sticking. The Acc Relay on the 71 controls most of the electrical items that need to be disconnected when the starter is engaged. The Blue/White wire coming from the Ignition Relay on the color wiring diagram (nice job!) connects directly to the ACC connection on the Fuse Box. One note on the wiring diagram, a very nice job, but for future reference, the "basket weave" of the wires, although artistic, is hard to use. 2¢ Enrique
-
Sight unseen? Hard to say, I'll say Shipping plus $5.00. Picture will help determine if they're a good type or not. (Sorry to be so blunt.) Enrique
-
Can't tell from the pictures. Brush (Cut Pile) push the fibers to one side. If they are "individual" or "brushes" then it's cut pile. Loop, again push fibers to one side, the yarn used will be in an obvious LOOP. Enrique
-
{Sorry for the length of this post (one of my typical long ones), but read the top part through and the footnotes only if you need them. Enrique} The next thing to do is to bypass the Dimmer Switch. Go to the Dimmer Switch, to the side of the Steering Column. Find the wires going to the Dimmer Switch, the pair should be: Green/White* and Red/Blue* Disconnect AT the switch and join the two wires that go to the wiring harness. Start your car (so you don't drain the battery while testing) and turn on the lights. If this resolves the tail light and instrument light problem, then your dimmer switch needs replacing or repairing(1). If this didn't clear it up, let's bypass the combination switch and see if the problem is there. The Horn Relay is mounted on the driver's side Kick Panel. There are 3 wires leading to it. Disconnect the Green/Black* wire and connect with a shunt wire (plain wire with the ends stripped) to the Green/White* going to the dimmer switch. Press and hold the horn pad ON. If this turns on the lights on the dash and both tail and running, then your problem is definitely in the combination switch wiring. Remove the Steering Column Shroud and observe and if necessary, mark any connections so that you can re-connect properly later (2). Disconnect ONLY if you cannot look at, and access the back of the combination switch solder points after removing the screws that hold the switch to the column. Look at the switch at the base of the Light Stalk. On the back you should see where a Green/Blue (GB) and Green/White (GW) wire connect to it. Check that both wires have a good connection and have not come loose or OFF the solder point. If they have, re-connect them and see if that cleared the problem up. If the connections are good, connect the GB wire and the GW wire with a jumper wire. Check if this has resolved the problem. If it has, then your switch is bad. You can either replace the whole combination switch, or the individual light circuit switch, or take it apart for cleaning/ repairing. But that's another post, and hopefully your problem by now will be resolved. Enrique Scanlon * Standard Wire Notation: {Color of Body of Wire} / {Color of Stripe} (1) To repair the dimmer switch, remove from the dash. This is very tricky and some people have found it necessary to remove the DASH to get to it. The switch is held to the main metal frame of the dash by two Phillips Screws. The switch is placed into it's opening hole on top of the frame and then is screwed down. This means that you must access the screw heads from above the switch. This is the tricky part, as directly above it is the Tach. If you have a 90° Phillips (short) you can do it, but it is difficult to align the bit with the head. I found that a Ratcheting 90° combination (Phillips one side, Standard Blade on the other) worked best for me. Once out, look at the SPRING that has been imbedded in the bakelite. If there are any breaks in the wire, it's easiest to replace than repair. If you insist on repairing, you must bridge the gap in the spring. Soldering will work, but you must be careful that the final bead of solder does not stick up above the main edge of the spring. Next look at the swipe plate. That's the metal washer with the "hand" (as in a clock) sticking out and making contact with the spring (above). If it is NOT making contact, gently bend it downwards at the angle point just past the flat center portion. Bend it enough that it makes soft but firm contact. Actuate the switch several times and observe that the swipe plate makes contact on the spring throughout it's travel. It might help to lightly scuff the top edge of the spring in the bake lite to ensure good electrical contact for the Swipe Arm. Lastly, check the contact at the center of the switch, Make sure that the Swipe Arm has a good contact to the connection wire. (2) As a note for those of you who might be interested in how to "mark" or "tag" your wiring harness easily, quickly and with a LOT less grief than other methods. Dymo© makes a new labeler, the Letra Tag©. This is a thermal labeler using paper or plastic tape with an adhesive back. It has a keyboard on the face with special characters and 2 line capability. It runs off 4 "AA" batteries, and it's tape is inserted via cartridge. I've been using it to print a series of letter tapes that I then insert on each side of the connection. I'd been doing this with Masking Tape and pen, but it can get tedious and sometimes impossible to read later because the masking tape gets gunked up. What I do is have the labeler produce 2 labels, each about an inch long (on mine 6 characters in double line and 5 in single). Remove the adhesive from the back on one, apply to one side of the connection, and do the same with the other label on the other side of the connection. You can now safely disconnect that wire and you will be able to re-connect it correctly later. Although this may be over-kill for some of you who are absolute geniuses at remembering where and how every wire goes, it helps those of us who are aflicted with "Now, how did this go?" itis. To simplify things, just use a SINGLE character repeated as many times as necessary to fill that inch. Since the labeler will allow you to "save" the last label you printed (it stays in memory as long as the batteries are in the unit, or you clear it), you can readily keep track of what the next letter to use is. I start with AAAAA, key the Print Button and CUT the tape. Repeat and I have the two labels I need. I can allow the machine to shut off (battery save) or erase and print BBBBB. I keep this up for EVERY wire CONNECTOR in that part of the circuit. By the time I've disconnected every connection, I have it properly labeled for re-assembly. When I'm in a situation that I need more than just the letters to describe / identify a wire or connection, the second line feature allows for space.
-
"Which is the good one ?" LOOP = Original Style BRUSH (Cut Pile) = Easier to clean (in my opinion), and feels better in bare feet. 2¢ Enrique
-
Did you do something recently with the rheostat for the lights? How about getting into the center console and disconnecting a Red and a Red/Green pair of wires from another connector? Lastly, does your horn still work? All those derive power from the same wiring circuit. 2¢ Enrique
-
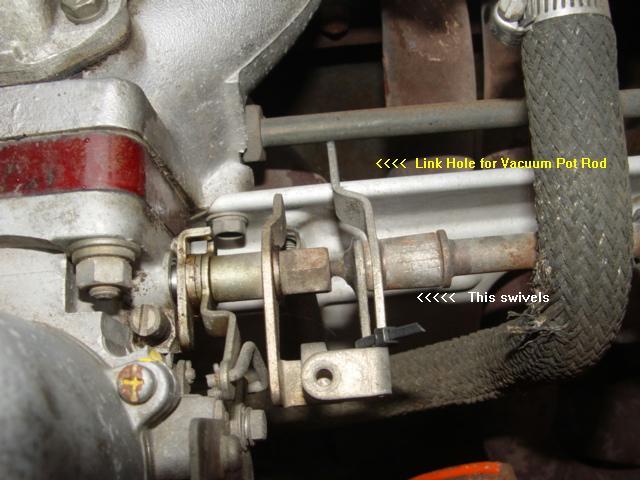
That's correct, except that it is the balance screw for part of the system that your car apparently has had removed. The Air Pump for the "smog" system has been removed from your car, and the vacuum pot that prevents the carbs from "slamming shut" has been removed. This is where it hooks up to. The screw you are missing is to balance the carbs upon deceleration. If you were to cut that zip-tie you'd note that the linkage will just flip flop around and do nothing. As far as determining that the vacuum advance system in the dizzy is still ok, look well underneath the points plate. If you see a ball bearing or two floating around in there, then it is shot. I'm not sure that 1/8" of travel is sufficient to consider it functioning well. I'm of the opinion that you should try the LEAST intrusive remedies first. That means that you should check all the items that do not require massive disassembly, adjustment or changes, BEFORE you go doing those changes. Remember, the car did RUN, as such, I don't think you need to disassemble the whole thing only to discover it's a bad plug wire, plug, filter, or adjustment. The things that everyone has been mentioning are the type of items that they've had experience with, and as such are the first things that come to mind, exactly as Zedrally points out. The gas problem is something you should have done something about. However, by now it would be hard to drain and clean without having a very hazardous situation on your hands. If you do decide to drain the tank, be very careful as 15 gallons of gas is not something you just want sloshing around on your driveway. If you do drain the tank, then decidedly change the fuel filters even if you "just" changed them. 2¢ Enrique

-
STOP!! BEFORE YOU ADJUST YOUR CARBS AND GET A MORE SERIOUS PROBLEM. That it "started right up and ran great" then shortly thereafter "someone flipped the 'run like $^!# switch'", to me, is a clear indication that something ELECTRICAL is what's wrong. The only thing you haven't checked is if it will IDLE ok, but just not let you accelerate unless you do it V E R Y S L O W L Y. if THAT is what it is doing, your problem is in the Distributor Vacuum Advance plate. This little plastic plate with a couple of ball bearings on it, is what the vacuum advance solenoid actuates. When this goes bad, the exact symptoms you describe happen. Take a look at that BEFORE you go making adjustments everywhere else. 2¢ Enrique
-
Post some pictures when you get it back. Enrique
-
My vote for the two hardest bolts to remove are the ones holding the Hood Latch Pin to the hood.........after the Hood Release Cable breaks. Enrique
-
As believable, or better yet seemingly plausible which makes them self-validating, as these kinds of "warning" or "did you know" types of letters are; do not be surprised if your friend may in fact have thought he was passing on TRUE data. Too many people "check the internet" thinking that just because they found information there, it MUST be true. With the advent of Google's, Yahoo's and other search engines that peruse millions of documents looking for "key" words, phrases or items and then give you a listing of items matching your search, you have absolutely NO WAY of knowing how valid the information is. In fact, if you aren't careful in what you research, you could actually be quoting a page that actually DISPUTES what you posted. The vast majority of people don't search deeply enouogh to ensure the integrity of the data they use to then form an opinion. This is how those stories that "everybody knows" multiply. There is also another potentially catastrophic type of e-mail abounding recently, the false "account verification" scam. This is referred to as "phishing", where you send out thousands of e-mails to people telling them to please update their account information because ..... has occurred and they need your help in putting it back in place. People by the hundreds have clicked onto what they thought was one place, a bank, credit union, credit card issuer etc, lured by the use of REAL logos, emblems, even URL addresses, except that when you click onto the link provided (so helpfully) for you to enter your info......the server you are hooked up to is in fact the thief's. He just patiently records your data, SSN, DOB, Acct. info etc, and lo and behold, he becomes YOU! What we must do as a club, is to inform all our members of these scams, and also of those bogus "informative" e-mails, so that we can help "police" our little slice of the web. 2¢ Enrique
-
Here are the ACTUAL awards from 2003: http://www.truestellaawards.com/2003.html Enrique
-
Good Job Mike! That says it all. I was going to post this one: http://www.truestellaawards.com/bogus.html Enrique
-
Stephen, I borrowed the last line and made a subtle adjustment to it. E Kirby: Think of all the items you've seen discussed on the site. Instrument lights, check them now for darkened and burnt out ones. Personally, I would replace them all, not cheap, but in the long term, cheap insurance. Check for any wiring connections that are showing frayed or cut. Unplug and replug every electrical connection to make sure that it is snug and insulated and makes good contact. WASH the insides of the defrost and vent hoses, the car will smell better. Check the foam gasketing on the center vent, it will undoubtedly need replacing (the foam around the connector from the plenum to the HCP). Lubricate the cables for the heater controls. Check your fresh air vent cables and vents themselves. And that's just off the top of my head. I'm sure you'll get a few more people chiming in with their own personal PITA favorite. Enrique
-
If you're planning on doing a two stage paint, why not go with one of the 350Z colors. My personal favorite is that burnt orange gold (sorry, ? le mans sunset orange?). Aside from the color choice, the blending of the "new" and the "old" makes quite an impact. 2¢ Enrique
-
Actually, all you need to make the whole system inert (in a 240) is to disconnect the fusible link going to the starter. That's the main power link for the car, and NOTHING will receive juice. Check the schematic and you'll see. Enrique
-
Let's not disdain this service. Many, MANY parts are RAPIDLY and irretrievably becoming scarcer than unobtanium. That Troy is taking the time to have these reproduced, is an indication of what he is willing to do to support, bluntly, our hobby. Does he expect to make a buck? I would. Do I find that unfair? Not at all as long as I can get a part that will work. In a few years a PROPERLY maintained vehicle, will for a fact, HAVE TO HAVE non OEM parts in order to keep it running simply because the OEM parts are 20+ years old. Just plain old casual driving will eventually require fan belts, brake shoes / pads, tires, and everything else that gets worn out simply by being used. You can try to "restore" some of these parts only to find yourself needlessly spending tons of time and money, when an equal substitute is available. Personally, I bought my Z to drive and enjoy. If the difference in buying a cloth radiator hose and a plain old aftermarket replacement is more than overnight and a FEW bucks, I choose being able to drive the car. Unless, of course, you "drive" a trailer queen. If that is your game, then by all means you should be using OEM parts only. No derision is intended, just that even Concours permits certain replacements without penalty. Which ones or in what manner I am not aware of, other than I have been informed that there are permissions. I think this is good advice regardless of where or whom you buy from. Having never had that experience in the dealings I've had with Troy, nor found him to try to imply that the parts WERE Datsun parts, I'll take exception to Carl's observation without malice toward Carl. Simply put, we all have different manners and forms of dealing with people, and sometimes we find someone that interacts with us in a less than pleasant manner. That I've always had good transactions with Troy, versun anyone who may have had a bad one are not necessarily indications that you will have the same experience as either one. Having said that, let me say that we should ALL heartily promote ANYONE that endeavours to produce, have produced, or can obtain the information on those items that will help us keep these babies of ours on the road. I intend to drive my car for a LONG LONG time, and to do so, I need everyone else who enjoys these cars to also be helping keep these people in business. Although there will be some who will say this is a plug for a specific vendor, it isn't. It is a plug for ALL our vendors. 2¢ Enrique
-
Also don't forget that the light has acorn nuts inserted into the nut holders. If you get a longer screw, you'll just bust the back out of the nut and get corrosion on the screw. You CAN remove and replace those nuts, but be careful as the plastic needs to be bent slightly. You might also consider replacing the screws with bolts. The lower edge of the light, closest to the rear deck, is a literall bitch to get unscrewed without busting your knuckles and / or stripping the head. I found that a 1/4 ratchet with a swivel made things a LOT easier. Enrique
-
OOPS! It's been a while since I worked on that part, and you guys are right. I added a second speaker on the RIGHT hand side and that helped me to get confused. On the LEFT side, the same applies to the side light. The antenna mast bolt knob assembly needs to be centered. Also check that the gasket underneath the round part is in fact making good seal all around the mast. The pillar emblem as well could be leaking. One last thing to check would be the hatch hinge pockets on the car. Those connect to the pillars also. I stand corrected, thanks for the pointer. Enrique
-
You might be able to swap skins, but to me, the amount of work entailed in that would make it not only prohibitve but also ...bluntly...stupid. By the time you remove the "new" skin, you'll either have used the grind the edge off and hope to re-weld onto the new frame, or you'll have spent a lot of time popping off the welds and bending the lip. In either case, you will have some bodywork to do. If, what is wrong with your doors now is that you have some rust, you'll be money and time ahead by just repairing the rust than trying to do a skin change. As Carl said, go buy the correct year. If all you need is the skin, check with either MSA or V/B. 2¢ Enrique
-
If I recall right, the speaker is in the right rear of the car. As such, you might check not only the pillar emblem, but also the gas filler neck cup where it attaches to the fender. It wouldn't surprise me to discover that the caulking they put around the edges has cracked and is allowing water in. Another place to check is the right rear side light. If the gasket isn't centered properly over the opening, or if it isn't tightened down properly, that could leak also. 2¢ Enrique
-
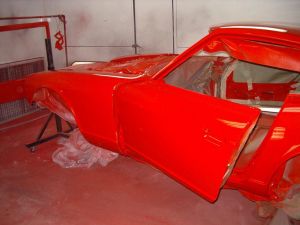 EXCELLENT COLOR! What color is it? Enrique
 -
Guus: I believe your mud flaps are on the wrong side. I can only see the left hand one, but the curve on the flap should match the curve on the fender. 2¢ Enrique
-
My take on the items, is that they are rain shields for lights where the main body of the light is inset into the panel. The top part of which might have water drip on it. Door speaker mounting kits a lot of times come with a rain shield. Could it be that these are the rain shields for the courtesy lights in the hatch of a later year Z, such as the 280ZX? 2¢ Enrique
-
The red lines denote where the meter would be put to. The blue line denotes how in a CONTINUITY check, you would get continuity between the two points the meter is hooked up to. I was trying to understand how you would have a voltage at that point if it still had a "wire" between the two leads. I'm just going to have to go out and check this out with my meter. Enrique