EScanlon
Free Member
-
Joined
-
Last visited
Everything posted by EScanlon
-
I might surprise a few people by this, but the kind of damage you exhibit is exactly what I had, and I used the POR and their Power Mesh product to repair it with. The Power Mesh is basically a strengthened, single ply fiberglass sheeting that you apply along with POR to strengthen panels. Is it the BEST way to repair this, no. Is it a BAD way? Not in my opinion. The rust in your pictures is nasty, as the holes show. The "proper" way, is to cut it all out, and weld / braze replacement metal in. This can be a very tedious and expensive proposition, which is why the complete pan replacement would be the "best" and the most "proper". However, it doesn't necessarily get cheaper. Expect to pay about $1,000 US by the time you are done to replace the floor panels. That amount includes the purchase, shipping and welding of the floors. If that amount does not scare you, AND you can find a good welder who can do just that, then go that route. While laying in patch panels may be a bit cheaper, it does have the unfortunate effect of looking unsightly when you are finished. (Unless you take a LOT of time and care to hide / blend in the repair, at which point you might have been better off replacing the whole pan.) The POR method uses the Power Mesh fabric to reinforce the POR and the metal. I would not expect this to be as strong as the original metal, but having seen a "fake" panel actually made from the POR/Power Mesh and having had the opportunity to try to bend / break it, I was very impressed with the strength it DOES have. Having learned that, and knowing that down the road, I'll be taking the car apart and redoing that whole area (possibly years down the road), I decided to try it. My results were exceptional. The floor has a noticeable strength to it, has no leaks, is noticeably quieter, and what's more, cost me less than $100 US for both floor pans, and I was able to do it rather quickly. For those interested, here's what I did. Once the tar paper had been removed and I was able to ascertain the extent of the problem, I wire brushed, and ground off as much of the "soft" rust as I could. Soft rust is the stuff that is already flaking or already permeated completely. Although this exposed a few more holes, I wasn't surprised. Then I sandblasted the floor, specifically those areas that still demonstrated that shiny black rust that you can see in a couple of your pictures. At this point, the complete extent of the damage was evident. I decided to braze closed the more critical cracks and holes, as well as make a couple of metal patches for the really weakened and torn areas. The patches were migged for the most part, with only one or two being brazed in. Now the floor was ready for the POR process. There were still a few areas that showed some of the holes, but the steel around the holes was still relatively strong. I vacuumed and pressure blew the interior to remove the sandblast media, then I applied the Marine Clean product, and used a nylon and soft metal wire brush to thoroughly degrease the area. This was followed by a thorough water hose blasting to ensure that it was rinsed thoroughly. I then used my air hose to power dry as much of the metal and nooks and crannies as possible. The car was then allowed to dry (in summer). The next step was the Metal Prep. Again, the floor was completely bathed, scrubbed and treated for at least an hour or more. I made it a special point to ensure that I also reached inside the rocker panels. In order to do that, I used a Cleaning Wand with my compressor and a pail of the Metal Prep. The Cleaning Wand has a hose attached to it that allows you to pick up a liquid and expel it out via air into tight nooks. (I had placed several of those wallpaper soaking tubs underneath the car to recover the Metal Prep so I could re-use it over and over again.) Once finished, I allowed the Metal Prep to drain out of the car, recovering as much as possible in the wallpaper pans. That done, I rinsed the car again with the hose. Another force dry and air dry period. Now the car is finally ready for the POR. First, using duct tape, or some other liquid proof tape, I taped the bottoms of the holes from underneath the car. This was to prevent gobs of POR from dripping onto the driveway as well as reducing "scrap". Once satisfied that all the holes were "patched", I applied a good layer of the POR paint to the floor. Then, I cut the Power Mesh material to conform to the areas I was repairing. Since I still wasn't completely sure of the material, I decided to cut TWO pieces for each area. My intent was to lay the second layer of material at a "cross" direction to the original. Although it is a fiberglass mat sheet, by rotating the nominal "direction" of the second layer of fabric, you add strength to the union (just as in the true fiberglass/ resin process). I made what I consider a mistake then, immediately after coating the floor, I began to lay out the mesh. Looking back now, after the hazzles I encountered, I would recommend that you WAIT until the first coat of POR is just..almost..tacky. Meaning that the POR is still somewhat liquid, more of a real sticky tar, but not yet hard nor what the instructions refer to as "finger-drag" sticky. Depending on the humidity, this can be an hour or more to more than 4 hours. It is better to err on the side of wet than on the side of dry. At this point, lay your mesh pieces in place. They'll stick MUCH better than what I had happen (don't ask). If the mesh doesn't stick to the POR, you waited too long, give it a quick re-coat to make it sticky. If on the other hand, the POR literally feels goopy, then you're early. You want the POR to be dry enough that it doesn't release the mesh once you've pushed it into it, and soft enough that you CAN push it into it. Lay out all your pieces, and push them firmly INTO the POR you've painted. Once you have them firmly in place, start painting POR over them. Remember that the NEW paint over the old will activate the old to an extent, so don't get so over eager that the POR lifts the Power Mesh. (That's what happened to me. Geez, what a mess / nightmare.) Add enough POR that the mesh is coated and somewhat wet, but don't go for saturation yet. Allow this coat to reach the same state as before, i.e. just before finger tacky. Paint some more POR over the whole floor, this time taking the time to fully saturate and smooth out the mesh finish. Allow to dry. After about 4 hours or so, you should be able to cut out any drain holes that SHOULD be in the floor pan. (It's up to you if you don't want to, but they are there to allow you to DRAIN any liquid from the floor.) This is a simple process with an X-Acto knife (hobbyist scalpel) if you catch it just before it turns rock hard. (If you've worked fiberglass, just as if you were trimming mat or cloth from a mold / repair.) That was the repair of the floor. For those interested, I also used my blow gun sprayer to shoot POR into the rocker panels as deep and as thorough as I could. That way I could protect the INSIDE of the rocker panel. Hope this helps someone. Enrique
-
You are NOT being an asshole. You are entitled to restitution to restore your vehicle to the condition it was in PRIOR to her damaging it. That internally the car required more repair than you knew would be is not the issue. The issue is that she damaged it. Now, if you wanted to be a really nice guy (read that as in "sucker") you could offer to pay for part of the damage since neither you nor her were aware that there was prior damage / rust that is exacerbating this repair. Enrique
-
AND Ok, if the answers to the next questions are what I think they are, then you may have a somewhat tedious but very desireable out. Is your car insured? That is, were you properly insured at the time of the accident? Lastly, have you reported it to YOUR insurance company? Was her car insured, and did she report it to her insurance company? If you were insured AND she was insured, just turn it over to your insurance company. Advise them that you were "trying to save them and you money" , and that her offer was a way of not having to pay out the deductible. Although they'll hem and haw, they'll not nick you for it. What they WILL do, is force HER insurance company to pay up to repair the car to what you insured the car to be. Even if you just mention that you're going to send it to the insurance company may be all that is needed to force her to come up with the full amount of the repair. That is what you want. Either she will NOT want you to go to your insurance company, cause she knows the hazzles that will entail, or she's afraid of being canceled by them. You, you just want your car fixed. Whether HER company (which it will) pays or your company pays (which it won't, and will fight it), is irrelevant to your final desire. As long as either one pays the body shop, they'll fix it to what it needs to do. The biggest limitation here is what you and the insurance company evaluate the car at. An insurance company, aware of the purchase price may want to limit it to 2/3 of the sale price. However, if you point out the VALUE of the car to the collector market, you might have a better chance. The previous condition of the vehicle will determine it's collector value, and therefore the amount that you must use with the insurance companies, in order to determine what it takes to return it to THAT condition. Think about it. It may offer that solution you're looking for. Enrique
-
Welcome to my world! On the front page the two columns on the sides block part of the center, and pushes stuff all the way down. Let me see if I can upload a pic. Enrique
-
Sadly, many sellers do just that, hide a fail-safe profit markup to the HANDLING portion of the S&H. They figure that they're starting the item at a low $, so if it does go cheap, they will still make a few $ when it ships. However, on other sales, they'll be more realistic on their initial selling $ and not gouge you as much on the S&H. Don't know if e-Bay has any rules against that, but you might check and if so just forward the message you wrote above to the appropriate people. In the meantime as you mentioned, Caveat Emptor. Enrique
-
I spoke to a windshield glass repair business owner recently when we had my wife's Subaru repaired. I asked him specifically about polishing rhe windshield on the new Z and he said it would be cheaper to replace the windshield. Since I had figured that they were NLA, I asked him for a guesstimate. It turns out that the glass is still relatively easy to obtain, it is the gasket that will affect the price dramatically. As far as polishing, he recommends that it only be done by a true professional, and only if a replacement cannot be found. FWIW Enrique
-
First, just try to "open" the door by pulling up on the outside handle or out on the inner. If that doesn't solve it, FINISH the rotation of the "swiveling" part, to the position it would attain when the door is closed properly, and then "open" the door. Trying to close the door with it as it is now will cause more problems. 2¢ Enrique
-
Quit your bragging! Your SIDE markers should NEVER be lit unless the driving lights are on. This applies regardless of front or rear. That they operate in response to the turn and hazards, and also to the brake circuit, tell me that someplace a wire has been connected incorrectly. Since you mention that the IPO had made some creative fixes, I'll mention that that is the reason I replaced all of my dash wiring to correct the errors in mine. That being said, it isn't impossible to repair a bunged up wiring harness, but it might be a very long and extremely tedious process. Replacing the harness will make it much easier to correct problems without introducing new ones. You also need to be aware of some production differences between the wiring harnesses. That your car is an early Z with a stick will make it easier than if it were an auto, ( AT's have a kick-down circuit as well as a Neutral cut-out. Not sure as to the neutral switch in a manual.) It has the least or no smog equipment that was wired in. If you need some help, I'll try to give a hand. Enrique
-
From the INSIDE out: The two incidents, were they one and the same? If the accident was totally her fault, and she requested you avoid hazzling the insurance for it, and she would just pay you out of pocket. Did you then enter into a WRITTEN notice of such? If so, how does the wording in that notice describe how she's going to pay you? If it states that either a dollar value or level of restored functionability is an inherent part of the deal, then, you might have something to go on...or not. Right off the bat, from what you've described in your initial post, I would be inclined to say.....you're Phillipsed. (Before you PM me, as in a Phillips SCREW). So, let's get more details.
-
First, open the tail light covers and check that: 1. the Parking Light element in the bulb is not broken / burnt out. 2. you are in fact, getting power to the bulb. Then we can start giving you all sorts of suggestions, like how to remove all of the wiring, changing your alternator and how to convert it to power steering. Enrique
-
I'd like to read about the results if someone tries this. What I know about levers and pivots is that you would be reversing the "throw" of the lever. Stock position would require a short push/pull for a longer pull/push. Think of those model air planes on a control line. The distance your hand travels at the end of your arm is a very short distance in comparison to the distance the airplane flies. By reversing that, now it is your HAND that needs to travel the distance, while the plane gets to move a short distance. Translating this back to the car, is that you will now require a LONG push/pull for a SHORT pull/push. How this will affect the car's behavior is what I'm interested in finding out. My thoughts are that it would restrict the rpm's to a given "window" simply due to the limitation in the throw. (i.e. only allow 500 to 3.5k or 3k to 6k, simply because the set of the throw at "idle" and "wide open" is such to only allow that much adjustment.) So, will someone try this and get back to us? Enrique
-
I don't recall the particulars, but I believe a member previously replaced his cables with some piano wire. Sorry, don't remember the gage nor hardness, Hopefully someone else will recall the specifics or can inform you better. Enrique
-
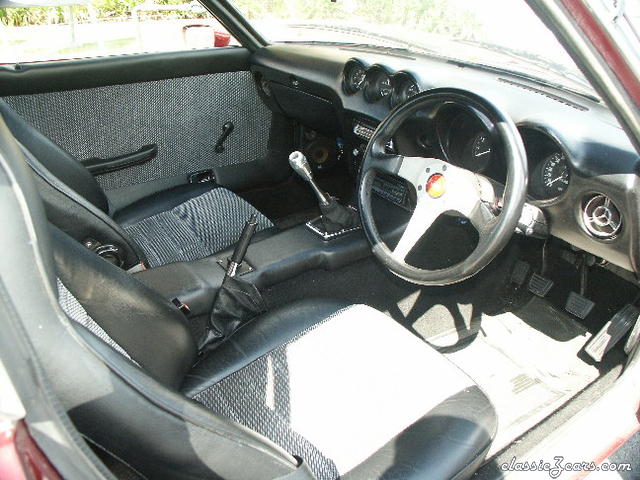 I concur with the interior! Excellent custom work on that console, and classy touch on the seats.
 -
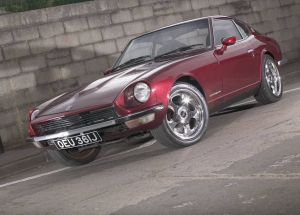 This a sleeper? Are you crazy? This car screams! The look is, admittedly subdued, but done very stylishly and provocative. The wheels, in my opinion accent the look of the car into the atmosphere. Although they are not as they seem, (trasnsparent black anodyze on the faces with bright chrome beveled edges) in this picture that is how they appear. The picture is an excellent calendar shot, and worth more than a simple magazine inclusion. Would like to see more of this car.
 -
Before you go tearing your car apart, do the following basic checks. First swap your front tires for the rears, and take the car out for a drive. If the problem has gone away, you need to get the tires checked. Go to a reputable tire dealer, preferably one where you have done business with, or the one that services the tires you have. Have them do a SPIN balance on the tires. A spin balance over a bubble balance is the only way to truly balance tires. The spin balance may very well cure the problem. Also have them check the tires for belt separation and failure. I had a pair of tires on a car some time back that exhibited the exact problem you mentioned, when I finally had the money and went in for a front end alignment, and suspension workup, the mechanic called me up and said all I needed was a new set of tires. In my case, the belts in the tire had failed and seprarated, causing this middle speed vibration. On the other hand, if swapping out the tires from front to back does not alleviate / eliminate the problem (you might find that the shaking now comes from the back end), you then can address the suspension, alignment, etc. 2¢ Enrique
-
The lawyers are only interested in the ones with deep pockets. The car rental company will probably offer some sort of settlement in order to get the case to go away. It is a sad fact of the economic blackmail that lawyers have instituted onto our society. Either you pay out right away, so the scavengers...oops, lawyers get their full share, or they'll suck you dry over a period of years. The lawyer rarely if ever has anything to lose. They get paid by the hour to battle ANY kind of argument that can be legally plausible, and if they win, they have pre-arranged for a share of the loot left AFTER they take their hourly wage out of it. It is for THAT reason that the settlements have gotten so high. A family or individual who sues due to a truly negligent action, is hoping to get some economic restitution due to the limitations imposed upon the rest of their life(s). They may not be able to AFFORD the legal representation required to achieve that restitution. A lawyer when presented such a case, if he feels they can pay him for his time while they pursue it, he'll take the case on. If on the other hand, the promise of a LARGE payout is there, they'll take the case on a contingency percentage of the payout, and then take their hourly wage out of the payout. Large companies have evaluated the cost of litigating such a long and image damaging trial in the public court. The cost in lawyer fees, expert witnesses, lodging and all other related expenses, in addition to the buying publics perception of the company, very quickly add up to more than a fast 5-7 digit settlement. Economically speaking, which would you rather do, pay out 5 million in fees and lost sales, or 500 thousand right now? The lawyers know this, just like your average street mugger, a small pain as opposed to a larger more protracted pain, the choice is obvious. Even a wolf will gnaw off it's own paw in order to get away from a trap. Unfortunately, any attempt at mitigating the leech effect of the lawyers, is constrained in that it takes LAWYERS to write it up. Give up a lucrative and sure thing for them? HAH! 2¢ Enrique
-
While: FeO2 is the Elemental script for Iron Oxide, aka Rust; FEO in Spanish means UGLY. If there are ANY spanish speaking people in your circle of friends, acquaintances, or neighbors, you ~~~MIGHT~~~~ be seen as a ....... doofus? 2¢ Enrique
-
The Series I Tool Box Hinges look more like a plastic style piano hinge, without the hinge pin. The plastic is flat with a thinned out section in the middle that allows the piece to bend along it's length. The hinges for the later tool boxes are more like your standard small brass hinge you can get at a hardware store for small boxes / doors. When I was looking to "create" a replacement hinge for a pair of Series I lids, I thought of using either piano hinge, or a rubber strip sandwhiched between the box lids and a piece of flat stock metal, then riveted or screwed / bolted together. 2¢ Enrique
-
Here's a perfect example of differences between bodyshops and bodymen. When I do a complete color change, I shoot the sills, engine compartment and other places that must be shot to do a "complete" color change first. These are shot to full color and gloss. Then, prior to shooting the exterior, I mask off the edges that would allow overspray to attack those now finished areas. I will have also sanded any overspray on the exterior and prepped the edges to receive a second coat of paint. Although the color sanding on a metallic paint job will increase the gloss and "depth" of the look of the paint, I've not had that many instances where it has really shown to be worthwhile. Many jobs the "customer" (I don't hire out.) is more interested in returning the vehicle to use and would not notice the slight difference. On those jobs where I've had a definite requirement of smoothness, depth, gloss, or .... I've even gone as far as shooting three times with sanding in between. Then again, the job depends on whether you're using lacquer or enamel as the two are worked differently. Enrique
-
MY MISTAKE: Should read: MICRO MARK. They bill themselves as the small tool specialists. 800-225-1066 They also have an excellent selection of hard to find SMALL tools, for those of you who work on models, R/C, dioramas, etc. Enrique
-
If you have access to a good choke plate from which to make a mold, you can get some of the silicone molding compounds to make a mold. Then with the various resins, epoxies and other materials out there, make a copy of the original plate. Micro Tool is one company that I know of that specializes in specialty hobby items. They have a large selection of mold making RTV silicones, as well as other types. They also sell the casting material. Enrique
-
From what I got taught, many years ago, when painting a METALLIC paint, you ALWAYS want to paint all panels that are contiguous on the car at the same time and at the same angle. The easiest way to accomplish this is to paint them ON the car. The reason given to me is that metallic paint will readily react to the static electricity you generate as you paint and will let the metallic flakes "align" themselves according to the charge. It may sound like a lot of hogwash, but having seen a fender shot away from the car, up against a door that was painted ON the car, and you could readily see the difference in the metallic shine. Plain color (i.e. non-metallic, pearl, or candy) as long as the conditions are the same when you paint (temp, humidity and number and thickness of coats), should look fine against one another, as long as the paint is from the same batch. Thoughts anyone? Enrique
-
I have the tangs on the floor that go through the tail end of the front carpets, and the carpet DOES loop through there. However, the carpets are held in place by the snap grommets at the top of the carpet which are screwed into the firewall. I've never seen these clips either. That's why I asked what the original position was that they were found in. Enrique
-
I don't recognize those clips either. They almost look like some sort of spring clip for the lock mechanisms, except that it's a small groove. What was their "original position"? I'd be interested to know. Enrique
-
This might be a bit convoluted, but might effect the "choice" option. In the code for the site, are ALL member's galleries made "downloadable" and / or public (meaning non-registered user viewing) or can it be done selectively? By this I mean to ask if as a group you either make them downloadable or public, or does the program permit individual gallery options. One possible way, is if the program allows the download select to allow those members who don't mind if their pictures get downloaded to "open" their galleries, and others can "close" theirs (as far as downloading). The last option would allow the individual to make his images "public" and therefore downloadable by anyone, or only viewable by registered members and presumably only available for download by members. Whom we would hope would adhere to the "club's" consensus as to whether to ask permission or not. Personally, I don't mind my pictures being used, and those that I've posted that belong to others, I've tried to give credit to. 2¢ Enrique P.S.: I didn't vote in the poll.