EScanlon
-
Posts
5,117 -
Joined
-
Last visited
-
Days Won
2
Content Type
Profiles
Knowledge Base
Zcar Wiki
Forums
Gallery
Events
Downloads
Store
Blogs
Collections
Classifieds
Everything posted by EScanlon
-
Xargon: Your turn signal flasher may be: a) plugged in backwards. This may sound crazy, but I had the same problem with a 76 Merc Capri II. Swapped the leads and bingo problem solved. Now, it doesn't make sense electrically, but it solved my problem. the wrong type. Many people inadvertently buy the "Heavy Duty" type thinking they are built for longer life, whereas they're built for shock type environments. This means that the internal components are just a bit heavier, hence more current to heat up the element and get it to click. Regarding the relay method. ChrisA mentions one method, and if I recall H4Lights also has a method. Both of them, from what I hear, are very good and allow you to completely bypass the combination switch from powering the headlights themselves. The combi switch is probably one of the biggest headaches as far as the car's circuitry. 2¢ Enrique
-
Could it be that the car preferred a bit of gravy with it's Kibbles 'n Bits? ES
-
Are you sure someone didn't "recharge" your catalytic converter? Then again, how many miles do you get to the bag? Or, maybe the PO thought you had to feed it back there in order to get the engine to "growl"...... ta da pum pum..... :stupid:
-
Exactly. The idle speed of your engine is set by the idle screw on the carburators. They provide a given amount of fuel that allows the engine to operate at a given RPM. The alternator generates electricity that in turn goes to the regulator where it is distributed between powering whatever electrical devices you have turned on, apart from the engine, and recharging the battery. Please note that usually the alternator is not sufficiently powerful enough to recharge a dead battery to full cranking amps. For that you usually have to use an external battery charger. When you turn on additional items that require electricity, the demand on the alternator increases. That increase translates into additional torque required by the alternator to produce that amount of electrical current. The additional torque is in turn transferred to the engine via the fan belt that rotates the alternator. Now the engine must overcome that extra drag. Since the amount of fuel it is receiving is still the same, the engine slows down (RPM drop), just as if you'd let off the clutch partway while still stepping on the brake. If you are running higher wattage lights on the standard wiring that the car has, you run into yet another problem. The wiring is set up for 50/40 bulbs and not the higher wattages on replacement H4 or other types of bulbs. The additional load through the standard wiring then generates heat which in turn causes a higher resistance through the wire. Both of these then cause additional power loses due to the heat / resistance. The alternator gets bogged down even more. Since there is a given amount of current that the alternator can produce at a given RPM, some items get "short-changed" and do not receive the amount of current they need to operate properly. That is why when you accelerate, and the amount of current being generated meets and exceeds the demands being placed on the alternator that you see the lights brighten up again. The fix for this is difficult to diagnose properly. You can turn up your idle speed setting. You can change out the light bulbs. You can turn off extra items not required to reduce the load. OR You can live with it. Hope this helps. Enrique Scanlon
-
One additional note: I had saved both the horse hair insulation from the transmission hump as well as the fibreglass from the firewall. After applying the Q-Pad and heat forming it to fit, I then sprayed 3M Contact Adhesive and replaced them both. Since I had removed the vinyl from the insulation and the back, I layed out the vinyl on the floor and using some plain old dish soap and water, I scrubbed the vinyl clean with a tire brush. This removed years of gunk and other crud. I then examined the vinyl pieces and re-sewed any seams that looked poor or had come apart. Any tears or divots in the vinyl were repaired with VLP a liquid vinyl repair product. Then a good wipe down with Boss Gloss and they were re-glued to the car. The end result was that the vinyl looks almost new. Only if you look very closely do you note any imperfections that would denote that they are the original pieces the car came with. So, hope this helps someone. Enrique Scanlon
-
Mike: I went all out. That is, I covered the COMPLETE floor pan from the bottom of the Cowl Bucket, the kick panels, the floor, the sides of the rocker panels, the transmission hump, the rear vertical riser (tool box front), the vertical panels below the quarter windows, inside the doors, the hatch floor and even applied some to the inside of the Hatch and the rear fenders. I used full sheets as much as possible and then cut extra pieces to fill in any open spots. Yes, it was spendy and very time consuming. However, the result is that my Z is almost bone quiet when running. You can hear the throaty exhaust, and (unfortunately) some of the rear end clunk and stuff (they'll be fixed soon). But the end result is that I can hear the original radio at very low volume and still carry on a conversation with anyone in the car. The noise level before was such that my wife had commented on how noisy it was, so something had to be done. On all that, if I recall, I used like 20 or so packets, or about 120 ft². Then again, I wasn't counting as I was buying them 3-4 at a time (due to not doing it all at once and that being what my supplier kept on hand, I wiped his stock out 3- 4 times.) There are other products out there that advertise as doing the same as Q-Pads, Dynamat, Brown Bread are but two that I know of. Price differs so check on those before you buy. I didn't want the aluminum backing of the Brown Bread and Dynamat seemed to me to be more expensive than the Q-Pad. Additionally, I couldn't find information that positively told me that the Dynamat would NOT absorb water, whereas the Q-Pad is plain old tar with a sticky back. Hope this helps. Enrique
-
Halogens, for the most part are a higher wattage than standard replacement bulbs. Due to the additional wattage requirement they need, they tend to dim when not bein "fed" properly. 2¢ Enrique
-
Guys: Don't assign blame to the tar mats as the culprit for the floor rusting. They aren't to blame. The blame was Datsun in NOT applying a protectant to the metal. The tar they applied was applied directly over plain old galvanized metal. Over time, the sticky back of the tar, combined with heat, dust and other stuff caused the edges to not be adhered as well. Then combine that with 30 years or so of temperature changes, condensation, people spilling drinks, etc, and you have perfect conditions for rust to develop. Since the primary purpose of the tar mats is to provide acoustic insulation, with a small secondary of heat control, they aren't a bad idea. The key to not having problems is to properly protect the metal. When I redid my floors after removing the old tar mats, I sand blasted to remove all the rust I could, then applied POR to protect the metal. Only after that cured did I apply a replacement tar mat. That in turn was heated with a heat gun and pressed in with rollers (ink rollers from an old print shop) and a rag. This allowed the tar mat to conform to the contours of the floor. The tar mats I used were Q-Pads by Evercoat. They aren't cheap at $20 US for 6 pieces about 12" x 12", but they do provide a great sound deadener below the carpet. 2¢ Enrique
-
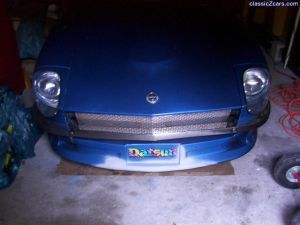 I agree. It looks good, but I had to look at both pictures since the first shot kind of blends the bumper and new grille together. Definitely a Dark Matte Grey or just darker than the bumper to help the eye differentiate between the two. That cheesy "license plate" has got to go though.
 -
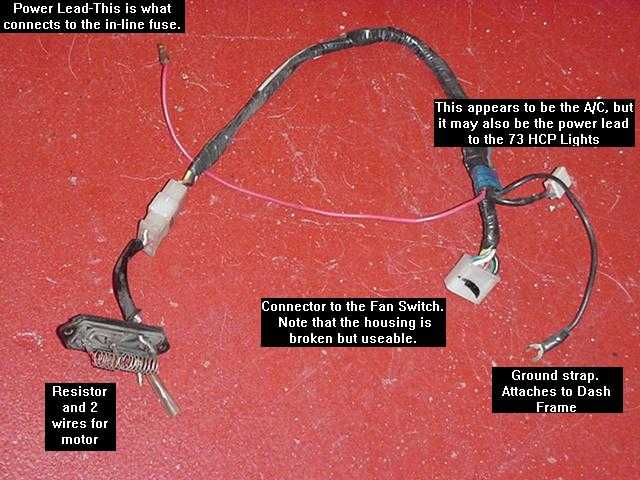
Kats: The hole right by the "Y" in the wiring harness. All of that wiring will be hidden by the rear hatch plastic cover. The plug you have in the hole now will be used to plug the hole you are currently using. Enrique
-
Go to a larger hardware store. I've seen many colors in the high-temp paints. Additionally, don't waste money on the primer as the high temp Rust-o-leum variety (even Stephen's NOW) will adhere well enough for what you are doing. The biggest thing you MUST do, is ensure that the caliper is degreased and free of dust / rust / fingerprints. To degrease, you can use plain old lacquer thinner, or get spendy and go for the true blue Wax and Grease Remover available at a paint shop. You could even use Mineral Spirits as long as you wipe it off completely and allow any possible residue to evaporate. Now you are ready to paint. For most spray can paints you should have a temperature of at LEAST 65° F. Less than that and the paint will not cure properly and take forever to dry, and it won't really be dry. Note that this means the PART should be 65°F or greater, just cause the ambient air temp gets to that stage doesn't mean the part has reached that temperature. You can use a heat gun or hair dryer to raise the parts temperature, but don't overheat it as that causes other problems. Next, apply your first coat of paint LIGHTLY. Allow to dry to "tacky" (i.e. your finger sticks slightly, but does not marr the paint) and then apply a second or additional coats as desired. Now - WAIT! I've seen more spray can jobs ruined by too impatient handling than anything else. If you try to rush the job by using the heat gun or hair dryer be aware that it is very easy to "skin" the paint. That is where you dry the outermost layer of it, but the interior is not, just like a pudding. That's not what you want as that will trap the solvent(s) in the paint and probably mess up the paint job. (By the way, that's one cheap way of making wrinkle paint.) If you wait 24 hours or so, and the temperature of the part has been maintained, then you will have a nice finish that should last quite a while. Mine has lasted close to two years and has even survived a couple of mechanical fixes. Hope this helps. Enrique
-
CHEATER CHEATER!! Ok, Stephen, go put a couple bucks in the Club till for the advertisement. Enrique
-
I painted mine with plain old Rustoleum. Figured: A) It's cheap. If they flaked, or started looking bad, the repaint would only set me back a few bucks. The color selection was more than adequate. C) If I didn't like the way they looked afterward, or later, all it would take is a rag soaked in thinner to rectify. D) It's CHEAP!! E) It didn't matter if they got ugly in a few weeks, a simple wipe of a thinner soaked rag and / or a color change, and VOILA! done again. F) IT'S CHEAP! 2¢ Enrique
-
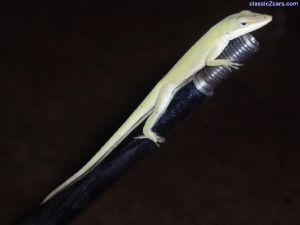 That's the GEICO lizard. He was probably checking out your car!
 -
Don't know if you can get it in Australia, but JB Weld is a type of epoxy that is harder than your usual resin style epoxy. You could even make a mold off the good one and then make the new one. 2¢ Enrique
-
Ok, with that picture I hope you can address whether you need that wiring harness or not. Now, as far as wiring schematics are concerned. They are fine if you know where to find the individual wires that are represented by the wiring schematic. Unfortunately, the majority of schematics do NOT identify which wires are together. An exception to this is the later schematics for the 260 and 280. However, those have their own level of incredible complexity tossed in as to make them totally unuseable. The FSM does have a Multiple Connector Diagram as well as a Single Wire connector diagram. Those in hand with the wiring schematic are a good set to decyphering out the wiring. So, hope all this helps. Enrique
-
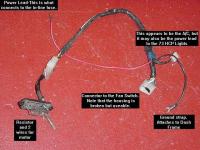
First, take a look at the picture I'm attaching. I "borrowed" it from the e-Bay auction. Enrique
-
The inline fuse should be behind the radio / HCP not too far from the wiring connections to the heater. If you look back there there should be 2 inline fuse holders. One is for the radio the other for the heater blower and resistance. Now, as far as the wiring to the blower motor. Yes both wires APPEAR to go to the resistor, but in fact only the BLACK actually connects directly to the resistor. The RED wire connects to the wiring harness and then feeds up to the Heater Control Knob. If you'll note the 4 wires coming out of the Resistor, the black goes to the motor, and the other three go up into the wiring and then to the control knob. The fourth wire is a red and it connects to the red wire from the motor. Now, on the short wiring harness between the heater control knob and the motor / resistor, you'll note that there are six wires feeding to the knob. The additional two wires are a red and if I recall a blue or black. The red would go to the one you found that looks like it was blue changed to red. The other should connect to another connector or directly to ground. (Sorry, I couldn't find that short harness in my spares box.) Hope this helps. Enrique Scanlon
-
Find a good mechanic and have him do a good tune-up. You'd be surprised how spunky the Z can be without all those performance mods. By this I mean get your valves adjusted, have the brakes checked / repaired, get a set of tires that will make the ride better, check / replace shocks, lube the car. You get my drift. I would recommend you do this BEFORE you start modifying. I'm not opposed to mods, but let's face it, you rarely get the opportunity to go 100+ mph and worst of all it's dangerous and illegal. If that's your bag of tricks ... go for it. However, be advised that the majority of "help!" calls people post are of the "I added a thing-a-ma-jig and now I'm having serious problems." type. So, if your car is absolutely perfect mechanically, and you still hanker for that extra oomph, then go for it. However, have you considered that MOST of the time that you will be showing off your car, it will be ....STOPPED? With that in mind, I would recommend making sure that the car LOOKS cherry. Get the seats recovered, if they're like the majority of 30+ year old seats, all torn and delapidated. Get the paint polished. Again, if the mods are required for your enjoyment, then 2mZ has good input. Personally, I've seen too many souped up cars in the .... junkyard or wrapped around a tree. 2¢ Enrique
-
1. The two connectors are correct. The 6 wire side goes to the switch and the 4 goes to the wiring harness if I recall properly. (I may have it backwards, but I also thought it was odd.) 2. Yes. The motor has part of it's wiring directly connected to that resistor, the other wire goes to the wiring harness. 3. Hard to tell from your picture, but they may be the courtesy light wires. All of the wiring to the blower motor goes through the heater blower switch, and not from the right hand side kick panel. Have you checked the inline fuse on the wiring to the blower motor? That one looks like a radio fuse, but it is a second fuse put in line for the motor / resistance. Hope this helps Enrique
-
Felida, just North and West of Hazel Dell. Enrique
-
And if you're not a big stickler for OEM or exact replacements you CAN find the same style rivet at Lowe's. Go to their specialty fastener section and you'll find them in various lengths and diameters. Right off the top of my head I believe they are the 3/16" - 1/4" diameter and about 1/2" to 3/4" length range. You should be able to find a good close replacement. Hope this helps Enrique Scanlon
-
Actually the rarest one is the one that has 710 on it. 2¢ Enrique
-
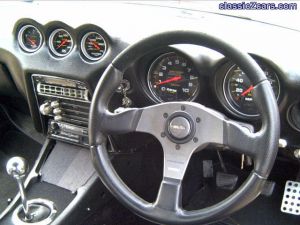 Those replacement gauges go well with the car! The silver trim is decidedly sharp!
 -
Front end at the beach
EScanlon commented on That Ozzy Guy's gallery image in Big Z Photo Collection
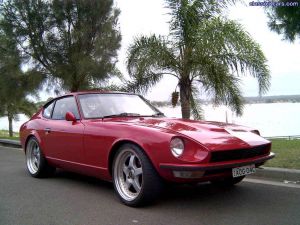 Gotta admit that painted bumper does blend in well and looks sharp!