EScanlon
Free Member
-
Joined
-
Last visited
Everything posted by EScanlon
-
Why do you think that ONLY a 2+2 Z roof will do? Think outside the box. What you are looking for is a piece of sheet metal with the same side to side and front to rear curvature that matches your car's. The reason most (if not all) body shops require the part to be from an identical model vehicle is to avoid problems in getting it to fit. In fact, if you check, these folks go so far as to measure where the hole would be in the donor roof and then cutting that piece of metal. The main reason behind this is that they don't have the time, nor the resources to go pick and choose amongst cars to find a match. And they are right, it is the easiest, cheapest and most logical way of getting a donor piece. However, your situation is different. You are searching for a RARE car AND an even RARER model. So now you have to get creative. That is, if you are willing to expend a bit of thought energy and physical work in order to achieve your goal (a hardtop look) and at the same time save yourself some money. Using some stiff construction paper, or some cardboard make some templates that match the side to side curve and the front to rear curve as well. If necessary, make a side to side template of the roof just in front of the opening. Then another one just behind. Matching these with a pair of each of the front to back templates on either side of the hole and you can now assemble a curve finder. If you take care you can cut corresponding slits in the pieces and slide them together just like the cardboard used to separate bottles in a box. Now, go to a local boneyard. and using your cardboard template, lay it on the roofs of potential donors. You're now looking for vehicles whose roofline MATCHES your template and NOT the same car / model. Although this may seem time consuming, you may be surprised to find that there are many cars out there whose curvature is actually the same as yours. Remember auto designers use curves that appeal to the human mind. Those curves are surprisingly similar. Doubt it? Take a look at the mind-numbing similarity of cars lately. Another alternative for that is to contact a CUSTOM body shop who can in fact FABRICATE curves out of flat sheet metal. These shops typically will have an English Wheel Press on the premises. They'll have the experience to measure and match the curve you need and fabricate it with relative ease. You might even ask them how much it would be for them to fix it. The key here is to not impose restrictions on your repairing the car. Hope this helps. Enrique Scanlon
-
You have the money for an electric sunroof with a metal panel to be installed but don't have the money to repair the roof to it's original status? Doesn't add up. The sunroof will still set you back possibly a hundred or two from a boneyard. Then you have to get someone to adapt it to a roof line that it wasn't made for. Lastly, you need to wire it into an electrical system that is sensitive to additional currents being applied to it. All of this calls for an experienced body man, which means several hundred dollars. Now you've allocated 500+ dollars to the job. Surely you can get someone to weld in a roof for less than that. OR Maybe you have the experience, but if you do, why not just weld a patch back into the sunroof hole. Enrique
-
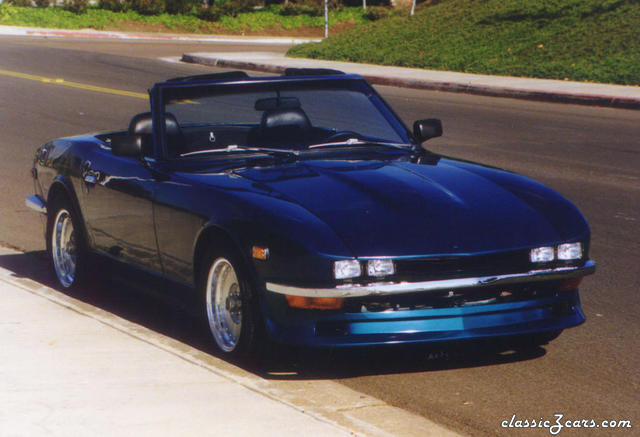
 Is this the same car as the other convertible, after a paint job maybe?
 -
What do you mean by the rear sight shield? Enrique
-
-
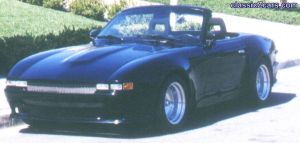
Darn, the original post did not accept the picture and I didn't get an error message. Here it is again.
-
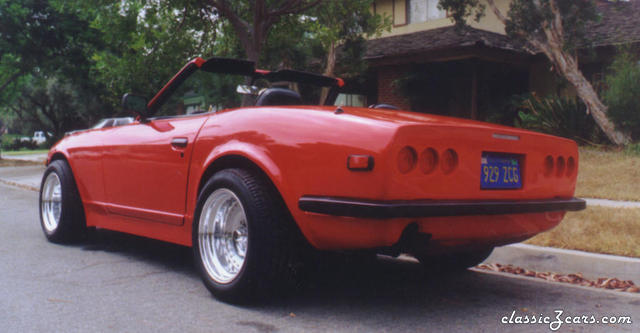
 I agree, the overall look is excellent! Would love to see what they did to the back end. Any more pictures of this car?
 -
One other note, as far as I recall it didn't operate the SIDE marker lights at all, just the extra bulb in the front and rear parking lights. Enrique
-
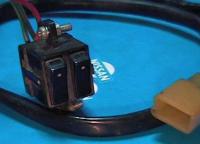
Will: The switch you are referring to, as far as I know, was only available in JDM cars. Additionally, only the Series I as we label them in the US had the opening in the center console to accept the switch. Additionally, the wiring does not support the switch, as that extra light had it's own wiring for both the front and back as well as the sides. The attached picture shows you what the switch looks like. I was able to find one from Japan, and they are somewhat rare there also. The tail-lights do have the extra hole for the light. It is normally plugged with a rubber plug that goes between the two bulbs in the upper half. I was not able to find the bulb holder that goes in there, but have been told that the multiple compressible prong type or rubber base would work. I did find a replacement side marker light from an early GM vehicle COULD be made to fit by notching the hole in the light housing. The front parking lamp housing doesn't have the hole, or at least my car didn't. It is possible that true blue early Series I front parking lamp housings DID have the hole also plugged with a rubber cap. There is a flat spot, however, where one could be drilled and installed. I've been told that these bulbs were only 5W bulbs, and were powered independently of the ignition circuit, with only one side being activated at any one time. The purpose of these lights was a requirement by Japanese Law that required the traffic side of a vehicle to be illuminated at night. Interestingly enough, in Washington State that law still applies on roadways without street lights, although whether it is enforced or not is questionable. Hope this helps. Enrique Scanlon
-
Good Luck on the project. Sounds like a lot of work, but if it turns out sharp it was worth it. 2¢ Enrique
-
Remove the ignition lock assembly from the car and take it to a locksmith. Sometimes they can work miracles and get you fixed. However, there is no guarantee prior to going in. From what you posted, it seems as though you may be having difficulty in removing the lock assembly from the steering column. Look on the left hand side, you should see 4 "rivet" looking things if they haven't been removed previously. Those are breakaway security screws. You can try drilling them out, or use a screw ez-out, although some people have reported success by using a Dremel tool to cut a notch in the head and then using a regular flat head screwdriver. The key point is they ARE screws, and can be removed accordingly. Once you are ready to replace them, you can buy replacement breakaways but most people find them to be a PITA and just use regular screws. 2¢ Enrique
-
Those are reflections of light from the original picture. Look at these pictures of That Ozzy Guy's Featured Car and you'll see a similar reflection: http://www.classiczcars.com/photopost/showphoto.php?photo=9353&password=&sort=7&thecat=500 http://www.classiczcars.com/photopost/showphoto.php?photo=4160&password=&sort=7&thecat=500 As far as I know, there isn't any kind of light available off the shelf to do what you are referring to. Hope this helps. Enrique Scanlon
-
A Factory Shop Manual along with the Microfiche CD that you can get from this site and you have the bulk of information on how to disassemble, what parts are involved and tons of diagrams to do it with. Many questions that have been asked and answered here are found in the FSM. The Microfiche covers the bulk of many others. Only when we get to Datsun-Fever's post of whether Kibbles 'N Bits or Purina is the best food to put in your tail pipe do we get stumped. 2¢ Enrique
-
Now Stephen, don't be mean! Enrique
-
Something that causes a lot of problems and can be overlooked until many other things have been tried is the Vacuum Advance Mechanism in the distributor. Take the cap off the rotor, and using the hose that connects to the vacuum solenoid pot, suck on it to create a vacuum. You should see the insides of the distributor rotate a few degrees. When you release the vacuum, it should return to where it was before. Both of these travels should be SMOOTH and not jerky. Below the point plate there is a plastic plate that houses a few ball bearings. These are notorious for drying up and cracking, releasing the ball bearings and causing the vacuum advance mechanism to not work properly. 2¢ Enrique
-
If you are referring to the RED car at the top left, then the headlights are the standard all 72-78 Z headlights. The Side Markers are also standard for the same years. The "turn" signals you see below and on the bumper I think are actually a pair of AMBER FOG lamps. The bumper makes it hard to detect if the standard turn/park lights are below the headlight buckets. The White Car (behind the chicks, and your power of concentration is amazing) has the same style of headlights and side marker lights. You CAN see the turn / park lights below the bumper and the headlight bucket. Whether the car has fog lamps or not is not noticeable. The car DOES have the Bumper Overriders or Bumperettes mounted both front and rear whereas the Red car does not. If you are talking about the Ladies that are superimposed over the white car, and assuming that by "Headlights" you mean the same thing as I do, then find your local girlfriend and she should have a set you can play with. If that is not an option and you must absolutely have a pair, if I recall you can get a pair of your very own for about $3-4,000 depending on size. :cheeky: If on the other hand, you are referring to a completely different set of headlights, could you explain? Enrique
-
If you are going to use the primer as a "stop-rust" item, be aware that primer is in fact, porous. If that is your intent, then get some paint with it as well. The key thing in choosing the primer is being aware of what you will be topcoating it with later. If as I stated above, it is only a temporary coat, any primer will do, just be sure to apply a paint of the same brand/type as the primer. Then when you go to apply the final paint job, then have the whole car sanded and primed with the appropriate primer for the paint to be used. This is to avoid problems with the paint either immediately after painting or later down the road when the paint completely cures. 2¢ Enrique
-
Xargon: Your turn signal flasher may be: a) plugged in backwards. This may sound crazy, but I had the same problem with a 76 Merc Capri II. Swapped the leads and bingo problem solved. Now, it doesn't make sense electrically, but it solved my problem. the wrong type. Many people inadvertently buy the "Heavy Duty" type thinking they are built for longer life, whereas they're built for shock type environments. This means that the internal components are just a bit heavier, hence more current to heat up the element and get it to click. Regarding the relay method. ChrisA mentions one method, and if I recall H4Lights also has a method. Both of them, from what I hear, are very good and allow you to completely bypass the combination switch from powering the headlights themselves. The combi switch is probably one of the biggest headaches as far as the car's circuitry. 2¢ Enrique
-
Could it be that the car preferred a bit of gravy with it's Kibbles 'n Bits? ES
-
Are you sure someone didn't "recharge" your catalytic converter? Then again, how many miles do you get to the bag? Or, maybe the PO thought you had to feed it back there in order to get the engine to "growl"...... ta da pum pum..... :stupid:
-
Exactly. The idle speed of your engine is set by the idle screw on the carburators. They provide a given amount of fuel that allows the engine to operate at a given RPM. The alternator generates electricity that in turn goes to the regulator where it is distributed between powering whatever electrical devices you have turned on, apart from the engine, and recharging the battery. Please note that usually the alternator is not sufficiently powerful enough to recharge a dead battery to full cranking amps. For that you usually have to use an external battery charger. When you turn on additional items that require electricity, the demand on the alternator increases. That increase translates into additional torque required by the alternator to produce that amount of electrical current. The additional torque is in turn transferred to the engine via the fan belt that rotates the alternator. Now the engine must overcome that extra drag. Since the amount of fuel it is receiving is still the same, the engine slows down (RPM drop), just as if you'd let off the clutch partway while still stepping on the brake. If you are running higher wattage lights on the standard wiring that the car has, you run into yet another problem. The wiring is set up for 50/40 bulbs and not the higher wattages on replacement H4 or other types of bulbs. The additional load through the standard wiring then generates heat which in turn causes a higher resistance through the wire. Both of these then cause additional power loses due to the heat / resistance. The alternator gets bogged down even more. Since there is a given amount of current that the alternator can produce at a given RPM, some items get "short-changed" and do not receive the amount of current they need to operate properly. That is why when you accelerate, and the amount of current being generated meets and exceeds the demands being placed on the alternator that you see the lights brighten up again. The fix for this is difficult to diagnose properly. You can turn up your idle speed setting. You can change out the light bulbs. You can turn off extra items not required to reduce the load. OR You can live with it. Hope this helps. Enrique Scanlon
-
One additional note: I had saved both the horse hair insulation from the transmission hump as well as the fibreglass from the firewall. After applying the Q-Pad and heat forming it to fit, I then sprayed 3M Contact Adhesive and replaced them both. Since I had removed the vinyl from the insulation and the back, I layed out the vinyl on the floor and using some plain old dish soap and water, I scrubbed the vinyl clean with a tire brush. This removed years of gunk and other crud. I then examined the vinyl pieces and re-sewed any seams that looked poor or had come apart. Any tears or divots in the vinyl were repaired with VLP a liquid vinyl repair product. Then a good wipe down with Boss Gloss and they were re-glued to the car. The end result was that the vinyl looks almost new. Only if you look very closely do you note any imperfections that would denote that they are the original pieces the car came with. So, hope this helps someone. Enrique Scanlon
-
Mike: I went all out. That is, I covered the COMPLETE floor pan from the bottom of the Cowl Bucket, the kick panels, the floor, the sides of the rocker panels, the transmission hump, the rear vertical riser (tool box front), the vertical panels below the quarter windows, inside the doors, the hatch floor and even applied some to the inside of the Hatch and the rear fenders. I used full sheets as much as possible and then cut extra pieces to fill in any open spots. Yes, it was spendy and very time consuming. However, the result is that my Z is almost bone quiet when running. You can hear the throaty exhaust, and (unfortunately) some of the rear end clunk and stuff (they'll be fixed soon). But the end result is that I can hear the original radio at very low volume and still carry on a conversation with anyone in the car. The noise level before was such that my wife had commented on how noisy it was, so something had to be done. On all that, if I recall, I used like 20 or so packets, or about 120 ft². Then again, I wasn't counting as I was buying them 3-4 at a time (due to not doing it all at once and that being what my supplier kept on hand, I wiped his stock out 3- 4 times.) There are other products out there that advertise as doing the same as Q-Pads, Dynamat, Brown Bread are but two that I know of. Price differs so check on those before you buy. I didn't want the aluminum backing of the Brown Bread and Dynamat seemed to me to be more expensive than the Q-Pad. Additionally, I couldn't find information that positively told me that the Dynamat would NOT absorb water, whereas the Q-Pad is plain old tar with a sticky back. Hope this helps. Enrique
-
Halogens, for the most part are a higher wattage than standard replacement bulbs. Due to the additional wattage requirement they need, they tend to dim when not bein "fed" properly. 2¢ Enrique
-
Guys: Don't assign blame to the tar mats as the culprit for the floor rusting. They aren't to blame. The blame was Datsun in NOT applying a protectant to the metal. The tar they applied was applied directly over plain old galvanized metal. Over time, the sticky back of the tar, combined with heat, dust and other stuff caused the edges to not be adhered as well. Then combine that with 30 years or so of temperature changes, condensation, people spilling drinks, etc, and you have perfect conditions for rust to develop. Since the primary purpose of the tar mats is to provide acoustic insulation, with a small secondary of heat control, they aren't a bad idea. The key to not having problems is to properly protect the metal. When I redid my floors after removing the old tar mats, I sand blasted to remove all the rust I could, then applied POR to protect the metal. Only after that cured did I apply a replacement tar mat. That in turn was heated with a heat gun and pressed in with rollers (ink rollers from an old print shop) and a rag. This allowed the tar mat to conform to the contours of the floor. The tar mats I used were Q-Pads by Evercoat. They aren't cheap at $20 US for 6 pieces about 12" x 12", but they do provide a great sound deadener below the carpet. 2¢ Enrique