EScanlon
Free Member
-
Joined
-
Last visited
Everything posted by EScanlon
-
The Hazard Switch itself comes out from BEHIND the dash. The ring just holds it in place in the dash from the front. There may be a wire harness finger clamp back there preventing you from pulling the switch out directly, but if you can feel back there you should be able to spread the fingers and remove the switch. The switch does have 2 wire harness connects that it connects to the wiring harness with. As far as your heater blower, it may be that the power to the switch has been shunted. Since it plugs in just like a radio would, it isn't unusual to discover that people have either blown the fuse and not replaced or used the power line to the motor as a source for an aftermarket radio. 2¢ Enrique
-
And hopefully his car's hatch area is less prone to rust than Daddy's! Enrique
-
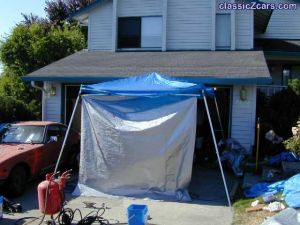 Actually the neighbors took it quite well considering. I made it a point to clean up EVERY night, and to work diligently every day in order to minimize the mess and the length of time it was up.
 -
 Actually it isn't, and that's the main reason they were removed when the cars arrived here in the U.S.. The Throttle Control does not have an automatic disconnect and as such is a DANGEROUS cruise control. What it is for is for those times when you need the RPM to warm the engine up and not extra rich idle setting which is what the choke does.
 -
Time out guys! While those lists of numbers seem to denote a hard and fast stop and start point for the different year cars, in actuality there is a LOT of bleed over. While HLS30 006072 is the LOWEST VIN sold as a 1971 Z, as recorded at the registry of zhome.com you can also find that the HIGHEST VIN # sold as a 1970 was HLS30 011618. So now we have 5,546 vehicles that were ..... what? 70's or 71's? The same thing happened in 71/72; 72/73; and although not verified probably happened in 73/74. And that is without looking at the production months. We in the U.S. refer to a Series 1 and a Series 2 as if they were a tangible point that the rest of the world can look at, which is not the case. Additionally, we only had one year of the 260 while other countries had many years. The most accepted differentiation between the "Early-Early" Z and the "Early-Late" (or "Late-Early") Z is the presence of the hatch vents and lack of column vents on the E-E. Then you get into the style of center console, then you get into the dash type, then you get into the seat reclining mechanism or not. Not to mention tool boxes, cutouts on the steering wheels etc. As far as the 71, however the most common differentiation is the location of the vents. 2¢ Enrique
-
Good information to have for those of us in California. You might consider submiting it to the regional discussion group as an article. Enrique
-
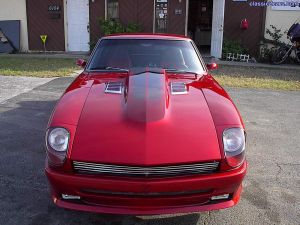 Shows some very creative and beautiful accents! Definitely a looker!
 -
I called it a radiator support, but if you look in the picture that 2mZ posted, you'll see the cross member support that goes accross the front end in the lower left of the picture. Now if that is so rusty as to cause problems in jacking, you have a parts car candidate or some MAJOR work to do. Since it is a structural member of the front end, I would expect it to be strong enough to hold up the front end. 2¢ Enrique
-
Make sure you put a piece of wood between the stand and the A-arm. That's important because the jack stand can slip and dent the arm. Since you are checking the brakes, you're probably hoping to free-wheel the tires. As a result the jack under the a-arm may be in the way. If that is the case, you might consider jacking via the differential, then puting the stands on the inboard side of the arm. As far as the front end, you could use the front radiator support if the rail under the floor looks weak. 2¢ Enrique
-
Save your money! A pair of bent needle nose pliers will work just fine and have more uses than that spanner wrench! Enrique
-
The bumper is the standard early 70-early 73 style without the rubber (you can still see the holes where the rubber gets mounted through). As far as obtaining one, new check with Chloe at Midwest Z, used check e-bay or your local boneyard. They are getting hard to find so don't be surprised to find the cost to be well over $150 and possibly still need chroming. HTH Enrique
-
Sandblasting gets a bad rap due to inappropriate use. The biggest problem with sandblasting warping metal is that too much air pressure is used as well as a highly abrasive media. If you blast too long even with a lower pressure but with a high abrasive media you'll actually heat the metal. Between the heat and the air pressure is what causes the warping. Properly done you can etch glass, strip off the paint in layers, or even sandblast plastic for texturing. Media is generally classified with regards to it's hardness, and abrasiveness. Nowdays, they usually just refer to the abrasiveness. Silicon Carbide, Aluminum Oxide, Glass Bead, Walnut Shells, Poly Abrasives and lastly Sand are the most common. Each has uses that they are best for and other uses for which they shouldn't be used and others where they're simply ineffective. All of them will perform differently at different pressures. Check Eastwood's web site and you'll find a bunch of information on the different grades of blasting media and you'll get a better idea of what and how to use them. Trying to replicate all that info here would take a long time. Hope this helps. Enrique
-
The 73 240Z has the same style tail lights and tail-light surrounds as the earlier ones. The rivets accross the ledge of the hatch SHOULD be plastic rivets with a plastic pin insert to spread the legs of the rivet. Sometimes these get replaced by PO's with ACTUAL rivets. If that is the case with yours, then yes, you do need to drill them out. If they are the correct plastic type, then carefully push the pin THROUGH the rivet and out. Do it carefully as you want to retrieve / find that pin. Once you've pushed the pin through, it should be relatively easy to lift the body of the rivet up and out of the hole. Next, look BELOW the tail-lights to the lower edge of the tail-light surround. You'll note that the surround metal is inserted into a pair of metal clips that grip the metal. Don't spread these or use any kind of tool on them. What you need to do is to work the metal of the surround out of the clip gently. I find that if you gently pull on the outside edge (the one closest to the fender of the car) and slowly work it out from the bottom it will slide out of both clips. Both tail-light surrounds also slip into the center surround metal which is held attached to the car by the license plate AND the license plate light. Under normal conditions you shouldn't have to remove the center surround. To remove the tail-lights you'll have to access the INSIDE of the back panel, as the lights are held in by screws from the inside. You could TRY doing it through the access hole in the rear cargo area finisher, but you'll need very VERY small hands and be double jointed. The proper way of getting access is to remove the plastic surround at the back of the cargo area. Again, you need to be careful in removing the rivets as you need the pins. You CAN buy new rivets, but that gets expensive. Once you have the surround removed, find the pins to your rivets. Then you'll be able to see the screws holding your tail-lights in place. Disconnect the tail-light harnesses, then remove the screws. Don't fight the screws as the nuts they screw into are held by the plastic of the tail-light. In fact, it would probably be a good idea to give them a quick shot of penetrating oil from the outside to ensure that they'll unscrew properly. Once you have the screws out, you'll have to push the lights out. They'll be held in place with mastic between the rubber gasket and the metal. Be careful of the gasket as these are important in keeping fumes out of the car. Reassembly is pretty much the reverse. The only point to note is that when you put the rivets back, compress the legs, insert into the hole and push in firmly. Then while holding the rivet in tight, insert the plastic pin to keep the rivet spread. Hope this helps. Feel free to ask more questions if we've left anything out. Enrique
-
That you cannot get a good charge on the old battery is a definite indication that it's toast. Get the new battery in, then check your fusible links in the fusible link box on the firewall. They'll look like plain old wires but they are NOT. They are a style of fuse which protects the circuitry over and above the fuses. As far as the multimeter, let's hold off on HOW to use it until we have specific tasks to effect. Hope this helps Enrique
-
Don't despair. I'm sure that the members here can help you get it going. First off, get the battery charged or replaced. Then we can start addressing any gremlins that might show up. All of the components you mentioned are electrical, but that you got the engine running may indicate that you have something else to address. It may be as simple as a missing or blown fusible link or as complex as a short / fried circuit. You can get the battery checked at a Sears Automotive Center and they'll advise you as to whether the battery is shot and needs replaced and if your charging system is working. Good Luck Enrique
-
You just got the typical brush off from a repair center that basically means "It's too much for us to do without charging you more than you're willing to pay for." If you'll check this forum you should find about a dozen or more postings on just that subject alone. In very brief notes: Fuse Box: Check the holders, pull out and replace the fuses with new. Clean contact springs and tighten before re-inserting the new fuses. Headlight Connections: Clean contacts, both at the actual headlight bulb but also where the harness connects to the headlight pigtail. Combination Switch: Very common to have the contacts in the headlight switch to get corroded and cause higher resistance than required. Some people have shot contact cleaner into the switch and were done, others have disassembled and refurbished, yet others have just bought new. Although the work is tedious and involved, once you're done with it, if you've done it right, usually you're done with it for a few more years. Biggest problem is that there are few contacts that are sealed from the environment and eventually they develop a film that increases the resistance which causes the fuses to blow. Good Luck Enrique
-
Alfa: Sounds like the voice of experience talking! Enrique
-
The ring around both types of hazard switches has a pair of holes in it for the use of a spanner wrench. A spanner wrench has the typical "U" shape of a wrench, but has a pair of pins on the side of the wrench. Those pins fit into the holes on the wring. Your most common use of this type of tool is to remove grinder wheels from the spindle shaft on a grinder. If you don't have a spanner wrench of this size, see if you can find a pair of bent-nose needle tip pliers. Insert the tips into the holes and unscrew the ring just like a regular screw (Lefty-Loosey; Righty-Tighty). I've tried doing this with an e-clip plier, but found that the throat of the plier is not big enough to accept the shaft / handle of the switch and that the pins are somewhat fragile for this type of application. Hope this helps.
-
I would add the following to that list: A pair of pantyhose. You'd be surprised how strong they are when wrapped around a pair of pulleys to replace a broken fan-belt. Additionally, it only takes a minute or two to put on and will at least operate the water pump until you can get off the road and repair the belt properly. They can also be used as rope, as a filter and as a primitive elastic spring. Ensure that your basic tools include a pair of pliers and a knife. Bring along at least one can of Fix-A-Flat. Although blow-outs do occur, the majority of flat tires are due to nails or debris. The can of Fix-A-Flat will at least get you to the next exit. Before you take off, do a good inspection, but don't go crazy replacing spark plugs, hoses etc. Do the minimum required, such as change the oil and filter, fuel filter, and get the air filter at least blown out if not replaced. If possible have the tires checked by a tire shop. Tread depth, condition, balancing are important on ANY trip of any length. If you can, remove the wheels and at least get an idea of how the brake shoes are. I'm sure this group will think of a bunch more. Enrique
-
Thank you David! I believe that is the main reason that Chris offered up this post, to discuss and define, amongst us Z-Car owners and lovers those terms that have been mis-understood, vague and open to personal interpretation. To address the unfortunate incident on a first person basis. I have done business with Troy and through an error of MINE, I bought a few emblems that were the wrong year for my car. I was not aware of subtle differences between the Script "Datsun" on the hatch. Could his ad have been clearer? Yes. But then again, I should have done my homework. When I contacted Troy, he not only swapped the emblem out, but he basically let me have it for shipping costs and the small difference between what I paid for at auction and what he would have BEGUN his listing for and not for what it COULD HAVE been. Troy is a human being like the rest of us, and he's also learning much of this "electronic market-place" the same way we are. Trial and error. Heck, I know business TODAY that still don't use computers to effect business, and others that use word-processing programs to write up invoices and orders. So, in that respect I try to cut people as much slack as I can. In any transaction I do my darndest to answer any questions I may have that in my opinion would affect the value of that item. Have I gotten burnt? Yup. Enough times that I've gotten my wife mad at me for .... not asking enough questions. My bad, no argument. David, I apologize to you for having made such a big deal. It was not my intent to direct any comment at you personally, but rather to those actions that even I am guillty of. And, being human and older, I was hoping to make it obvious to those members that had not yet been burnt by that type of transaction that they had to look out for themselves. Wiliams: No apology is necessary as I did not take offense. To address the basic question in your post about the content of an ad and what I might construe, let me put it this way: I NEVER assume that the description given is EXACTLY as the item is. That is something that I've learned in my 25+ years of being in sales. Product literature points out the good points, and subtly obfuscates or omits the bad. Sales people play on your emotions and eagerness to buy. Too many times I've been told what I want to hear, but not what they intend to do. Thankfully, I've taken enough knocks that I attempt to get things in writing. You'd be surprised how many times I've had salespeople do a quick shuffle and tap toe to get out of what they had been saying before. The turning point for me came about when I stopped trying to get the better end of a deal and just ensured that I got everything I was promised. Like I said before, I trust BUT I verify. To the rest of the membership that may read this: I encourage us all to now contribute in order to return this post to it's original intent. There are many terms that we take for granted and presume / assume that they mean the same thing to all. This discussion highlights this problem amongst our community like a bold yellow highlighter. So, in hopes that we can again attempt at defining "original", I would like to offer a different term that would better describe what most people want original to mean; NON-MODIFIED. By inverse relation, a MODIFIED vehicle would be such that changes had been effected to it that rendered it different than the way it was delivered by the factory. This would include changes due to ABNORMAL repairs, such as replacing the transmission, engine, or other items. Items such as oil, gas, wiper blades, spark-plugs and tires would not be considered modifications as those items are required for regular periodic maintenance required to keep a vehicle running. Granted, the Concours folks would differ. But I think we can agree that the terminology for a Concours vehicle is not that that would be applied to a car that is driven and enjoyed. I am not saying that Concours folks do not drive and enjoy their cars, but rather that where a Concours user would fret and worry over the brand of spark plug used, an owner of a driver would not. To add to this discussion, and to differ from Modified above, I also offer the term: CUSTOMIZED. Customization, in my opinion means that the vehicle has had changes effected to it that noticeably change the non-modified appearance of the car as delivered by the dealer. Whether that customization is to improve performance or functionality is not the issue, but rather that the vehicle has been changed. In my case, I have a 73 Heater Control Panel...in a 71. I made that change because the original HCP is not illuminated where the 73 is. Swapping out the square top carbs in favor of the round tops. Some might call this a modification, and here's where we enter the realm of discussion...... Enrique Scanlon
-
My favorite product was Clear Guard by Turtle Wax. Sadly, it has been discontinued. It worked too well and would last forever. Boss Gloss is EXCELLENT, and in my opinion second only to Clear Guard, which by default makes it number one. After that the Meguiar's family are superb. I use those on the outside of the car almost exclusively. About the only thing I use Armor All, Son-of-a-Gun, and the new Extreme brand of liquid vinyl products....is the tires. That's because I know I CAN and WILL be replacing them eventually. To me, from personal experience, the use of silicone oil is like shooting up heroin. Looks good for a bit, but you pay for it forever after. I've heard of the use of baby oil, or mineral oil. To me both those products have the bad tendency to attract and capture dust since they never dry. The smell is also something I can do without, in the case of baby oil. I have no idea on the UV blocker question, but it seems to me that what would work on your skin wouldn't necessarily work on plastic. 2¢ Enrique
-
Years ago when I lived in Iowa and Michigan and I did my own Anti-Freeze changing, you could buy a solution to flush out your cooling system. I don't recall the brand or the name, but it came in a miniature version of the anti-freeze jug. The instructions were to pull out some water / antifreeze from the radiator (about 16 oz.) and fill with the contents of the bottle. Then you ran the engine up to operating temperature and about 10-15 minutes after. Afterwards you would just drain the system, refill with plain water, run for a few more minutes and drain again. I don't believe you were required to drain before you added the flush liquid. Then you would add your new anti-freeze / water mix. The product claimed to eliminate hard water deposits as well as buildup of any corrosion within the system. It did advise that it COULD open up holes in gasketing that had been sealed by the prior deposit / scale. It did not specify that you had to remove any of the parts you are mentioning. I've long since relegated that type of activity to my mechanic, so I cannot say whether or not you can still find it in an auto supply store. Hope this helps. Enrique
-
Stephen you are absolutely right. Each person must base their decisions on their own criteria. My main point in ranting was to point out the biased and one-sided viewpoint of that whole mess. If Troy were to post his side, it may well be such that the whole matter becomes trivial. Wills: I purposely avoided answering your questions because in my opinion all it would do would be to fan the flames. I will ignore the implied slur regarding my person, with regards to the description of any item I may sell on e-bay, based on your assumption as to what I might or might not conclude. For the record, my e-bay id is basically the same as my log-on here. I will assure you that any item I would put on e-bay would be an item that you would be upset if you were to miss out on the bidding based on your prejudice. You might consider posting YOUR e-bay ID and allow all the vendors that frequent this site to know you by. That way, they may opt to not let you bid, to eliminate a potentially bad transaction. Then again, that may be reason enough for you to hide behind your anonimity. What I construe an advertising phrase to mean and what someone else chooses to understand is what makes lawyers happy. My choice to ask further questions or not is based on the simple premise of Caveat Emptor. Once I've gotten to know a seller, I may trust, but I would still verify. I don't expect anyone to effect their business with MY interests in mind. 26th Z / Chris: I am sorry to have participated in railroading your post away from what you intended. I agree, I also would like to see an intelligent discussion as to what constitues originality. That term and "Classic" are items that this thread did point out are not only subjective, but perhaps undefineable without a lengthy discussion. Unfortunately, you can't please everyone. 2¢ Enrique
-
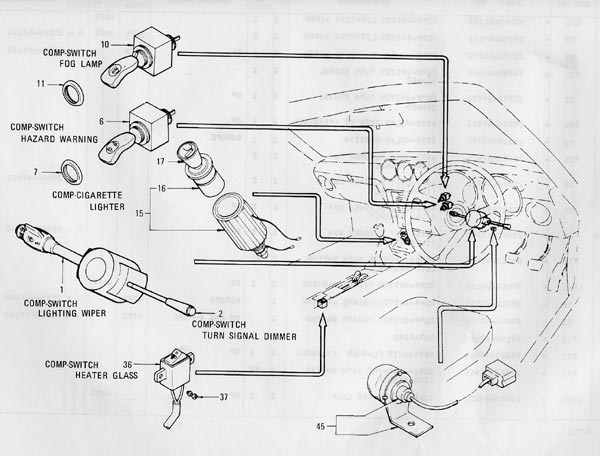
Funny, you can't edit a prior post to add a picture, but you can edit a post with a picture and change / delete the picture that is attached. The picture attached shows both the Hazard and the Fog Lamp Switches. Both are the Paddle Style. By the way, if anyone can identify item #45, please do so. I don't have a picture of the Pull Style Hazard Switch. Maybe someone else can post one. Enrique

-
The NON-illuminated hazard switch is a simple paddle style switch. That is, you flip the lever/paddle UP to actuate it, or DOWN to shut it off. The Illuminated one, on the other hand, is a round rubber knob with a green lens in it. To operate it, you either pull it OUT to turn it on, or push it IN to shut it off. In neither case do you TURN the paddle or knob. That you are able to do so tells me that the switch is definitely kaput. I'll see if I can find some pictures of what they look like. Enrique