EScanlon
Free Member
-
Joined
-
Last visited
Everything posted by EScanlon
-
Let us know what the dealer says when you bring it in for servicing! Remind him that it says in the book they'll take care of it and have your car's credit card validated. E
-
The fusible link for a 72 Z is between the Starter's POSITIVE Batterty connection and the wiring harness. You should be able to see it below the battery going to the wiring harness on the side of the engine bay. As far as I know, there is only ONE fusible link in the 72's. If your car has the Intermittent Wiper (4 stops on the Comb Sw. ON-INT-LO-HI) then your car has 73 wiring and not 72. Check the connections at the battery, make sure you've cleaned the clamps and posts, also the grounds. You've added grounds and changed components, that's all good, just make sure everything is proper. Is the V/R mounted on the firewall or is it floating loose? How about the Amp Gauge? Good connections there? Also, I remember reading about another Z's Alternator NOT putting out proper voltage unless a certain RPM was maintained, are you idling or are you checking at higher RPM's? Are you making all these checks with all electrical systems off? How about your battery, is it fully charged? A "new" battery oftentimes needs a good external charger to bring it up to voltage, your Alternator will normally re-charge what you take out, but it takes forever to bring a Battery up to full voltage. FWIW E

-
Your Ace Hardward store typically has an excellent fastener section. Most of the Datsun screws I bought there were both available in Stainless and in the correct 1.25 pitch. The only ones I couldn't find readily were the ones that mount the Heater Control Panel, the Seat Reclining Cover screws and the Choke / Hand Throttle Knob screws. I ended up going to an R/C Hobby Store to find the Cover and Knob screws (and the corresponding tap). The Heater Control Panel screws were donated by a friend. FWIW E
-
Yikes!! This kind of question causes trouble, I replied as I did because from your first post it, you appeared to have a good understanding of what would be required etc. It isn't a matter of just loosen, tweak, and tighten.... although ideally that is exactly how it will go, but you need to be aware that as soon as you loosen the bolts enough to allow you to shift their position the bolts can shift along either of the x-y axis points. Which can mean your door will now be too low/high, or too far forward/back. If the top set goes further forward than the bottom set, then your door won't align on the top edge properly, conversely if it's the bottom set. My reply was to let you know which of the sets of bolts would need to be adjusted in order to achieve a front to back adjustment of the door. The bolts on the door for example adjust in and out and both sets (door and body) adjust up and down. It is by careful adjustment that you get the proper position you need. Addressing the question as I would do it, is that I would open the door and support it with a floor jack and a cloth covered piece of wood long enough to support a good length of the door. Then loosen the bolts and adjust the whole door forward -CAREFULLY- you just need a bit, then check for fit, i.e. tighten bolts, lower jack, check the door in the opening and repeat ad nauseaum until you get it right. Hope this helps. E
-
Remove your kick panels, and behind there you'll find the body bolts for the hinges. Since you replaced the hinges you already know this. Now, support the door within the opening and gently loosen the body bolts and gently slide the hinges forward, it doesn't take a lot. If you're careful you shouldn't mess up the in/out at the top or bottom of the door, nor the front to back angle, just the front/back position, but it does take some patience. Just be careful of sliding it too far forward because when the door is fully open, if you have any type of door moulding, it may interfere with the front fender. FWIW E
-
Either a kink or a poorly lubed sheath, but definitely a symptom of being stuck and "snapping" forward (that's why it's jumping). It doesn't hurt to take out the whole cable, check it for straightness then lube it before re-inserting into the sheath. Also as Zforce mentioned, make sure the route from tranny to speedo is as smooth as possible, i.e. no sharp bends in that sheath. FWIW E
-
Sadly, the documentation in the parts manual, whether in Microfiche, CD or book leaves a lot of questions to be answered. It's not uncommon for there to be obvious omissions and mis-directions to occur. As far as the turn signal assembly, take care that you receive one that not only has the same connectors for the wiring, but that the main body mount is the same as the one you are replacing. This is because there WERE variations on the different turn signal bodies that many are not aware of. You can usually get the Combination Switch to work, connect and mate up to the replacement turn signal assembly, but there are situations where there are differences in how things line up. Recently a friend of mine replaced his, only to have to modify the "clam cover" (the plastic surround) because the turn signal stalk rubbed against it and was no longer centered within it's opening. The connectors matched, but the body was different. He had received the new assembly as an exchange when he had his original turn signal assembly "refurbished". While the refurbisher simply sent him another turn signal assembly, the replacement piece was not an exact replacement. As you can see from the pictures that Marty posted, one shows the nylon block for the Horn Swipe, the other doesn't, nor a place to mount it to. FWIW E
-
POR would work well here also, although the biggest problem will be in getting it into the door plenum. Wear gloves, and if possible a double pair of long sleeves. Dishwashing gloves might have a long enough sleeve also. Do a search for POR and you'll find numerous threads. FWIW E
-
These are all good suggestions if simple starting fluid in the intakes won't get it started, but the OP in post #6 mentions he's resolved the problem. His notice that the tank being from a 71 would not have a fuel pump is in error as the electric fuel pump for the 240's were all external to the tank. E
-
Contact MSA and check for their Alternator Plug-In which allows you to use the internally regulated alternator with the earlier circuitry Z (which requires the external regulator). E
-
You might finish the sequence of events. Does it stop smoking once it reaches normal operating temp, or does it do it ONLY when you first start the car and not later in the day after you've run it and then parked it for a while. Does it do it always when you start the car any time during the day regardless of whether you ran it that day. It's hard to tell the "color" of that smoke, is it plain old white or does it have a bluish tint to it, either one points to a different type of problem. Have you checked your coolant levels, are they rock steady and not slowly gonig down? How about oil? Does it use "a little" or "a quart per tank of gas". When was the last time you took it out and gave it a good old spirited run on the highway? I'm only parroting what I've read here, the other guys who are the engine mechanic type will undoubtedly have tons of questions, but you might start by answering the questions I've posed. E
-
Maybe it's just her way of saying "NO!" to fellatio.... actually of NEVER being asked to do it. Just a thought...
-
If you're using a mechanical fuel pump, the rubber diaphragm can crack and allow fuel into the oil. Your caris a 280, so that's probably not the case though. I'm sure others will chime in. E
-
Sorry Blue, the nicest thing anyone can say about the Wiring Diagrams on Atlantic Z is that they are simple.... too simple to be of any use other than to discuss grossly general terms. Just about every circuit disappears into a "magic box" and exits on another undefined wire and ta-dah you have a circuit, what happens inside the "magic box" is just that magic which is useless if you're trying to decipher things. About the only thing they're good for is to roughly identify colors. The one true blue Datsun wiring diagram they have there is the generic 1970-ish one size fits all markets diagram. Look closely, it doesn't have an Accessory Relay, nor a Rear Window Heater. At that they have it labeled as being for the 72 Z. The Choke Light circuitry as well as the Rear Window Fog and Seat Belt Warning system denote a specific wiring diagram with all the relays and sensors, the only thing to determine is the Automatic Transmission diagram or the Manual Transmission diagram. But before you go into the nether studies of wiring diagrams: The wire you mention at the Accessory Relay, the picture isn't clear enough to show the colors, just Yellow, or Yellow/White or...? The Heater Control Panel illumination lights need the back of the panel to complete the circuit to ground via the ground wire. These lights light up when your park/headlamp lights come on. Do the other instrument lights work? If not, check your rheostat. Just a couple things to check first. E
-
Arne, that second picture is deceptive as to the Heater Control Panel it makes it look "fuzzy" which is what the Lighted panel would look like. Look at the first picture and I think you'll agree it's a non-Light panel. Also look at the exit slots for the heater levers, tbey're not deep enough. But, if the whole dash and center console DID get swapped out for a later model, the most important question is did they swap out the two harnesses on the dash AND the ones going to the engine/tail wires. If not, how much jerry-rigging did they do to get a 73 harness to mate with 70 engine and tail connectors. What about his Windshield Wiper switch, TWO settings (technically three: OFF-LO-HI) or THREE (again technically four: OFF-INT-LO-HI)? You can swap in an intermittent wiper motor AND the wiper switch into an older model, but it takes a bit of creative wiring to get it to work properly and it can still be problematic. (VOICE of EXP) FWIW E
-
Can you confirm that this is a 1970 Z? That Hazard Flasher seems to be the Pull Type and not the Toggle, which was used in later years and not on the 70. Also, confirm the number of "stops" the Windshield Wiper knob has. Just two or three? Post your VIN /MFG DATE, to help ascertain what you should / shouldn't have. E
-
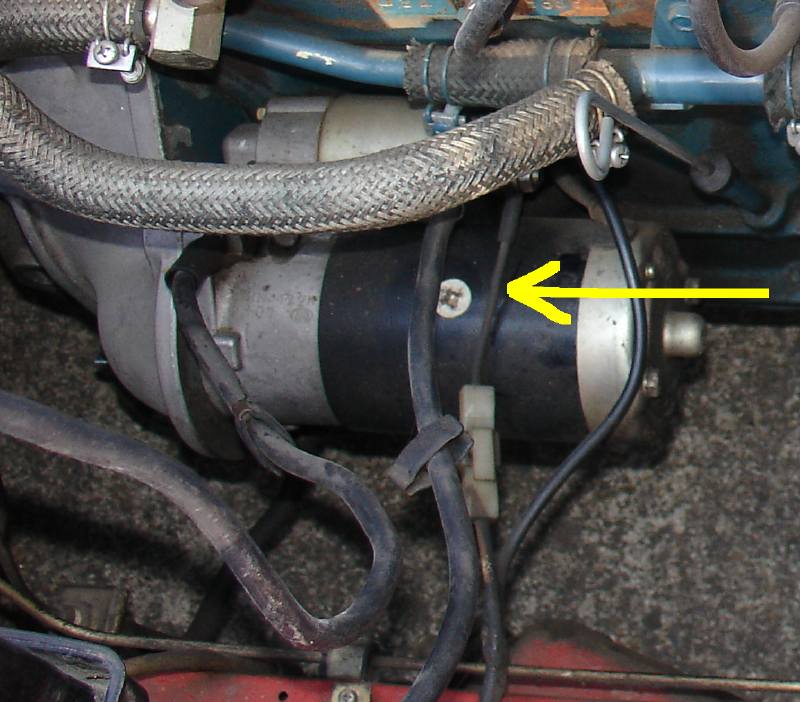
Arghh, that's downright ugly. Probably replaced that way due to the special connector that Nissan put on the original and the PO (Prior Owner, although in this case IPO: ID-10- T Prior Owner) couldn't /didn't find a proper replacement and he (hopefully) just spliced in a length of fusible link wire. Check into a proper fusible link wire (it's not standard cabling) or at least look into Maxi-Fuses. Remember that this one little fusible link takes ALL of the vehicle's amperage through it, it's not just a wire with a fuse. E
-
The earlier wiper motors had 5 wire connectors in the 2x3 power connector, they did not have the intermittent wiper control. When they added the Intermittent control the 6th wire connector comes into the picture. That's one way of determining a wiper motor from an unknown manufacturing year. E
-
If your vehicle is a 70, per your signature, that piece is NOT what you need. You would need the ashtray/cigar lighter opening combination cover. That's why you can't find the harness/connector, that connector piece is for a later model at least late 72 if not 73 with the Seat Belt Warning interlock system and the Choke Warning light. Neither one of those systems were on the 70 model. Only if you change the complete dash wiring harness (and the engine bay and rear harness) with all the required relays, sensors etc would that piece be needed. FWIW E
-
The "Garage" is a new item to this version of the software. Some of us have been here for two or three software upgrades and might miss that since most everyone else has their cars in their signature area. Either that or people post their model within the post. Just trying to help you get an answer. E
-
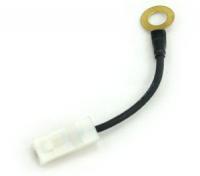
This is where you'll be reminded that it's a good idea to put the year/model of your car in your signature block. That way people don't have to do a bunch of research to identify what year car you have. I found from your original post that it's a 71, that means it only had ONE fusible link between the Starter Solenoid and the WHITE wire from the Voltage Regulator going to the Fuse Box. Without that one fusible link, the complete electrical system in the car is inert, there is no other circuit that feeds from the battery. Replace the fusible link, you may have to order it as the ends connect directly to the car's electrical harness, and you should be ok to go. If it were your Ammeter that fried, but NOT the fusible link, you'd have lights and other accessories that operate separate from the ignition circuit, but you wouldn't be able to start or run the car. FWIW E
-
Cesar: QUIT SHOUTING! Also, you might use paragraphs and sentences, it makes it a whole lot easier to try to understand what you're saying. Few folks will even attempt to read it once they see what you've posted above, and that means no answers for you. E
-
You don't list the year of your car, and if it's one of the earlier ones it didn't get that weatherstrip piece or medal ridge. If memory serves it was on the 73's and later. FWIW E
-
Yes we do. Start here: http://www.classiczcars.com/forums/dto_clubs.php?do=services Be sure to Register your club: http://www.classiczcars.com/forums/dto_clubs.php?do=reg and Mike will get you set up. The site runs on contributions, so while we take care of the bulk of the work, please feel free to chip in to offset the utilities. E
-
Jim: The green and black ARE for the fuel pump fuse connection in that picture. What I was referencing in the picture is that in the background of that picture you see another connector, which is pictured in the second picture. THAT connector is the one that finishes the circuit for the Fog Lamps. All that is needed there is a switch to jumper those two wires the Red and the Green/White. If you could have had the Fog Lamps mounted at the Dealer (Back in the day), they would have mounted the fog lamps on the bumper and inside the console you'd have had a switch connected to that connector. The Fog Lamps are powered off the Parking Light Circuit and are only on when the quarter lamps are on. At the front of the car, you may want to use individual relays or just one to receive the power from the harness' wiring rather than power the fog lamps directly. You'll have to run a power source, but this way if you have any doubts/concerns as to your wiring harness, you'll be safe. FWIW E PS: The Red wire that is part of the connector is the direct connection to the Fog Lamps up front. The Black wire up front connects directly to the ground screw up front.