


EScanlon
Free Member
-
Joined
-
Last visited
Everything posted by EScanlon
-
"Fascinating" = Spock; Star Trek "Vewy Intewesting" = Henny Youngman, Laugh-In Well, Zedrally gets the bonehead of the day award. (All in fun, no offense intended.) From his post in reply to my query as to the ignition switch and the combination switch on a RHD vehicle: From that I gathered that the ignition key would be on the RH side of the steering column and that the lights / indicator assembly would be the SAME as a LHD car. Which as Alan mentioned would be a major PITA to work with, especially in areas / cities that require all turns / changes in lane to be accompanied with the appropriate turn signal. Alan's pictures on the other hand, clearly show the ignition on the LEFT of the column and the combination switch and indicator stalks CLEARLY REVERSED. As would be proper for a RHD vehicle. I can't make out the writing, but I will suppose that the writing on the light switch is correct and not upside down. OR..... Could the Australian RHD vehicles have come out with LHD combination switches and ignition shrouds? This could become a very interesting thread even more than it already is! So, maybe Zedrally doesn't deserve a bonehead award. But it does bring up more questions than it answers. Alan wrote: Actually, I don't think that at all. Is it unusual for me? Yes, but then again, I've ALWAYS lived and driven in LHD countries. Is it wrong? No, can't say that either. As far as being un-ergonomic, I guess I don't see why. You'd be using your right arm to hold the wheel, that's your stronger arm, and to do a simple gear change your right. Heck, if anything it's the LHD that's un-ergonomic. That there are many countries out there who drive on the "wrong side of the road" would depend on the viewpoint of whomever is making the statement. Surely the British think Americans are on the wrong side, and vice versa. It isn't wrong when you are used to it. Think of it this way, (analogy time) A Scot or Irish or Englishman who don's his best colors for a wedding or other event that requires Traditional Formal Dress would wear a ...KILT! Try that in New York City and you'll have a lot of buffoons making fun of you. In Mexico, men hugging men is simply a sign of intense friendship and camaraderie. Again in New York City, those same buffoons would be having a hey-day. It all depends on what you've grown up with, gotten used to, and willing to accept. On a completely different point now. The throttle linkage for the RHD is extremely interesting. I note that there is an angled shaft that has TWO pivot points behind the brake and clutch pedal BEFORE it travels upward to then pull the throttle rod. Then on the engine side of the firewall, it again has another long shaft. I was hoping to see that the RHD had either eliminated or dimninished the angle of the rods so that it might not have the inherent "throttle jerk" because of the angle imposed. I guess that the RHD cars also suffer from it. I also note that the Heater Control Panel Levers all go to the left. Just a point that clarifies some of the points I'd made earlier. This has been extremely informative. Thanks Alan. On a final note, I note that your Horn Button has a Z instead of Datsun. Yet the year of the console and similars imply that it's a 72-73 240. Care to comment? Anyhow, thanks for the reply. Would like to see where else we head with this.
-
Alan T. wrote: Using an analogy: The human population has both left and right hands, yet the vast majority are right handed. There must be a reason for this. Or is there? Although a bit on the sardonic side, it applies. There may be that there isn't a SPECIFIC reason or even an intentional decision by the designers / engineers / production / inventory folks, but rather one of .....no one questioned it until too many things had been designed, built and delivered designed with the handle on the right hand side. That console on the car you saw, may well have been one of the few prototypes created to demonstrate that in fact it could be done for the Left hand side. As I think about it, with the vast preponderance of the world's population being Right handed, it may be that whomever was tasked with getting the brake handle done just felt that it would be easier to use on the right hand of the tunnel. With all due respect Alan, it may be that you are looking for an answer to a question that was never posed. Alan: I don't know where this quote comes from. Maybe I've read it and have not really paid that much attention to it. I think it may be necessary to consider both the author's nationality and the intended sales market for his book. Alan: Undoubtedly their major sales focus would have been the U.S.. Back in the late 60's with the U.S. economy running a high war-induced fever, the prospect of being able to sell something - ANYTHING - in the U.S. would have been a very tempting lure. However, let's recall a few items that would have been part of the mix back when Datsun was considering expanding it's presence in the U.S.. WWII had ended 20 years before but sales of Japanese products in the U.S. were still not viewed in the best of lights. Heck, it used to be a big joke to have "Made in Japan" stamped on an item, and the comedians and pundits all played on it. If the item was kitsch then no doubt someone would point out that it was Japanese in origin. As a result, when Honda and Yamaha first began to export their motorcycles to the U.S. there was much speculation as to whether or not they would establish a foothold. When Honda took an additional step and introduced the first model of the Civic in the very late 60's, and Datsun had already been shipping the original 1600 and later the 2000 Roadster to the U.S. at first they didn't have sales to make the home office really excited. Yet as time went on, things DID improve. The Civic went on to become one of the leading automobile models, and it is still in production 30+ years later. Yamaha's motorcycles are legendary, so are the Honda's, and although Yamaha's venture into automobile's may have come about a bit too late for it to really blossom like the Honda or Datsun, it is nonetheless there. The key point I'm trying to establish here is that in the late 60's Japan needed to not only prove to the U.S. consumer that it's products were not a cheap knock-off that would fall apart at first use, but that their products were in fact what U.S. consumers wanted. How do you do this? By providing items that THAT market demands. If as you market it you label it as being for that market, well I would like to call that a bit of artistic license with regards to the marketing. Let's not forget that Datsun brought to the Sports Car market the first car priced where the average buyer could fulfill their fantasy of owning a "Foreign 2 seater Sports Car". 2¢
-
Actually, no, I am serious about this. Yes, I believe it is the same as the LHD cars, but as others who have NOT seen OR driven a RHD car, this kind of question is something that comes up. You saw my post regarding the combo switch, and answered me. Yet Alan's seemed to imply that it was reversed, although it may be my misinterpretation. So are the foot pedals the same or not?I can see some of the advantages for the clutch, but as I mentioned about the throttle linkage, the connection could be interesting to examine. Heck it might help provide an answer to the Throttle Jerk situation mentioned in another post. I hope the analogies come off as just that, a different way of looking at the situation, which clarifies the point. 2¢
-
Alan T. wrote: Emphasis mine. From this I gathered that the turn signal (indicator) and light switches were in fact reversed. But your post denies that. Alan, what did you mean by that? Cuong Nguyen wrote: Which raises some questions. Could someone describe the arrangement of the pedals on a RHD car? On a LHD car, the clutch is at the left most position, then the brake pedal and lastly the accelerator pedal which is all the way to the right hand side, very tight upon the transmission tunnel. In fact, most cars have a wear spot here from people's feet rubbing against the vinyl as they press on the accelerator. The throttle linkage on the engine side of the firewall would be something to compare / discuss. On LHD cars, there is a very short distance between the exit point for the throttle pedal rod and the shaft leading to the carburators. Now, presuming that Datsun didn't change the location of the carburators from the left side of the engine to the right side of the engine, and presuming that the foot pedal arrangement is the same as for LHD cars, that would be a very interesting throttle / carburator linkage assembly. Enrique
-
I've painted with Acryl Enamel and using a gloss additive and a hardener finished with a gloss that is hard to beat. No doubt a clear coat over the top would add ~some~ gloss, but other than for metallic finishes I don't know that it would add sufficiently to justify the added cost and preparation time. But then again, clear can be a matter of opinion. Personally, unless the finish isn't as glossy, or as "deep" in hue and intensity as I would like it to be, I try to stay away from clear. Clear can be very tricky, and deceptive to paint. I've seen experienced painters run it, or sag it, or even dry line it. I've even had the misfortune of having it sag due to very minor temperature fluctuations. Unlike your basic paints, clear has very little tendency to want to stay put. I'm not sure if I'm describing this properly, but think of it as the thickness of the fluid. Regular tinted paint will actually "bulge" at the top part of the paint when you begin to pour it out. Kind of like a thick fluid. Clear doesn't. Even in it's unreduced state it is thin in comparison to paint. This is what makes it so tricky to paint. Where a good paint job with Acrylic Enamel consists of 3 coats, first coat being a mist / fog coat, second coat being a smooth and even double wet ensuring everything is painted, with a final double wet coat to gloss out. The clear is basically a double wet final coat. I don't know that I would want to chance a second double wet on it. But that is what and how I was taught. Other painters have a different feel for the paint. 2¢
-
I may have quoted it wrong, but basically I was told it means "Who watches those who watch over us." 2MZ's post is right on the money. Too many police officers do feel that their position permits them to be "above" that law. I'm NOT saying MOST police officers, just that even one is too many. The police officer who off duty feels it's ok for HIM to speed. Or even ON duty, who as 2MZ posted, turns on the lights to blow through a light without having a legitimate need to do so. The biggest problem with this is that when the public becomes aware of it, it seems as though ways are found to "justify" it and not atone for it. 2¢
-
When I've painted stripes on cars, for the most part, I've painted them over the predominant color of the car. That is, if the car is predominantly WHITE and the stripes will be black, I'll paint the whole car white, then mask off and scuff the area to be painted black, and shoot the black paint. However, it can leave a tell tale "ridge" or "edge" at the transition point. Where this may not be objectionable on a race car, to some people it can be. There are methods of "knocking down" the edge so that it isn't as noticeable, but it is still there, and to the trained hand / fingers, it can be felt. (Heck, sometimes even an untrained hand can feel it.) If the edge will be hidden below some sort of body moulding, then usually it will be left alone and no one is the wiser. On situations where it will be noticeable there are techniques for knocking down the edge after the paint has dried OR just after the paint has been shot. The first involves the use of either sand paper or scuff pads and the application of a clear coat to restore the gloss, or sometimes rubbing it out carefully in order to avoid "warping" the "line". The other technique is to pull off the masking tape as soon as possible after shooting the stripe, BEFORE the paint has had a chance to completely dry. This is very tricky, as the intent is to remove the "dam" of the tape so that the edge can "flow out" and not present such a high ridge. Then there are those folks who simply won't have the additional paint. That process then involves masking the car such that the stripe is masked off before the application of the main body color. Then after the paint has dried, the masking is removed and now the stripe area is exposed, still in primer, to receive it's coat of paint. The new masking is now done very carefully to match the inverse of the original masking, i.e. you mask up to the edge of the old mask, and then you paint the stripe color. The intent of this procedure is that both edges of the paint, being of the same thickness, will then NOT present a palpable edge. All of them become a matter of personal preference, and personal ability. Probably the biggest factor will be the color of the paint being applied over the base. Obviously a light color applied over a dark will require more paint to hide the base color, whereas a dark over light won't. A light over dark will have a thicker edge than a dark over light. Hope this helps.
-
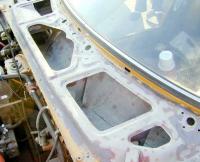
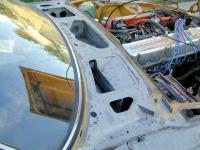
Ok, by now I hope you've looked at BOTH pictures. They are a picture of my car, BENEATH the cowl metal, both the right and left sides. Did anyone notice that in EACH picture you can see no less than THREE wiper mount holes? That means that there are FOUR wiper holes on the car. Four wiper holes, hmmm, do you suppose that Datsun originally considered using very short wiper blades since most Japanese people are short and therefore don't really need a tall wiper blade since they'll never look out the top half of the windshield? HA! The answer, in my opinion, is that Datsun INTENDED this vehicle to be easily converted from RHD to LHD or vice versa. So as to whether the car was originally designed to be one or the other.... A human ovum is neither male nor female, it isn't till the sperm actually breaches the cellular wall and the two diploid genes are mixed that you have a definitive gender assignation. And even that has been shown to sometimes go awry. So, RHD cars with the brake on the RH side vs LHD cars with the brake on the RH side can be debated all you want, but in my opinion Datsun may have intended this to ALSO be a switcheable feature. If you look at the plate for the hand brake that is below the jute and vinyl, you will note that other than being welded, they could be interchanged side for side. That would allow the brake to be mounted on either side. However, unlike most of the other differences between the RHD & LHD parts, this one is very minor. Everyone has avoided "listing" the differences between the RHD and LHD cars, but they must be examined before this one item can really be discussed. Case in point: The ignition key and the combination switches. On a LHD car, the LEFT stalk is for the turn signal and high / low beam switches. the RIGHT stalk, has the windshield wipers and wash as well as the headlights and parking / running lamps. The text embossed on this stalk would prevent it from being reversed on a RHD car and put on the left. The ignition lock and housing is such that the key is inserted into the lock from the RIGHT hand side of the steering column. All other American vehicles that I've owned, or driven have it this way. The only car that I've ever driven that was different, was a 68 Datsun Roadster; which had the ignition lock on the LEFT side of the column. Would someone post the description of these items on a RHD car please? There are some other items that would help shed light as well. LHD cars have the Fresh Air Vent and Flap assembly in the RH side firewall. The battery in the engine compartment is also on the RH side. The fuel door is on the right. The rails for the left side seat are such that the left seat has a longer range than the passenger, but that could easily be swapped around. The dash is an obvious one, but on a LHD car the Speedometer is on the left and the Tach on the right. The center position gauges are (L to R) Oil/Temp, Amp/Fuel then Clock. The Heater Control Panel levers all are pushed to the LEFT to turn their individual controls OFF. This one would be more difficult for Datsun to swap around as it would involve a completely different face plate AND lever assembly just like the Handbrake would. But that returns us to the original item of discussion. Although the designers of the car may have tried to incorporate all of these subtle features into the car so that it's configuration as a Left or Right hand drive could easily be changed, manufacturers, as a general rule, don't like that. The additional items, inventory, money investment, item tracking etc etc would undoubtedly have been pared down to those items that ABSOLUTELY needed to be maintained and discarding those that simply didn't matter. The items that we have left, can actually be viewed as vestigial remnants of the car's original ambidextrous beginnings. "The popcorn you are eating....., has been pissed in. Film at 11." Kentucky Fried Movie Let the howling begin.
-
Smokey As a staunch supporter of our Police Force, Fire Department and the Military, (I'm an Air Force Vet, Hon. Discharge), I can tell you that the majority of us out here in the civilian population, DO support, and respect the laws, and the officers of the law. However, just like prison folk whose population is made up of robbers, murderers, embezzlers and all sorts of other illegitimate professions, who CANNOT STAND OR ABIDE a Pedophile, I am sure you will agree that the majority of police officers would not like to be lumped in with the "police officers" of New Rome. Yes they are "enforcing" the laws. But such a stringent, no gray area enforcement is actually closer to a Police State similar to what the Russians and Nazi Germany lived than what people in the U.S. have come to expect. As you know, if you really chose to, you could stop just about EVERY car you see, and find something to write a ticket about. From "dirty" tail lights, turn signals, inproperly displayed license plates, obstructed vision, safety violations, etc. you can find SOMETHING. The problem isn't that these things aren't illegal, or wrong, they ARE. The problem is when the enforcement of the laws applied to the infraction results in an unequivocal finding of GUILTY, with no recourse, then in fact they are punishments. When in addition to that, the police assign the punishment without that infraction having been committed, then they become tyrannical punishments. Reading some of the "Tales of Woe", it seems as though there is NO discussion allowed by the policemen at New Rome. And there are several tales there where apparently, ADDITIONAL infractions were levied due to the driver discussing the original stop. Yes there are a few where the driver was not cited, but the vast majority point to an unyielding and unquestionable suppression of rights. THAT is what is so objectionable about the New Rome police department. 2¢ By the way, keep up the good work, and THANK YOU for being a police officer.
-
And here's the second picture:
-
"And now for something completely different, a man with three buttocks..." Monty Python Show. I've been reading this post on and off for a bit, and took the time to read it completely today. Here's my contribution to stir up the fire..... In my opinion, the reason you have very few responses from the LHD drivers (meaning the U.S. drivers), is that, FOR THE MOST PART, few have seen, and even less have driven a RHD 240Z. As a result, their basis for comparison is simply not there. As in the Monty Python skit I paraphrased from, as far as that guy was concerned, everybody EL.SE was the odd character, he was perfectly fine with this 3 cheeks. Trying to ask LHD drivers if the handbrake is on the wrong side or not, is like asking women if their NOT having a penis is bothersome. I'm positive that they would look at you as if you had finally slipped a mental cog. Their reply would be to ask you how YOU can stand having that thing between your legs. Without a COMMON reference by which to compare the differences we simply do not have the frame of reference by which to compare and make an intelligent response. All we LHD drivers who have been deprived of RHD vehicles to drive and compare with can SUPPOSE, is what it would be like if the brake were on the other side. But, I'd like to introduce a bit of aviation fuel to the discussion, and stand back and watch the flames. I'm posting two pictures and I'll continue my post on a third reply:
-
Acrylic Enamel used to be "THE" paint to use. Nowdays, there are various paints that are considered to be the "cream of the crop". Where in the 80's and early 90's all you could find was Acrylic Enamel or plain Lacquer paints, in the later 90's they started coming out with new formulations. IMRON was one such paint. Then they started coming out with the two stage paints which had isocyanates in them to make them harder, and offer a wider more dramatic choices in colors. Almost all of these newer paints require a full face respirator, that is, you can't filter the air in the booth. You must have an air supply from OUTSIDE the booth due to the fumes / vapors which have, in essence, poison in them. As a result, there are many paint manufacturer's that have relegated Acrylic Enamel to the "secondary" product category. No doubt, this company got together with some paint manufacturer and proposed selling it to folks, such as ourselves, who are mostly interested in repainting to original looks. The newer paints are the ones that allow the color changing effects, the intensely deep hue of the color, or the ones that have a distinct "glow" to them. Car manufacturer's have introduced these as both the stock and special order paint colors. Body shops, have in turn needed to adapt as well. Acrylic Enamel is still an excellent paint. It is a one step paint, in that you shoot it, along with hardener or gloss agents added in and the results are excellent. (As long as you have a good painter.) The gloss will remind folks of the old Lacquer process of buffing / rubbing the paint. It's biggest limitation is in the scope of the colors and effects you can achieve with it. You won't find a true Candy Apple Red or Blue in Acrylic Enamel. The one they list on their site is just a very bright red and not true Candy paint. True Candy paint is a Lacquer process. It requires a color base; white, silver, black, gray, gold, or whatever your choice, followed by multiple coats of the translucent Candy Paint. The Candy Paint is TRANSLUCENT. It achieves the intensity of the color you want by the depth of the paint applied. I've seen Candy Red applied so thick that it literally looked like a Ruby. Then again, I've also seen it applied very thinly and it looks like a deep pink. The one on their site, from the fact that you cannot see the bottom of the can THROUGH the paint, tells me that it's going for color, and the name implies what you can expect, and NOT that it is a CANDY paint. At the price of $29 a gallon, it is a good buy. The only concern I would have is how much for shipping, and the other items required (hardener, gloss agent, reducers) as well as if they have the different temp and humidity reducers that made Acrylic Enamel such a good paint to work with. 2¢
-
Money no doubt! I'm sure Unca Mike would let you change yours to Z-Babe or....... it all depends on how much you want to send him.
-
TKR; At the risk of offending you, and that is not my intent, let me reply to your post this way. The USDOT is the one that determined that the 3rd brake light on vehicles would aid in reducing rear end collisions. They in turn, passed a law requiring all cars manufactured or imported into the U.S. after a certain date to be equipped with such a light. Note "AID" in "REDUCING". By logical inference, adding a 3rd brake light to a vehicle that did NOT come with it installed will IMPROVE it's CHANCES in avoiding one. It won't guarantee that the idiot behind you or the one behind HIM won't fail to react to the brake lights coming on. What it will do is make it easier to be seen. The 240Z is low to the ground, in fact lower than most vehicles out there. With it's taillights mounted that low, and so many vehicles out on the road being jacked up SUV's, or Pickup trucks or Soccer Mom's with those Mini-Vans, it is very easy for it's back end to fall bellow the line of sight of those drivers. Now you are REALLY hoping that the lights will be seen. Not wishing to add one of those after market 3rd brake lights to the roof of the car, or to the inside of the rear window, the only option available is to make the existing lights more visible. Now, making them brighter than original would require a DESIGN change in either the lenses, housings or wiring. This involves MUCH more than what I posted. What I posted, at best, would allow the lights to shine as they were ORIGINALLY intended by Nissan. If you examine the lights, the plastic housing backing is a very pale gray. As the plastic ages it gets dull and dark, and won't reflect light as well. By painting it white (instead of trying to mix that pale shade of gray) you restore the housing to close to original colors. The polishing of the pot metal plated reflectors is just to remove 30 years worth of surface oxidation. This is just to give us more of a chance of avoiding a rear end collision. Using Aluminum paint would work, in fact, it's reflective nature would be even better. I used white in order to not change the color of the plastic backing to the lenses, and because I wanted the reverse light to "look" white. (Note: the reverse light area does NOT have a reflector.) Those LED's that carguyinok posted would work, but those would be a design change that for some of the guys here would alter the appearance of the car sufficiently that it might cost them points at a show. I had seen them at G.I. Joe's but felt that the light would end up concentrated in one small area rather than diffused over the whole lens. Additionally, I agree with your viewpoint on the LED's, they are far too bright, especially at night and ESPECIALLY those that get mounted on the "wing". A Flashing Red Strobe Light as far as I know, is only authorized on emergency vehicles or vehicles such as the school or transport buses. Tell you what, YOU try that one and let us know when you get your first ticket. In my opinion that would REALLY look cheesy, or ricey, or whatever the term is now. As far as the brightness of the original sealed beam headlights on the 240, I agree. That's why I replaced my lights with the Halo Lights and a Xenon Bulb. FWIW
-
At a local Friday's, my wife and I had gone there for, coincidentally, Friday Night Dinner and drinks. I ran into a salesman for one of the Nissan Dealerships, who was introduced to me by the daughter of the manager of the same dealership. (They were out together after a college event of some sort and she knows my wife and I.) As I pointed my car out to the girl, the guy with her chimed in with (and keep in mind that he's a Nissan car salesman out with the boss' daughter.) "Oh, is that the 240Z, that's cool, that's the one with the rotary engine isn't it?" The look on the girl's face said it all.
-
I would bet that it is due to date of membership over and above number of posts. Otherwise, 2MZ would be listed as Pharaoh, or Caveman.
-
V/B sells these for $170 each plus shipping. And Fed Ex or Truck Shipping may be the only way to get it accross country.
-
If it's going to be INSIDE a garage, and you're not talking the humidity you find in the Pacific Northwest or London, you shouldn't be talking rust to the extent where more damage would occur. The addex expense of shooting some primer over ALL the metal to protect it would be doubled when you get into the bodywork and have to remove it. Besides, if you're trying to do the job cheaply, WHY blast the whole body? Just blast those areas that are rusty and you'll be doing a metal replacement on. Leave the paint that is still in good condition alone, then when you're ready to go to paint, either Wet Sand it smooth, OR use a D/A sander. But now you're talking a DIFFERENT project. That of painting. Do yourself a favor and not only read the posts here, but go to the library and find a book on basic car painting. Trust me on this, unless the paint / primer you have on the car now is absolutely needing removing due to a serious incompatibility over a prior coat of paint, DON'T remove or strip it with chemicals. ESPECIALLY if you are not the person who will be doing the paint job. Now if you INSIST on doing that, then don't screw around with sandblasting, go get the car acid dipped; which brings on a whole other slew of problems. There's more to this than this post will handle. But I'll let others chime in.
-
Sorry TK, not trying to be antagonistic, but in my opinion, due to the LACK of a 3rd brake light on the 240 AND the fact that it sits so low to the ground, I vote for making them as bright as possible. They'll never be as bright as those LED's you see on the market now days. At best you'll get a nice bright light. However, if your eyes are bothered by the tail lights on vehicles now days, you should either get a small tint on your glasses, or avoid driving at night. You might check into either those yellow tinted shooting glasses or the blue blockers. Both of those purport to improve night vision. As far as to HOW to improve the 240 tail light: 1) After disassembly, wash the lenses, reflectors and housing. I prefer a nice warm sudsy water and the use of an old toothbrush to get into the crevices. 2) After thorough drying, PAINT the surrounding plastic housing around the bulbs a BRIGHT WHITE. I use a paint from my R/C hobby which is called "Polar White" and I just brush it on. Since the important thing is to get a full coverage, the brush marks will not be noticeable. 3) After the Paint sets, POLISH the metal reflectors with your choice of metal polish. You don't need to be overzealous here as the intent is to just provide a basic reflective surface. 4) Polish the lenses with Meguiar's 3 step Plastic Cleaner process. 5) Reassemble and remount. The difference in the brightness and clarity of the lights will definitely please you, I guarantee it. Hope this helps.
-
Steve: Trust me on this one, if you had to go "up the chain of command" before you found someone who says that if you write a letter....yada yada, I GUARANTEE that should you EVER have any sort of claim on the comprehensive portion, that the opposition you will run into will resemble the D-Day Invasion. In fact, I would bet that they would "disapprove" any claim, regardless of what, when, where etc. I'll bet that the person you talked to didn't bother to discuss premiums, pushing it off on the "We'll have to see....", or roughly translated: "How much can we take you for?" like a hawker at a carnival. You are much better off finding a NEW company with which you can get some cooperation at the lower levels than having to fight your way "up" the ladder. That the attitude at the bottom of the corporate ladder is lousy is a perfect illustration of "sh!t" rolls down hill.
-
Someone correct me but as far as I know, the Z's were ALWAYS a 6 cylinder car. Also, you might provide a bit more information as to year etc and exactly where this "small big end bolt " is located.
-
-
If I were to do the job, I would prefer to weld onto sandblasted metal. I'm sure if you ask whomever will be doing the welding, he / she will agree, it is a heck of a lot easier to weld onto metal that is free of rust and paint than it is to find that the metal is rusted and the weld is either burning through, or not getting a good weld. Aalso as you sand blast it is possible that some of the rusted material will "give way", which may reveal new sections that will need additional patches / welding. But which is worse, to do the welding, THEN sandblast and discover you have MORE welding, or to do the sandblasting, and then do all the welding at one time. You might choose to do some final sandblasting AFTER you're done welding if only to get a nice clean surface onto which to primer / body work. As far as how much primer would be necessary to do a car, I'm not sure on the 510, but I would recommend you buy primer by the GALLON. In the long run, it's cheaper than buying it by the quart. Also, if you are going to be doing any body work on the car, you'd be surprised how quick you can go through a gallon. 2¢
-
 This is a 71 Series II, Automatic with a Series I console (original) and a Throttle Control (Not original, nor OEM with an Automatic)
 -
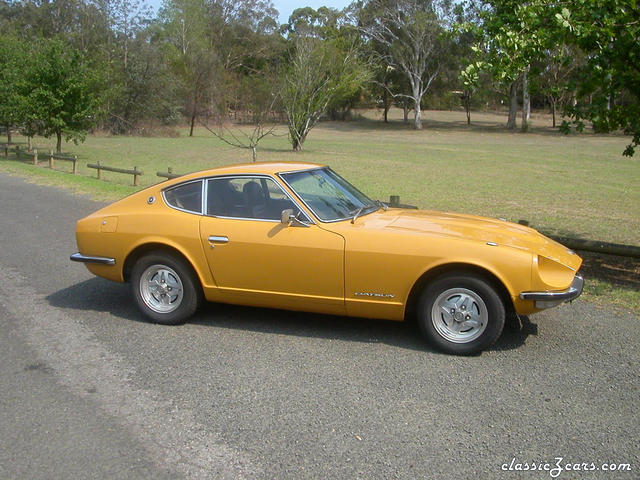 Excellent Color!

