EScanlon
Free Member
-
Joined
-
Last visited
Everything posted by EScanlon
-
Sorry, but there's no way of saying this nicely, but you have him doing equations and voltage comparisons when he's mentioned that he knows how to change fuses. That's going to discourage him more than encourage him. I'd suggest that he start with the most basic of electrical checking tools.... a continuity checker and a current checker. Both of these tools are available for under $10 (sometimes for BOTH), and can help correct tons of problems. The continuity checker is a simple AA battery, with a flashlight bulb and two wires. You put one wire on one end of the wire you are checking, and the other wire on the other end of the wire in question; the light bulb lights... you have continuity, if it doesn't then you dont. The current checker is the same item, without the battery. If the light glows... there is current, if it doesn't then you don't have current. Once he gets those items checked per the wiring diagrams, then he can get in there and start determining resistances, current drops, voltages etc.. But for the most part, in the 30+ years I've been working with the electrical systems on cars.... the two tools I mention are more than sufficient for the bulk of the troubleshooting. Knowing the voltage is the next step, and only for certain problems. That's when you use the most basic of the multimeter functions.... voltage. 2¢ E
-
That piece does not look worn. Are you sure it isn't the end of the lock cylinder that it attaches to that is the worn item? The lock cylinder metal is a "pot" metal and not as strong as the stamped steel piece in your picture, and it's more commonly the one that gets worn down. FWIW E
-
Good opportunity to plug the Club CD.... that would allow you to determine this sort of thing yourself. It says it should be ok. E
-
This is an older post, hopefully it still makes sense. http://www.classiczcars.com/forums/showthread.php?t=25997 E
-
Pics 2, 3 and 4 go on the door window frame, right where they enter the door themselves. Pic 1 gets the item in pic 5, but that is an old and no longer available seal. The new one, doesn't look like that. It's on a sheet metal piece that attaches to the quarter window frame. E
-
http://www.classiczcars.com/photopost/showgallery.php?cat=3542 Extra thick paint isn't going to solve the cause of the rust problem. It isn't lack of paint, it's that anything that falls INTO the cowl eventually gets flushed into this plenum where it gets caught between the fender and rocker panel. Whether it's leaves, dust, or whatever, it eventually becomes a "sponge" holding the moisture against the metal. One tiny little hole is all it takes for the rust to begin. The link above is what I did to extend the cowl drain OUT of the plenum and hence OUT of the car. E
-
Except that grinding or replacing the striker plate is not the correct fix. It's a modification to compensate for the lack of the rubber/nylon sleeve on the latch. The proper repair would involve replacing that sleeve. 2¢ E
-
The vacuum advance plate is BELOW the points plate. It's a small piece of plastic that houses several ball-bearings that the points plate (or in your case, the breaker/sensor plate) rides on. If those small ball-bearings fall out of their sockets, the plate will not rotate forwards or back smoothly. Usually (experience here) the plate will "stutter" or jump ahead and NOT return until the vibration stutters it back. If your timing got adjusted with the plate out of position, when the plate returned to position it would make it hard to start, and often it will stall under any kind of load (when you accelerate in gear) while still idling in neutral. FWIW E
-
I have BOTH the club Parts Microfiche CD and a true blue Micro-fiche set for the S30. Even with that information and the time to make the calls to the dealers, sometimes the on-line sites, even AFTER their Shipping & Handling fees AND their "overprices", they are cheaper than the time and cost of gas of having to drive across town to the nearest Nissan Parts counter that will actually take the time to take the order and keep you informed as to when it arrives. Other times, you have to go there; once, to order and pay for the part, and then again a few days later to get it, and thus being TWO trips. Add that in to your "savings" model. You can value your time as you see fit, but some people love the convenience of the internet, e-Bay and other on-line stores. If they're willing to spend the "extra" money, as you and Arne would phrase it, that is their choice. That is after all what ALL stores do. They buy it else where cheaper and resell it at a higher price, it's called Capitalism. Try it backwards for a while and let us know how it goes. That you have had the good luck of finding all your pieces for pricing other than at MSA, is your good fortune... NOW. Wait a few more years, and as your car ages and there are less and less vendors and NOS items available; as those of us with the older S30's have the "luxury" of enjoying; see if you don't wish there were a vendor willing to obtain the part for you.... even at a higher price. Which is another reason to patronize the sponsors, so that they WILL be here in a few years when Nissan Dealers turn you away. 2¢ E
-
Chris; The reference you present is informative and compelling. Does this mean we should also be on the look for 95 octane gas? After all, that IS what that sheet recommends. Last I checked, 92 octane IS considered Premium, unlike the 100+ I used to pump into my motorbike in the 70's. Don't get me wrong, it is an excellent reference and should help a lot. However, I'm just wondering how many of the oils specified are still being offered in their original specifications. That is, the ORIGINAL formula as specified by the Nissan Engineering team when that sheet was printed. Many expendable items for our cars have changed in the 35+ years since they were new (and 40 for the dates of this specific spec sheet). You really would have a hard time finding 175HR-14 tires at your local tire store, and if you DID find a set... would you really buy them and not Radials? Then again, would you rotate them as the original manual shows? The manual does warn about mixing the THREE different types of tires, but does NOT give a recommendation on size / type of the other two types. Does that mean we are limited to only ONE type of tire? Or that the engineers felt that you would make an educated or informed choice? Oil also changes formulations as time goes on. One spec sheet from my manual for the 72 Z shows that the Monograde oils from Shell and Esso listed on the sheet you provide were "Not Available" at the time of printing, and that's just 2 years AFTER your sheet. Additionally, Caltex, Castrol and BP are NOT listed, and in their place we have Sunoco alone. Not to mention that Shell's X100 oil on your sheet is now Super Motor Oil on mine (and only in Multi-Grade), and Chevron dropped the RPM in their oil name, and Texaco went to the Havoline Super Premium name. Yet the Mil-Spec (MIL-L-2104B) remains the same for all those oils. Hopefully that Mil-Spec is still the one that the cans you buy today, but last time I checked (about 2 minutes ago), the Mil-Spec doesn't appear on the cans...oops, plastic bottles I have. I think part of the point of all this is, that things do in fact, CHANGE! This is what this thread is all about. Your reference is good.... for a starting point. But as far as to what to use today... well that's what everyone is asking. Tire sizes, types and construction.... not the same as when the car rolled off the assembly line. Same with oils, DEQ, Gasoline and so many of the other consumable items on the car. That is the nature of progress in the automotive world. To service an older car, you ask around, from reputable sources, and from the manufacturer and even then, sometimes it boils down to a discussion of what IS available and not what you'd like it to be. 2¢ E
-
AND you have to have the part number since most parts departments either: a) don't have someone that is knowledgeable on the older Z's and knows part numbers by heart; aren't familiar enough with the E-Fast system to find it for you; c) find it humorous that you are hoping they have parts for a 35+ year old car on the shelf; d) find that some of those requests cost more in time and effort than possible return profit; e) really, REALLY hate those that come in "shopping" for parts, get belligerent when the parts man doesn't have time to "drop everything and research their list" and then do NOT buy any of them because they're going elsewhere where they can get everything cheaper.... AND for many, as Diseazd points out, it's a heck of a lot more convenient to peruse a catalog at your computer and place an order than to battle any of the above. But, also because many of us here find it important enough to patronize the sponsors of this site. Or am I missing something? But that's just my 2¢ E
-
I concur with the welcome to the forum, but I have a question for Wingr0... How do you expect the pictures to help? Or are you expecting a set of pictures that a) show the car running. show the car accelerating in neutral c) show the car stopped after it stalls. , just had to ask. But I also consur that it sounds as though it's a timing/vacuum issue. With all the changes that have gone on, the BASICS need to be checked. One of those sneaky little basic items is the Vacuum Advance Plate inside the distributor. It affects the timing via the vacuum. Remove your distributor cover, and disconnect the vacuum advance hose and either with a bulb or a clean hose, suck on the hose to create vacuum and then release. Repeat several times emulating an engine accelerating and decelerating. The points plate should rotate and return FREELY. If it does not, that could be part of the problem. Just a thought. E
-
When fax machines used thermal paper, and copiers were abundant, sometimes the only way to enhance contrast on the thermal paper was to use a yellow cellophane sheet and adjust the copier to NOT pick up the "gray" shading of the yellow. (The copier we had at the office actually came with a yellow colored sleeve for this purpose). This usually resulted in a much crisper and cleaner copy from the thermal paper. E
-
And AFTER searching here you are asking...? (hint, hint)
-
Cute! Since the 3m film is expensive, and the SEM needs several coats, and the "gravel guard" needs to be applied before painting, or as one of the last coats, and AZ-240Z was looking for something simple.... The contoured splash guards are NOT like your typical piece of sheet metal splash guard. FWIW E
-
Splash Guards? http://www.thezstore.com/page/TZS/CTGY/SG E
-
AND since you are posting from Barbados, you may want to consider that much of the information you'll find here and zhome is SPECIFIC to the US market. Not sure about Barbados, but you may have had more than ONE year of 260's, unlike the US which only had them in 75. 2¢ E
-
Yes, but IMO it's a poor diagram. You'll have to excuse my not sharing it. It is an attempt to re-draw the Z wiring in a Ford or Chevy format, i.e. circuits "arranged" all over the page, wide spaces between lines, generic re-directs (To Tachometer) without the Tachometer being shown on the page, blank "boxes" instead of switch connections (wires enter and leave.... SFM inside), whole circuits missing yet the diagram is billed as all inclusive. Sadly, these are touted as "easy to use".... unfortunately, they get a lot of "press" and as a result nobody comes forth with a truly GOOD one in it's place. Just my 2¢ E
-
-
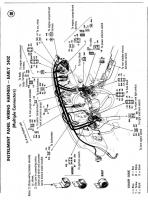
Exactly. The wires coming OUT of the "Body Harness" are the ones that correspond to the tail light in the colors shown on the diagram. (I'm going to qualify that with: the last few cars that I have seen and I don't have one in front of me, nor readily accessible to disect.) Now, the two wires going to the back of the car for the joint Brake/T/S bulb are NOT both White/Red. That is a typo going back to some of the first publications of the wiring diagram. The wire going to the RIGHT hand rear tail-light is White/BLACK or WB. The problem in the diagram arose when they first copied it, whether by photocopy or mimeograph and the lower portion of the B was lost and became an R, albeit one with a rounded "leg". After that, the WR/WR typo existed on most wiring diagrams. Follow the Upper (the right hand light one) back towards the Combination Switch and you'll see that it IS labeled WB just to the left of the Water Temp / Oil Gauge. Additionally, if you look at the photograph (important distinction) of the archived diagram, take a close look at the Tail-Light connections there. You'll note that there are 6 (SIX) wires to each tail-light. (The importance is due to the problems with resolution/focus that can lead to errors such as the WB-WR mentioned above.) One of those wires is the STOP light wire, the GY wire that leads directly back to the Stop Light Switch, and does NOT go to the combination switch at all. The other "odd" wire is mentioned below. Compare the balance of wires left and you'll see the remaining wires that match the wires coming out of your pig-tail. FWIW Enrique Of the wire sets one is Br for the LH light, and BrW for the RH (front same as the rear). Those are for the Side Marker Lights that were required in Japan to illuminate the side of the car that was closest to the road. The bulb would go in the center of the tail-lamp housing and required a separate hole in the front marker light in the front. The rear tail-light housing (same in the US as Japan, but NOT the lens) has a rubber plug with the letter P on it. That's where the bulb goes, in essence behind the reflector.
-
Don't. You won't need to extricate the motor from the plastic weather proof bag. The motor's shaft exits the bag and connects to the gear case. All of the disassembly and cleaning operations you will be doing are to the ball-joint linkages and the shaft mounts. The Ball-joint linkages should only require a mild cleaning and oiling. It is the Shaft Mounts that are the most problematic. Those require disassembly and all of the old grease that is packed within the holder dug out (literally!) and replaced with a good water-proof (marine grade) lubricant and do NOT use oil. The second most problematic is the gear transfer case. This will also require some cleaning and replacement of the lubricant within. Take care to NOT rotate the parking limit switch (looks like a little "pie-tin") on the back of the gear housing. Once you've cleaned everything and made sure they rotate easily and evenly (no stickiness at all), then carefully remount everything. Since you will have undoubtedly removed the linkages from the motor, once the motor and linkages are re-mounted on the car and BEFORE you mount the windshield wipers onto the stalks, take a moment to connect the electrical connector and actuate the wipers for at least one or two cycles, and allowing the motor to park by itself. The last step is one of the most critical in this process (almost). If you inadvertently (and it happens very often) you mount the wiper linkage arm to the motor 180° in the wrong direction, if you were to install the wiper arms FIRST and then actuated the wipers, you stand a very VERY good chance of scraping the wipers DOWN and over your cowl and hood. NOT a good idea. Instead, after mounting and before you install the wiper arms, take a piece of tape and afix a little "flag" to the arm. Actuate the motor and observe the operation of the wiper shafts. If they first rotate DOWN instead of UP, you need to remove and replace the wiper linkage arm in the other (180°) position. FWIW Enrique
-
These are one of those highly desireable unobtainable items. There were some reproductions made at one time, but the OEM ones are the more desireable ones. Sadly, "in the day" they were not generally installed because DOT and Police folks thought they "distorted" the headlight beam and blah blah blah. Today, just about EVERY car you see on the road, has some form of a headlight cover on it. Others didn't buy and install because they were seen as "knock-offs" from the Jaguar XKE series, which coincidentally back "in the day" was delivered without it's plexiglass lens, again to soothe the DOT / Police misperceptions. Today, like a set of original "D" hubcaps.... very VERY rare and EEEEK-spensive. Last pair I know of (OEM/Never used) sold for over $1200. Your mileage may vary. E
-
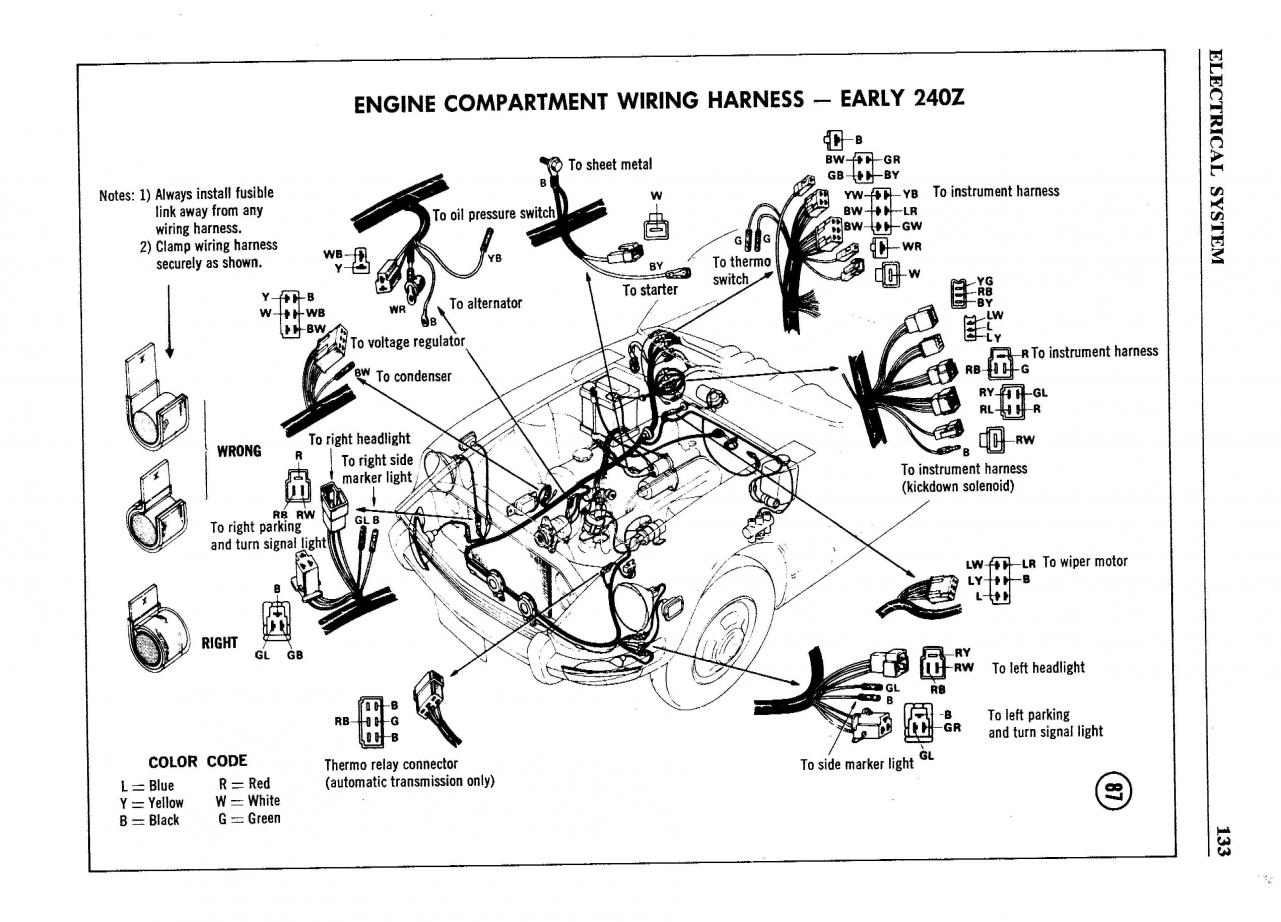
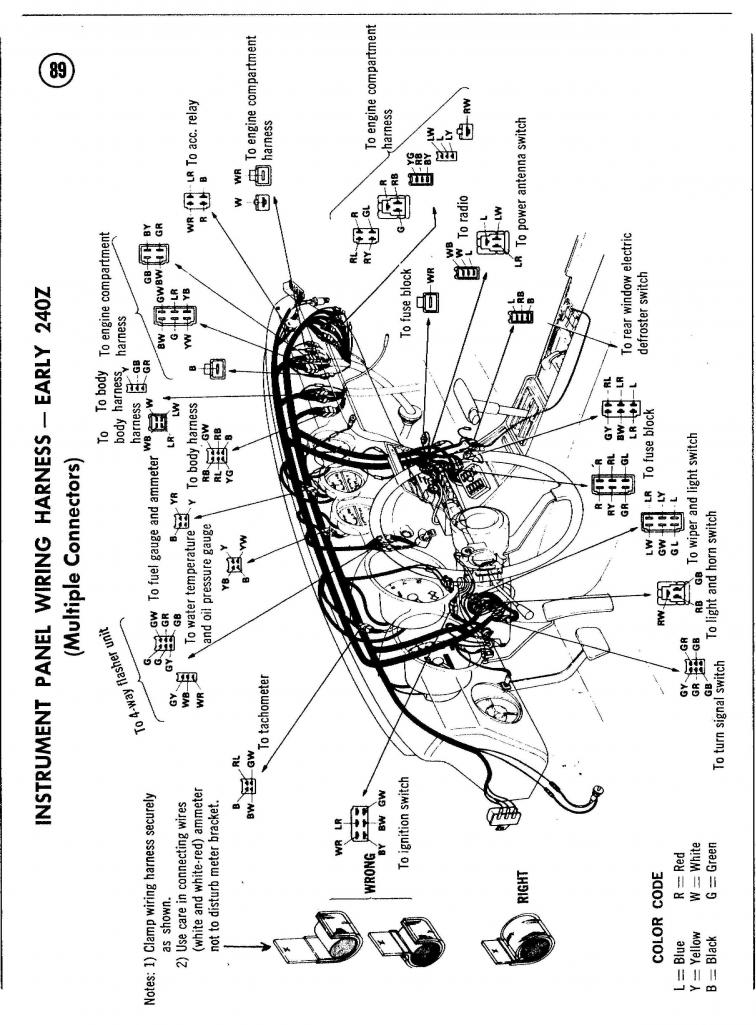
After having studied numerous versions of the early Z wiring diagrams, here's my view. The "Bars" are what was used in the original wiring diagrams as a separator between the Instrument Panel (dash wiring - 2 separate harnesses); the Engine Compartment and the Body Harness (Tail Section). The dashes you refer to are additions or modifications to the original wiring as well as optional equipment. While some of those items are seen as "stock" they are in fact, additions/modifications. There are various clues to my statements. The Fog Light wiring, the rear window defrost wiring, the step-light wiring, and the fuel pump wiring (Note that the fuel pump doesn't go through the rear "bar"), are all dashed wiring. As to the change in colors to the rear lights, I surmise that when the Z was brought to the US and it lost it's separate turn signal / brake wires, there was some modifications forced onto the wiring. The circuitry had to be modified to accept the Hazard Switch / Turn Signal / Brake Signal circuits sharing bulb elements and wires. The Japanese and European vehicles did not have to have this joining of the wiring, and their turn signal wire is separate from the brake wire (and the hazard is also separate). Vis-a-vis, when you install "European" tail-lights into your US market 240Z, in order for them to operate properly, you need to separate the Brake wiring from the Turn Signal wiring at the Combination Switch and run a separate wire all the way to the tail-lights. On Edit, I added a couple of pictures that show some of the connectors between the harnesses. These are for US market cars, I'd like to see if someone has an equal set of pictures for a Japanese or European market car as the differences may yield more information. A full wiring schematic would be a bonus! Just my 2¢ E
-
DUPLICATE THREAD, ORIGINAL AT: http://www.classiczcars.com/forums/showthread.php?p=321919#post321919 Lowell, no need to post duplicate threads.
-
Steve, this subject has been discussed ad-nauseaum squared. So much so, that if you search for "gas fumes" or "exhaust smell" (and yes, they are inter-related), you'll max out the search return at 100. Which means there are far FAR more than 100 reply threads. You could spend days reading those replies. To even try, and some will, to summarize it for you; will not pinpoint the specific problem you may be having. Search the archives, check the most often suggested items on your car and you may have the problem fixed. It IS a common problem with these cars. FWIW E