EScanlon
Free Member
-
Joined
-
Last visited
Everything posted by EScanlon
-
No, we didn't forget. You don't need us as enablers. Do you really need the extra plugs? E
-
That's your Horn Relay. H = Green to the Horn B = Green/Red to the Battery (Fuse) S = Green/Black to the Switch. E
-
Sarah; It isn't that it cannot be done... just that in the long run it is unadviseable. Most folks here advise maintaining things as close to "stock" in order to be able to advise folks on how to repair known problems. Start making changes to save a few $, and before long there are many changes. Soon there are a ton of unknown variables that have crept in and solving a simple problem becomes one that only the owner might remember. If he doesn't remember, down the line without knowing all the prior "fixes", it's hard to offer advise. Which negates the help this forum can offer. Remember, many of the help threads on this site deal with what an IPO did to "fix" the car. Without knowing ALL of those "fixes", it's a nightmare. (Right, Fast, Cheap) pick two and consider the consequences. 2¢ Enrique
-
Tyler, before you go removing the Hazard Switch and causing yourself a gazillion more problems, definitely take a look at buying that used switch. The turn signal circuitry is so basic that the only way to have them work in tandem with the 4 way flashers, is to have the hazard switch IN the circuitry.... that is, the Hazard Switch IS needed. Trying to remove the switch from the circuitry by jumping wires will prove to be a hideous headache.... and in the long run it would be much easier and less problematic to have simply replaced the switch. FWIW E
-
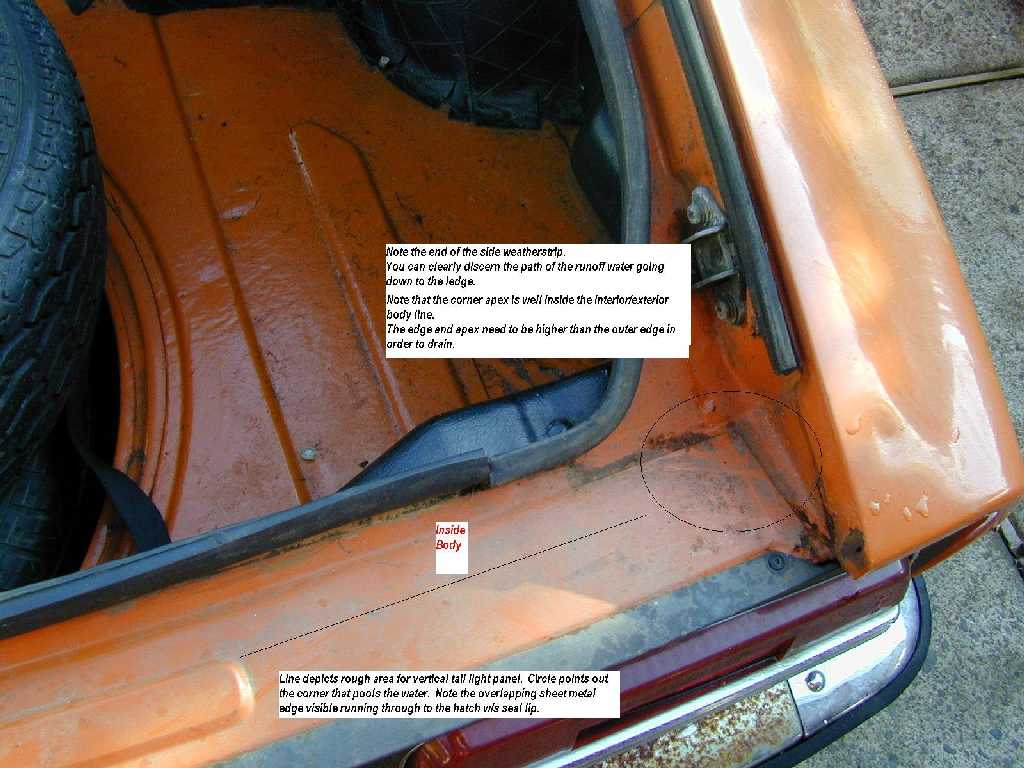
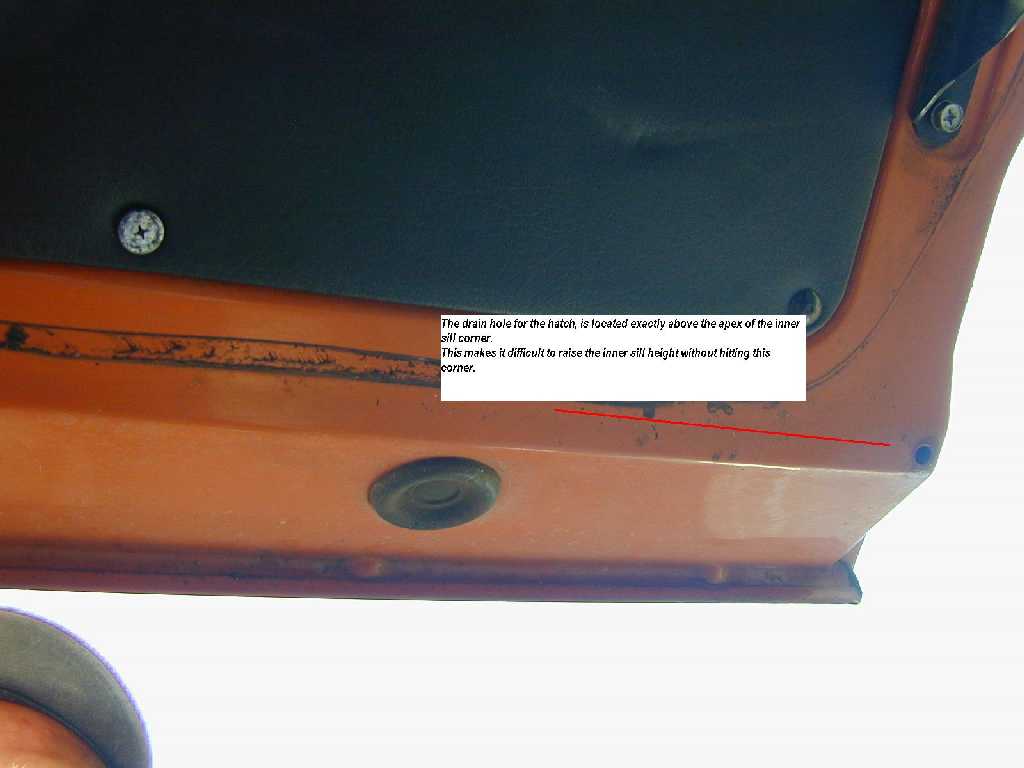
The length of the weatherstripping is such that it still pours into that area. Look at the two attached pictures to get an idea. E
-
You might be able to weld something, just like if you were to add some fiberglass, epoxy or some other material but the biggest problem is the shape of the hatch itself doesn't allow for much build up in those corners before it interferes with the hatch. Drilling holes would only vent the water INTO the cabin right about where the tail-light metal, fender and inner support metal comes together. Even if you were to successfully locate, align and drill the hole such that it actually did vent to the outside, the possibility of the water then creeping in between one or more of the metal pieces there would quickly cause more problems than it's worth. Sounds absurdly simple and in need of a simple fix, but it's one of those problems that quickly morphs into a HUGE problem. Parking indoors, or uphill... wish I could tell you different. There may have been other attempted "fixes", yet nobody has ever come forward and shown a true-blue fix that doesn't fail eventually. FWIW E
-
Park facing uphill. Sorry, it is a known problem.
-
Ditto, but I would also add one each of all the variants as offered in other markets. The European market Zed differed from the Japanese market Zed and from the North American Z... subtle differences, but present nonetheless. I don't think there are enough people that could recognize an S20 variant, nor a full deluxe JDM Z with all the trims and whistles. Some think the ZG nose was never a Datsun/Nissan concept. Others think the US Z came with Mag Wheels. Nor could most of us recognize the difference between a UK model and a JDM (and there might be actually NO difference). Additionally, racing legendary cars such as the Africa races. The actual cars only, not replicas except for some very few exceptions. Not sure which these would be. Personality owned cars? Unless Loni Anderson or Farrah Fawcett owned one and there was a wax figurine of them in a bathing suit..... probably not. I would include pictures of them with their cars though, but the car, in and by itself... I don't think it's ownership history denotes a "distinguishable" feature. E
-
Not to continue the off-topic discussion, but to point something out that has always been ignored in discussions of options, features, design etc. of the Z. That is the Steel Tariffs that were imposed by President Johnson in 1968 under the guise of "voluntary" export restrictions by European and Japanese manufacturers. These tariffs were plain old "quotas" of imported steel enacted by the government in response to pressure from the steel industry trade association and the steelworker's union. All under the guise of protecting US jobs/industry. This isn't an anti-american slur, nor anti-union, simply a statement of the global economic situation in place at the time that the Z was being finalized in it's design, production being proposed, and actually begun.... the TOTAL weight of the vehicle was the primary criteria by which the car was evaluated in the import scheme of things. This may be my memory playing tricks, but I distinctly remember reading article after article regarding design criteria by numerous manufacturers being modified to meet/beat the tariffs. Little things like thicker steel for rust prevention was NOT in the design, simply because of the cost of importing the raw steel into Japan and then paying a premium to export it out to be imported into the US. Extra weight items; carpet, heated glass, courtesy lamps, kick-bars, etc. were additional weight. I may be postulating something that did NOT actually happen, but I sincerely doubt that the management at Nissan would have been so obtuse as to not take it into consideration. Most people have completely ignored this component of the world trade situation back then. I was 12 in 1968, but I was living outside the US (Spain), and I can remember reading numerous stories throughout the end of the 60's and into the early 70's about the steel quotas, tariffs, and restrictions on imported vehicles. That part of the "whole picture" played a much bigger role into the whole production design scenario than trying to guess where given vehicles would sell in the numbers they finally DID sell in. FWIW E
-
Since you mention that you're looking for where the glass heater switch plugs into, you might want to look at these posts: http://www.classiczcars.com/forums/showthread.php?t=32187 Posts 2 and 7 specifically. http://www.classiczcars.com/forums/showthread.php?p=157255#post157255 Post 8 Both of those threads deal with the Defrost Grid you mention having. The wiring schematics I cite are the ones you'll need to correctly identify the circuit. HTH E
-
Sounds like your cowl drain has dumped trash behind the sheet metal and it has accumulated over the years... and kept it nice and moist against the back of the metal. Result? Rust through. When you remove the wing (fender for US folks), you'll probably find a glob of some sort right behind that rust. Check these photo's out for what I did, which updates the Cowl Drain Tube to properly drain OUT of the fender. http://www.classiczcars.com/photopost/showgallery.php?cat=3542 HTH E
-
R&R the tank yourself, then take it to the radiator shop. If it's one of the vent or fuel lines, they're just soldered in place (not brazed). If you were to completely drain the tank, and do a proper clean and flush, drop a piece of dry ice inside the tank, and with a heat gun (NOT a torch) you could sweat solder it back into place. Alternatively, you could POR the inside of the tank and that might seal it. Small leaks it will handle, but since you stated that the leak was big enough to be dripping as you watched... it might need either the Epoxy fix or a proper seal fix. FWIW E
-
Here's a search: http://www.classiczcars.com/forums/search.php?searchid=794533 I searched for Heater Control Panel as that is what is holding you back. The cables to the panel must be released for the dash to come out of the car. Don't try to remove them at the control levers, remove them at the items they control, i.e. vent, heater flap, defrost flap, water valve. Here are two of the more pertinent articles: http://www.classiczcars.com/forums/showthread.php?t=20818 http://www.classiczcars.com/forums/showthread.php?t=6981 HTH E
-
Hazard switch diverts power from the Stop Light Circuit when ON to power the Hazard Flasher. If the stop lights and the turn signals work properly when the Hazard Switch is turned OFF, then it's the Hazard Flasher that needs looking into. Don't forget that the Z has TWO Flashers, one for the T/S and one for the Hazards. 2¢ e
-
You should do some reading yourself. (No flame intended.) He RARELY posts the shipping charges he will charge. Pull a search on e-Bay Sellers and find Reddat. http://motors.shop.ebay.com/reddat/m.html?_trkparms=65%253A1%257C66%253A1%257C39%253A1&_ipg=100&_sop=1&_trksid=p3911.c0.m14 Look at his stated Shipping. Out of close to 100 items (the first page of 14, +/-1350 total items) only 7 had stated shipping. I'll leave it to somebody else to find the total of those that actually stated the charges. You are hit with the charges AFTER you've won the auction... only to find that they are more than anyone could expect and AFTER you cannot backout of the auction, i.e. you're the winner, you HAVE to pay his ransom or he gives you bad-feedback and reports you as a non-payer. The feedback system has changed, but I'll bet that few people are aware of the way changes are now instituted. ADDITIONALLY, after he charges you $10-15 dollars (US), or substantially more, to ship an item to you... you receive it in a manila envelope barely wrapped or protected.... with $0.42 postage on the envelope. Clearly the "handling" portion of the shipping is just a wee bit expensive. This is DECEPTIVE, as the bid/auction price should bear his "markup" for the item and not the shipping charges. His markup on the item IS the "handling" IN the shipping charges. As you put it, "It's up to the buyer / bidder to find out how much it will be BEFORE you bid - buyer beware !" The problem is that he neither posts what those charges will be, nor does he answer questions beforehand as to what he will charge, even when you supply location etc.. In essence, he's asking for a "blank check" auction bid which you hope he won't over-charge.... only to find out that he DOES overcharge. You have little to no recourse. E-Bay has never been too helpful in resolving this issue, and apparently not too willing to step in and do something about it. People need to be informed. So, where do you expect people to find out about it? The only way he'll change his ways is by people not buying from him, and letting him know WHY. The only way to inform people about his practices... on the internet... is to post that information.... on the internet, which is where posts such as this are made. We can't bloody well stand outside his store and protest, can we? When you get called out at 2am, you let people know how much you'll charge.... BEFORE you even get out of bed. IF they accept, you then get dressed and head on out. If they don't, you go back to sleep. That's proper and acceptable. You're doing it properly, you don't wait to get there and THEN tell them that it's going to be $150, otherwise they'd have the right to complain.
-
More than likely you have inserted a 2-filament bulb into a 1 filament socket or vice-versa. FWIW E
-
To wire two speakers to the original radio, simply wire TWO 8 Ohm speakers in parallel, i.e. Positive to Positive terminals and same with the Negatives and then to the speaker wiring from the radio matching the polarity. That's all it takes. Just don't try to use monster sub-woofer type speakers, a pair of simple plain old 5-1/4 mono speakers with small wattage will work fine. E
-
Steve; Just for S&G have you checked the Z registry at Zhome.com? http://www2.zhome.com:81/IZCC/ZRegisters/classic.htm E
-
If your car has fiberglass you have much more hidden damage than what is shown in the pictures. The Z did NOT have fiberglass applied to it at the factory, that would have to be a prior repair that was damaged. That in turn, says that your estimate of $1250 may well be very optimistic. The chrome bar, or over-rider as some call it, can be transferred, after you prep the new bumper. As far as straightening out the old... that may be more difficult, especially nowdays that most cars do NOT have chrome bumpers. 2¢ E
-
Oh come on! As a car salesman are you going to tell us that if someone had traded in an extremely fine example of a rare car... for whatever reason.... that you would take the time to locate any and all prior owners to give them the right of first refusal? Heck, no! You'd take it and grin all the way to the bank or to the phone to contact someone who would buy it at a fat profit to you. When someone unloads a car quickly.... sometimes it's because the urgent money need outweighs any sentimental attachment. To try to find a prior owner to see IF they'd be interested and IF they'd be willing to pay immediately and, hopefully, more; as opposed to selling to someone with cash in hand.... unless a contract had been signed... just isn't going to happen. 2¢ E To Fooshe55: Hopefully you can find your car. However, I don't know if the current owner would be so ready and willing to sell it. You may end up paying a pretty penny for it.... which will probably STILL be cheaper than starting over. Good Luck!
-
The whole outer shell casing of the lighter actually threads onto the inner frame. Remove the wire connecting to the back screw, then insert a finger into the lighter socket, and turn the outer shell from behind the dash. The finger you insert is to stop the lighter's small tab that is supposed to "lock" it in place from shearing off. Sometimes the outer shell has corroded a bit onto the inner frame. Take your time and slowly work it loose, you don't want to mangle it and damage the dash. Depending on the model you have, you'll either have an external bulb socket attached to the outer shell of the lighter (kind of a slide in and lock sides metal contraption), or you'll have a fiber optic lead going to an light bulb housing mounted onto the dash's frame. (On dashes with the pull style Hazard Switch, the fiber optic system also illuminated the knob of the Hazard Switch.) HTH E
-
You don't mention what year dash you used for the swap. If you used a dash for the later years 73+, then you will have problems trying to make things match. The 73 dash introduced the intermittent wiper and as a result the connections to the wiper switch differ and if memory serves the turn signal switch connection also differs. Look at the connections to the Combination Switch right by the steering column. If the connections to the Comb. Switch don't match the Dash Harness, not only will you have to replace the Comb Switch, you may have to swap out the engine bay harness AND the wiper motor in order to get things to function. Even then you may be chasing little connection problems for a while before everything works properly. In the long run, if the situation is as I've described you may be better off pulling the replacement dash, swapping out your old harness to the replacement and remounting everything. Trying to work around a pre-73 to a post-73 involves some tricky wiring that may be more than you want to handle. FWIW E
-
Could it be that the sequence of assembly is off? The rubber flap/apron goes over the filler neck flange and mounts BELOW the filler neck flange, next the filler neck flange which is then topped off by the filler cap mounting ring. This is from the metal "cup" out. If you mount the flap on top of the filler neck flange the mounting ring cannot exert pressure evenly over the whole flange and you get a leak. FWIW E
-
Filipe, that vendor is a known scammer.... no other way to phrase it. In simple terms.... NEVER buy anything from him. If he were to sell a horse, it would probably only have two legs and the other two would be painted on.... and the horse would have had his back broken by plowing rocky tundra... but the horse would be advertised as a thoroughbred Kentucky Derby Triple Crown winner.... Take a look at this thread: http://www.classiczcars.com/forums/showthread.php?threadid=32275 Warn anyone you know, post it on other sites, let your fellow club members know especially those that don't read the posts here. This guy is the "Nigerian Scammer" of the Z world. As proof of this, look at this item: http://cgi.ebay.com/ebaymotors/Datsun-240Z-Rare-Carbon-Fiber-OEM-New-Tail-Light-Panels_W0QQitemZ160314279196QQcmdZViewItemQQptZMotors_Car_Truck_Parts_Accessories?hash=item160314279196&_trksid=p3911.c0.m14&_trkparms=72%3A727%7C66%3A2%7C65%3A12%7C39%3A1%7C240%3A1318 Note that these are "OEM" yet.... aren't the way they were manufactured originally, which is why he says they're "new".... and if, per the description they're "custom built" how can they be OEM? A good example of bait and switch in my opinion.... "Yes, she's a virgin.... for the fifth time!!"
-
In my experience all the Z's from 70+ had the step-light wiring included in the dash harness. Look at the harness itself, right about where the wiring for the Door Plunger Switch exits the harness. On the driver's side it's pretty much at the end of the harness. You should find a pair of wires taped / insulated with some BLUE electrician's tape to the main harness. Those two wires (Red/Blue and Black; one pair on each side of the dash) are the wires for the step-lights. When you connect a set of lights to them, you don't need to ground the light as the black wire provides the ground. (Remember, they're supposed to be mounted to the door panel itself and not to the door frame behind the door panel.) The Red/Blue wire provides 12v from the same source as the Windshield Washer Pump, the Clock, the Map and Glove Box Light receive theirs from. (4th fuse down on the Right of the fuse box) Also, when you turn on the Dome light, regardless of whether the door(s) are open, the step-lights will actuate as well. The Step lights will, of course, illuminate when you open the door. As far as running the wire from the fender into the door: I don't know how Datsun was planning or expecting to do it. But since there aren't any powered items in the doors and no way of getting power to the inside of the doors without using a wire pair, I'll offer the following: Back in the 70's when I was doing stereo installs in vehicles (and yes, in the doors), we found that the easiest way we could "channel" that wiring without leaving it exposed where it could get pinched and frayed and end up with a "warranty" fix was to route the wire through some rubber or silicone tubing. We would drill a pair of holes, one each in the door and door hinge pillar. One of the holes would be just barely undersized of the OD of the tubing, and the other hole would be just barely oversized. The undersized hole was so that the tubing wouldn't slip in and out of that hole, while the oversized was to allow it to slip. Which hole was what depended on which side could accept the tubing as it slid in. The side that was stationary also received a dash of silicone around it's opening. The tubing was of a length that it extended at least one or two inches into each side with the door fully open. With the door closed, the tubing will insert itself into the oversize hole, and will extend fully with the door open. The advantage of this system is that the wire was protected by the tubing (and kept straight and tangle free) and there was a modicum of "seal" at the holes that got drilled. We used 16 ga speaker wire (extension cord type wire) for the majority of the installs. The current going to a step lamp is low enough that you don't need thicker wire. I only recall one installation where the owner insisted on "Monster" Cable and we just used two pieces of tubing then. There are "no-wire" contact systems out there for use by the hot-rod builders, but they all have the limitation that once the door is open, there is no electrical contact or current. Since the purpose of the step lamp involves having current when the door is open, those systems won't work. 2¢ E