EScanlon
Free Member
-
Joined
-
Last visited
Everything posted by EScanlon
-
It's been a while since I had to add fluid to my power steering unit, but I used to use regular ATF. Someone else chime in and correct me, but Power Steering Fluid IIRC is simply re-packaged ATF. E
-
Bruce; Go for it. Objective views are exactly what we need to read. As I've stated, I've not used other products, and as such, I don't think it's fair to denigrate them nor to imply something else is "just as good". As an Air Force Supply guy (Inventory Management Specialist 64570) one of the key things we were trained to look for were "Or Equal" items that a) did the same job/ function and were (ideally) less expensive. Sometimes you had to weigh one or the other over the other, depending on the current budget situation. Ideally, you had an actual test to determine suitability, and if not, you looked for testimonials from sources that were at "arms length". (i.e. not directly involved in benefiting) So, show the link and maybe down the road when I'm doing the next Z you'll let me give some of the product a try or ..... (hint, hint) (and hey, I'm just as cheap as the rest of you guys). E
-
If it runs with the starting fluid, it says you're getting spark, air and compression. Or at least in my thoughts. Have you checked that the fuel is actually making it to the venturi from the float bowl? Could be as simple as a stuck float valve, to some grit. I'm not an SU expert by any means but if it runs with the starter fluid but not on the gas in the SU's, that to me would be the first place to check. 2¢ E
-
Brian: Not to deny that SEM works well, but unless you've used BOTH SEM and POR and done comparative testing, the phrase "works just as good" is misleading. Also you've recently been posting about using Rustoleum for your engine bay, which leads me to question your statement about SEM. Why would you be changing brands? For this to be balanced, in order for Bart to make a sound decision, wouldn't it be better if those who HAVE used Zero-Rust or Rust Bullet to make their point known? That also applies to other products, as Brian has regarding SEM. However, comparative remarks should be by those who HAVE used both or more products, otherwise it's not a true comparison. That's why I'm looking to use a different product on the next Z I do, to be able to say which one I liked better, which one was easier to work with, apply etc. Just my 2¢ E
-
As I tried to point out earlier, this guy "trolls" with these type of questions. His prior set was about doing burn-outs and how to "improve" the quality and quantity of those burn-outs. He's looking for buttons to push to. E
-
Is this a SERIOUS question or is it another of your "troll" questions?
-
I'm referring to using Lacquer Thinner. Never had it not remove it all the way. In fact, that's what I use to clean up my spray nozzles for when I spray the POR into crevices. Never had it remove any of my skin, but then again, I just moisten the rag and then wipe. E
-
Bill is spot on with that caution. If you do get some on your skin, use lacquer thinner right away to cut it and remove it. If you wash your hands with water.... it will SET and set HARD. You'll have to wait till your skin sheds it. Good Reminder Bill. E
-
With all the suggestions, keep one thing in mind.... Don't do them all at the same time. Do the least invasive first. The fuel filter should be a simple swap and not affect timing, etc. The Vac Adv that I suggested only involves opening up and inspecting. After you've inspected then return everything to how it was before. The changes we were asking about weren't what you've done to the car since you bought it, but from one evening to the next morning. (i.e. it ran fine (day before) yesterday, and the next day it ran badly) During THAT time frame, did you do anything? If you did NOT do anything, then the change has to be due to something that wore out or broke, or as Gary pointed out, due to the change in climate. If on the other hand, you got in there and modified the timing, changed spark plugs, put in a new distributor..... well it gets even more complicated than a simple check will reveal. Determining a requirement for a new dizzy from a picture, unless the old one has obviously been through a chipper, would be hard to do. I've seen distributors that after a good cleaning and re-assembly looked NEW, yet had worn bearings, etc. and needed a complete re-build. The key is to do ONE thing, and then return the car to it's previous condition until you find the cause. Otherwise, as we've said before on this site, in a couple of years you'll be selling the car with this notice "I parked the car a couple of years ago after it ran poorly and I've not been able to get it to run again....." and someone will pick iit up cheap. I've bought two that way. FWIW E
-
How far forward are you looking at? Too far forward and you may be getting close to the fuse box location. As such you may be better off building your own center console than trying to modify one of the early ones or later ones. That is because part of their mounting points are on that bar that runs in front of the shifter hole. 2¢ E
-
Bart: Regardless of which rust protection product you use, first and foremost....preparation. POR, Zero-Rust, Rust-Bullet, Neutra Rust, et al, all will "clause" that surface preparation is important for proper adhesion. By "Clause", I mean that they'll excuse failure of their product based on poor preparation. And this is fair, because it wasn't their product that failed, it was the poor preparation. So, if the instructions call for removal of "loose rust", they're suggesting wire-brushing as a minimum. If they suggest removing "rust scale", they're recommending scraping and possibly some wire brushing. There are opponents and proponents of sand-blasting. Some will advocate carbide, others will advocate soda, some will caution totally against it. The key there is to adhere to their suggestions / warnings. Where I've used POR and have had very satisfactory results, I have heard good things about people that have used Zero Rust and Rust Bullet both. I myself, have not used either one, so all I can say is that based on what I've read, both instructions as to "how" to use it and other postings on their web-site, I found that their procedures and cost were more than I was willing to subject myself to. With that being said, POR does require some careful use. When they mean "open air" they're really recommending a Breather Mask with a good prefilter and carbon filter. The stuff DOES have cyanide (it's an isocyanate) in it's formulation. Meaning it exudes some very nasty vapors which you do NOT want to breathe in. The good side to this paint is that it sets ... H A R D. Hard enough that as Gary pointed out, you have to TAP new threads into any holes you may get the paint into. This is not a joke. Yet, it also stays flexible. I painted a pair of gas tank straps. When I went to install them onto the car, I had to bend them to get them to fit. After several attempts at fitting them, I discovered I had the wrong set (for a later year). I removed the straps and straightened them out. The paint did NOT crack nor peel off anywhere. Personally, I applied it mostly to bare steel. I had prepared the metal using a combination of items before I started painting. I sandblasted, wire-brushed, ground, welded, scraped, Acetone, Mineral Spirits (paint thinner) etc. However, I applied their Marine Clean with both a disposable paint brush, and also with scotch pads to ensure I had a super grease free surface and then I used their Metal Ready to etch the metal. That Metal Ready is an acid. It is critical to the process of ensuring proper adhesion to the metal....bare or rusted. Keep the metal wet for 15-30 minutes and it does a superb job of neutralizing the rust that's still there while giving the steel some "tooth" to grip. Even automotive primers require an etching primer to adhere properly to bare steel. Once you apply the POR you can brush, spray or roll, and generally only one good coat is required. If you choose to re-coat, do it within the curing period (check the surface and see if your finger "drags" as it moves along, if so it's fine. No drag ... you waited too long; you squish the surface ... too soon). If you wait till it cures you need to scuff soundly in order for the next layer of POR to adhere. If you're going to top-coat, you MUST use their TieCoat primer (which IS sandable and will allow other automotive type paints to adhere). If you choose to add undercoating to the underside after all the POR work, just apply it as the factory did. You can use Body Shuutz (I may have misspelled it), or something out of a spray can. It will adhere as long as you follow the instructions. While the POR is hard enough to accept those occasional rock dings, the undercoating will do wonders for silencing the road noise out of the sheet metal. I hope to work on another car later this year and next, and possibly give one of the other products a try, and then give a more balanced "report". Hope this helps E
-
Billy Bob! You done lurned how to count!! And you had one foot left over! How many times did you have to run the spell checker on them three words before you were fairly sure they wusn't missspeelllleeeed??? How's the missuz?
-
I found a prior post of mine: That was from having tried to use a "better" console in the car than what was in it originally and discovering the extra material that gets removed in the front of the shifter hole. Now we weren't swapping transmissions, we were just swapping center consoles. Additionally we were swapping INTO an automatic car a center console that had been used on a Manual car, and had been removed from such. Could it be that in swapping the Auto to a Manual the shifter hole in that early car had to be moved further back and therefore.... Here are a couple of pictures of the "early" console: http://www.classiczcars.com/photopost/showphoto.php?photo=2596 http://www.classiczcars.com/photopost/showphoto.php?photo=3865 and one of the "later" style, although not a very good shot: http://www.classiczcars.com/photopost/showphoto.php?photo=7700 Also ignore the armrest/cupholder as that's an aftermarket item. Biggest point of difference is that the "later" style had the ashtray mounted behind the shifter, whereas the "early" had it in front of the shifter and that the "coin tray" in the "early" became a very large surround in the "later" style. FWIW E
-
You can either drive FROM the wrong side of the car, as some rural mail carriers do when using a LHD car and sitting in the right hand seat. OR You can drive ON the wrong side of the road...regardless of which side of the car you're sitting in. OR Mebbe you IZ loaded....presently!!!
-
My guess: Vacuum Advance Bearing Plate. Since you mention that it won't rev past 3k, that in neutral it seems to be ok but not past 3k, and it didn't do it yesterday...presuming you did NOT do anything to the car, the small ball bearings in that plastic plate may have worked their way loose. The situation becomes one that as long as the vacuum is strong the plate will allow the distributor to advance via the vacuum pull (centrifugal is largely unaffected) but won't return to it's prior setting easily. To define it as the problem, remove the distributor cap, disconnect the vacuum hose from the vacuum pot, and with another hose connected to the vacuum pot ... suck on the hose and watch the rotor/point plate rotate. Release the vacuum you generated with your mouth and watch the rotor/points. It should return (spring) back into the original position (before you applied vacuum) rather promptly...meaning it doesn't take more than a split second. It's not a "snap", as much as a released spring. If it does NOT do that, either rotate or spring back, it's a good indication that the vacuum advance plate is shot. This happened to me, with the same symptoms you report. However, other causes may be the reason. This is just my WAG to check. FWIW E
-
Cuz, mebbe you wuz loaded?
-
The only difference between an Auto and a Manual Console in the 71 was the addition of the Shift Plate Selector Mechanism for the Auto. The Manual had the Vinyl Boot and lace. From what I remember, the manual can be made into the auto style by cutting the forward section of the shifter opening, but not the reverse. I may be wrong, but I know that you can't just flip from one style to the other and back (i.e. there is a cut involved). But from what you're saying, you may have an early (Series I) style console, the one with the two choke levers (which are actually ONE Choke and ONE Hand Throttle) and you're trying to swap it out with the later console which was introduced in the Series III (Choke handle protruding from the side ridge and not the center flat). If I recall Will (hls30.com) has a thread he wrote that details the differences. FWIW E
-
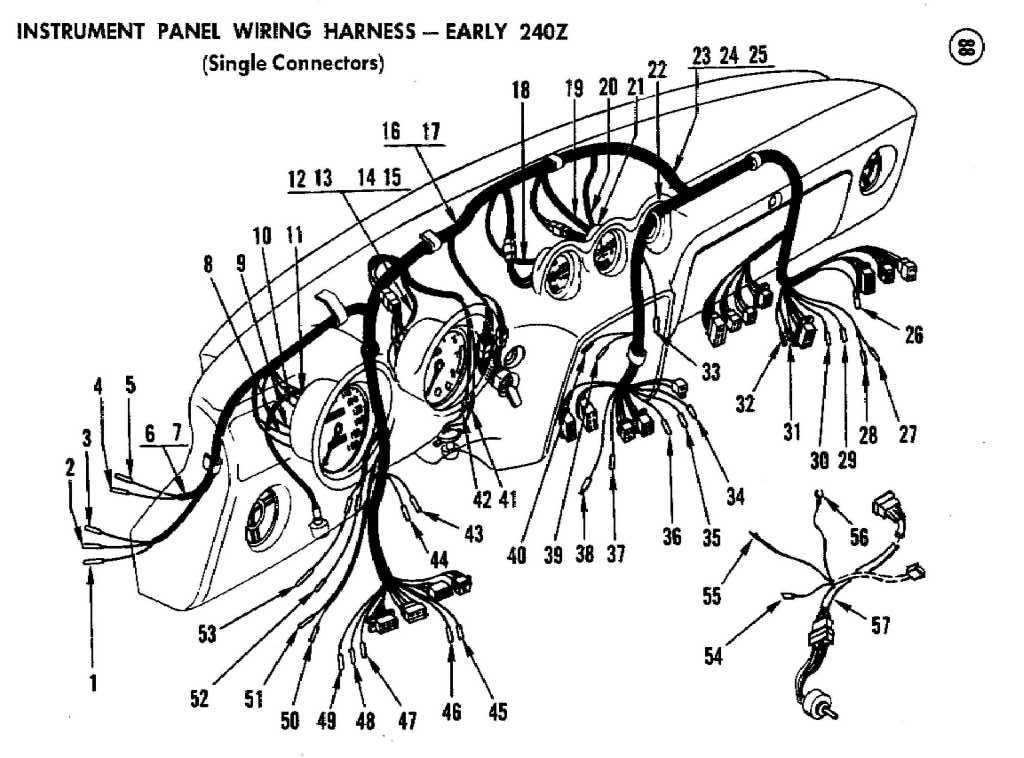
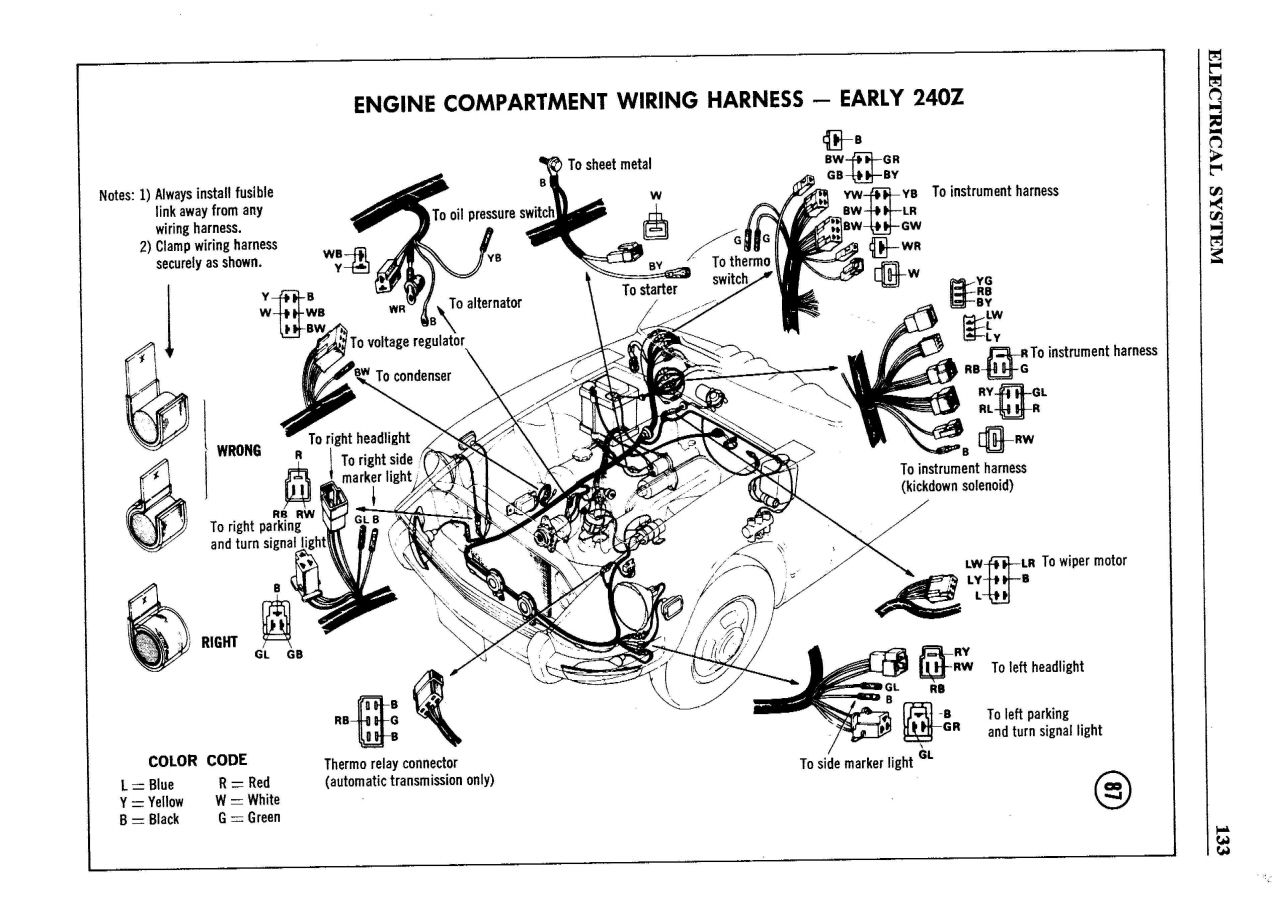
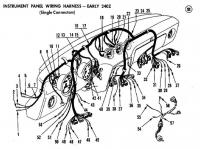
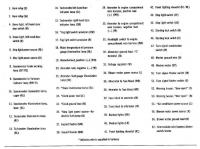
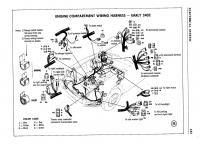
Attached are a couple of diagrams that will help. If they prove to be too small to read properly, post back and I'll e-mail you the large pics in a Zip folder (compressed). Hope this helps Enrique
-
Dan, that's even better than my solution. Mine was on the basis of what I had on hand that would do the job. It was left over material from my Air Force days. Now that I'm thinking about it, I can't really pin down whether it was the Polish or the Dye I used. (We used both in the service, the dye to repair scuffs on your boots, and the liquid polish for the heels and edges of the soles, the rest of the shoe/boot got regular Kiwi paste polish and buffed to a mirror shine.) As a result, it may have been the dye, which came in the same kind of dispenser as the liquid polish. (The container I'm referring to is the one with the angled sponge on the top.) Anyhow, I'm glad you got something, as for the most part the luggage straps get a ton of sun in the rear deck and being able to recolor them makes them look tons better. E
-
Actually, the last set of luggage straps I "tinted" were done using good old liquid shoe polish, Kiwi Brand. It's been 7 years and no fading or dye coming off on your hands. E
-
Nick: Go to www.zhome.com and there you'll find enough info to gleam a good understanding. Now this is for the North American Cars, the European and Japanese market cars will have further variations that are probably not covered there. E
-
Dye's require fibers that will accept the dye.... most carpet is nylon, plastic, or some other non-dyeable material. While you can get a dye to more or less stain the material, it will wear/flake off. The dye can't be beat when used on FABRIC that has a high wool or cotton content, but most automotive rug/carpet is nylon strand that has been woven through the backing. Cut or Loop is a style of weave and cut or no cut to the looped material and not a consideration on dye or not. The SEM material, although termed a "dye" is more of a "paint". I've had excellent results with it. Now this is where Cut or Loop will show a difference. A properly prepared CUT pile (i.e. brushed) will accept a SEM "dye" job very well, the Loop will require a bit more saturation (in my experience) which in turn will cause some of that goopiness and "glops" that Will referred to. The trick is to apply a light coat, let it dry, then a second coat and again let it dry, and so on. If you try to achieve color depth in one coat....heck, why not just pour it on. I've dyed door panels both in plastic and vinyl both with SEM and Flex added standard car paint. Both turned out very well, however the results are VERY dependent on the prior surface preparation. Don't skimp out there. Use the cleaner they recommend, it DOES open the surface up to accept the dye/paint. On carpet, make sure it is clean and DRY. FWIW E
-
When you adjust it, remember that you don't want to adjust it so that it's "hair-trigger" sensitive. That is, allow for a "bit" of play as you pull up on the outer handle before the latch is released (amount to be determined by you), but not so much as to make it that you have to pull up ALL the way. Too tight a trigger can and will cause unexpected door openings as well as possible problems in closing. Conversely too loose and you'll hear rattling in the door as you drive. 2¢ E
-
You may have adjusted the adjusting nut way too tight, both from the outer handle to the latch and from the inner handle through the swivel (90° torque tranfer) and to the lock. The outer handle has an adjustable nut on the rod leading from the handle to the latch. The inner handle is adjusted by the position of the handle bracket on the door. Hope this helps. E
-
No, just trying to joggle memory banks. If memory serves it is basically pure alcohol they use for fuel. But someone may have better information. E