


EScanlon
Free Member
-
Joined
-
Last visited
Everything posted by EScanlon
-
Gary's post with the part number given is the most informative one on this thread. Post the part numbers guys! Otherwise people show up at the stores you mention, ask for the item and are told.... "If it's not on the shelf, then we don't have it." 2¢ E
-
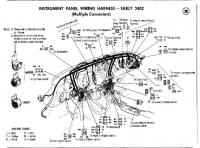
Take a look at the following diagram. It shows the colors for many of the multiple connectors in the passenger cabin. If you look just behind the Shifter (disregard that this is for an automatic) you'll see a 3 wire connector, the one with all three connections "stacked" one above the other. It's color legend is WB, W, L; or White/Black, White and bLue. That's the connector for your radio. Re-insert that WB wire back into the connector and your radio should function again. This isn't shown in the Wiring Schematic. The WB and W are for the speaker, the Blue is for power, and should have a separate in-line fuse. Some cars instead of a WB wire had a WL (White/Blue). HTH E
-
Actually your headlights are powered all the time, your Combination Switch allows them to ground while the Dimmer Switch selects which element gets the ground. Since the are powered all the time is why the Ignition Switch setting doesn't matter. In fact, that's why you hear of people leaving their lights on and killing their battery. The ignition relay is an item specific to the later 280's, so maybe we can get Stephen in to comment. There are a couple of items which lead to much confusion. So, let's eliminate the confusion by simplifying what you're checking for. Battery Voltage: It doesn't matter if you just bought it, if it isn't fully charged then many problems arise just because that's the nature of things. Charge it overnight on a trickle charger. While you're at it, remove the connections to it, wire brush them clean, both the posts and the clamps and re-tighten them. Check your grounds from the battery to body, wire brush where they connect. You mention that your ignition is dead, yet you then mention that it will turn over.... hmmm, how's that again? If the ignition switch is dead, it wouldn't actuate the starter, or if it did, then you may have a wire or connection bad. DO the Ignition Switch test by the FSM procedure. Remove and clean the ends of the fuses AND their connecting clamps and check the fuses OUTSIDE of the fuse box before replacing. Don't do a visual check, and don't do a continuity check while in the holder. Stop disassembling and "fixing" all sorts of items until you can address it, it's a much higher probability that you'll introduce and ADD problems than magically stumble on the source of your current problem. Only by systematic and patient effort will you find and fix the problem. HTH E
-
A better explanation is that what he's measuring there is Voltage DROP through the fusible link, which should be 0 (zero) for purposes of discussion. Your explanation is correct, but it bears explanation. If he did in fact measure a voltage at the two end points of the fusible link it would indicate that there is some resistance, whether small (corrosion or by design) or infinite (broken wire). A small resistance would show a very low voltage and a high resistance would show a large voltage. FWIW E
-
Dave: I read your post, and it seemed as though you were just ranting. Then again, with all the wiring being "FUBAR'ed" and your addition of even more shunts....heck you're right... "kiss our foot, you lame poser" . What were you expecting? You were spouting technical jargon of a pretty specialized nature (primary winding resistance), and then (it seems) asking a pretty basic question "Is that right?" ... Heck yeah!! Kiss our foot, you lame poser! It seemed as though you knew what you were doing. Did you really expect someone to look over your shoulder and ask you to move over a bit so they could detect if the secondary windings of the flux capacitator were properly degaussed before the primary field collapsed around the ferricambulator? Or is it that the magnetic envelope must invert at the proper sequential increment of defluxing of the potential field perniculator? Most of us try to answer ... when we know or are pretty sure of the diagnosis, based on the description given by the person asking the question. But in this case? Kiss our foot, you lame poser! So, hopefully you take this in jest and in stride, you probably got too deep too quickly for anyone to catch what the question was and provide you with our magical immediate reply. So, for future reference: pucker up and kiss our foot, you lame poser! FWIW and J/K E
-
Actually Dad absolutely refused Long Hair, Hip-hugger pants and Platform shoes for the longest time. Not till my Senior year in HS did I acquire a pair of the Platform Shoes with the tall heels, and soon found out they were no longer cool. I think I wore them to two parties before they were banished to the back of my closet. But as far as Disco? Heck, I'll admit to doing my best to twirl the night away moaning about a rain-soaked cake ... all the while watching the ladies in those form fitting body-suits with the fly-away skirts in stilletto high heels doing their twirls .... Go ahead, critique THAT!!! Lest we forget, here are a couple of other pictures of interest: http://www.classiczcars.com/photopost/showphoto.php?photo=11299 http://www.classiczcars.com/photopost/showphoto.php?photo=7701 http://www.rottentomatoes.com/m/corvette_summer/ And a video: http://www.classiczcars.com/photopost/showphoto.php?photo=13467 All of these are examples of designs and acceptable items THEN. Some of the many items are still desireable and some are not. While some of these are such that there will be some that will decry their being included in this discussion, the point I'm making is that they're ALL either advances or side-steps in the automotive looks department. Flames which were a huge component of "hot-rod" paint jobs in the 50's, were seen as pasé in the 70's and 80's when stripes were a big item. Psychedelic paint jobs and graffiti motifs were "in" in the 60's, and were scorned in later years (Anyone remember the Partridge Family bus?). Or outrageous engines poking through hoods with extremely modified cars, The Monkees, The Munsters, just to name a couple. The late 70's and 80's introduced two-tone paint jobs amidst other items, and stripes began a come back. The 90's can best be remembered for outrageous colors ... Dodge Neon anyone? And I'm summarizing and categorizing with broad strokes. If you wish to debate specific dates, years and trends, then we need a different thread. My point is that this car may now best be an example of something that was big then, and isn't now. Berating it, exclaiming how it gags you, or "burns" the retina's are just more examples of how pasé it has become ... but it wasn't ALWAYS this way. Had the original owner finished the project, who knows, it might have ended up winning a show or two. 2¢ E
-
Paul; If you do indeed have access to a friend who does this commercially, I wouldn't try to "re-invent the wheel". As Bob M pointed out, the procedure is to install Rubber on Glass, Trim into Rubber and then Assembly onto car. Any other method, even with the tool that Graeme (Nissanman) mentions (and there are several trim tools for just this purpose), have a high probability of bending, scratching or marring the SS trim or worse tearing, ripping or gouging the rubber. The basic problem is that the trim is not forgiving at all, and neither is the tool. Any incorrect movement with the tool and ZAP you have a bend, a kink or some other unacceptable problem. As a note, most trim tools require you to "saddle" the trim as the leading edge or rounded forks spread the rubber edges and then as the tool passes a given point the rubber now flips back over the SS trim. The problem is at that bend in the tool. There is a critical angle at which it will do the job smoothly ... as long as you are very patient, have lubricated the rubber AND the trim, and can hold the tool at the same angle for the complete piece. Any deviation from this and the tool itself can impart a bend or a scratch. Here's a couple of links to show you the tools I'm referring to: http://www.dominionsureseal.com/productsdetails.asp?id=36&catid=26 http://www.dominionsureseal.com/productsdetails.asp?id=34&catid=26 Here's a PDF with drawings that might better explain the tool. Pages 43-45 show the various types. http://www.autobodysupplies.com/2_Tools2005.pdf When you look a the tools take note that they're all "screwdriver" type tools. That means they're hand held and operated. That's where the patience AND skill come in. But, if it were up to me? I'd pull the windshield and re-install the trim onto the rubber and then re-install the assembly. Remember, replacement trim is big $, and getting good rubber is also a PITA ... you do the math. FWIW E
-
This car is a perfect example of how something that was seen as "desireable" back "in the day" is now seen as deploreable and embarrasing. Platform shoes, hip-hugger pants, screen-print silk shirts, paisley patterns in wild colors, white leisure suits, Nehru jackets, tie-dye, Ralph Lauren Polo Shirts under Button Down Collar shirts; just to name a few. All were "cool" and "groovy" or "funkalicious" at one time. Now, they're the type of item that some people deny having been involved with....like Disco. But, like Disco, if you were part of the "IN" crowd, whether you were a Beatnik, a Hippie, a Yippie, a Yuppie, a Rebel, or a Preppie, you "wore" the uniform. This car is a perfect example of this. The spoiler, the flares, the striping .... while "outrageous" now were very much the "rage" back in the 80's. (Remember the A Team's van?) Like paint, this year's most popular color will be pasé a few years down the road. So, while many will distance themselves from the 80's appeal of the stripes, the interior and the air-brushing, like Disco, back in the "Day" you either participated or YOU were considered the "outcast" or the "dork" or the "nerd". 2¢ E
-
Also depending on how damp it was where you stored it, you may have picked up a bit of corrosion in the grounds or other connections. Overheating circuits are often due to corrosion and resistance in their connections. A side comment, you don't need to post the same question to two different forums. The front page shows all the latest threads regardless of which forum you post it to. Extra copies of the same thread starting question tend to make searches difficult (which one is the one that got answered?) and also makes it difficult to detect which one had the right answer for a reply. FWIW E
-
The BR makes the connection between the Green/White wire that "T"'s off the GW going to the Tach and coming from the ignition; and the Black/White wire that "T"'s off the BW going to the Fuse Box coming from the ignition. Hope that made sense. But per post #4 you had already done that, so maybe I'm getting confused on something. Hope this helps E
-
It shouldn't. The Accessory Relay only comes on line once the engine is running and the ignition switch is in the RUN position. So to review: 1) The Starter DOES CRANK the engine. 2) The engine doesn't fire. 3) You've determined that the coil is not sending spark to the distributor. 4) You've reviewed the Pertronix connection to ensure that it's correct and working. I seem to recall an item on the pertronix requiring the BR. However, the last Pertronix I installed was on a Roadster (4 cylinder) and I used the stock coil so I left the BR in the circuit. It was working fine, so I'm not sure if that's a must on the Z or not. Anyone else with suggestions? E
-
Check the connections at your Ignition Switch. In the START position you should have continuity between the White/Red and the Green/White and also the Black/Yellow. In the RUN position, continuity between the W/R and the Black/White and the Blue/Red. The Accessory position is W/R to bLue/R only. (L is the short hand for Blue). You're making your own harness, which if you're following the schematic faithfully should mirror what we can reference and help you with. One last item, are you sure the coil wire to the distributor cap is properly seated at both ends? FWIW E
-
Brian; I would gladly take you up on one of those challenges like you see on Mythbusters. I've worked with fiberglass and have had the itch blisters to prove it. I say "would" because I believe you're being extremely optimistic as to how easy it is to lay fiberglass, carbon fiber or any one of the resin reinforced materials and maintain a smooth transition from one surface to another. If you've ever tried to get a large sheet of fiberglass cloth to behave (and that's what you're referring to), as you pull in one direction and have it distort and bunch up and require pulling in yet another direction all while your resin is beginning to set (working time is short depending on how much catalyst and ambient temperature) and STILL try to maintain a thin layer... then you know that this is a highly desireable condition, but in actual practice a hard to attain one. Then toss in the "eyebrows" of the gages and their inset "tunnels".... in ONE CONTINUOUS SHEET?? Not by any process that would be easy to set up in your average garage. Maybe if you use a vacuum forming machine...but then again, that IS what a Dash Cap is. It's a thin layer of ABS plastic that's been heated till it's pliable that is then vacuum formed over a mold taken from the dash. Is it perfect? No, there are at least 2 generations of molding conformity at play there before you start making the actual caps. But TWO layers of fiberglass cloth followed by a surface texture layer? I'd bet that you couldn't get that thin enough to challenge a dash cap's thickness, final texture and most of all... ease of application/installation. Just my itchy 2¢ E
-
I agree with Ron. It seems as though this site's reputation has primed your expectations and blown them out of proportion. You also might re-consider how you "demand" an answer. While many of us are "purists", many of us are not. But you don't get much help by insulting first. You provide a series of photos, showing extensive meltdown damage and pretty much the same items from different angles, then you show us a different car that is your proposed donor for parts and your trouble in removing the parts and expect those of us here to magically come up with an answer overnight? That's what it would have to be....magic. I don't think anyone here or at any of the other sites will be able to come up with a "Plug-N-Play" fix for you....except maybe replace the whole harness, and I'm not sure that that would do it. Something caused that problem, and I'm thinking it might have been a new stereo, or some other poorly installed "upgrade" that caused it. The wiring going to the fusible link holder is showing an extensive and, IMO, a complete meltdown. I don't think that simple replacement of parts is going to fix this. Those fusible links are safety items, they're designed to melt when trouble appears. One of those fusible links looks suspiciously like 10/12 gage wire (Black/White) wire. If that's the case, then there was NO fusible link in that circuit and the result was catastrophic. What your picture shows is a perfect example of why you should NOT use plain wire instead of a properly gaged fusible link. You might be able to remove the harness, unwrap it, and then proceed to replace the burned out wiring, but it's also possible that it melted other wires that are now making contact with each other, and they shouldn't be. It's impossible to tell from pictures if it's repairable or not. Sorry, but easy fix....nope. 2¢ E
-
I agree with Stephen. At that point a Dash Cap would be thinner, quicker and probably cheaper as well (they're about $90-100), and definitely less hazzle than trying to put two layers of fiberglass AND have it evenly smooth everywhere.
-
Yes, the fan/squirrel cage are mounted to the fresh air intake/valve. If you have A/C then usually that mounts in FRONT of that. And now, we're getting past my experiences as I've not removed the A/C plenum from a car in years (and that was a get it out of my way to get to the squirrel cage) and as a result I'm literally ignorant as to what to do to remove it. But it does sound as though something is stopping the lever from traveling back. The only other possibility would be if somehow the cable got bent while the lever was in the middle position and the bend does not allow it to retract into the sheath. Hope this helps E
-
Shouldn't be, sounds like an adjustment to the cable is in order. However, first a couple of questions: Did this just recently start happening? If so, was it moving all the way to the left OK? If this is the case, it is very probable that the foam/vinyl face gasket on the Fresh Air Flapper Valve has come unglued from the metal and is now obstructing the flap from closing all the way. To fix this requires removing the Fan Housing (not just the fan/squirrel cage), to repair. However, you CAN check if this is the case by removing the Fan/Squirre Cage and looking through to the Fresh Air Valve (as this is what the lever actuates). If it's been this way since a refresh or restore, it's more than likely a poorly adjusted cable. The connection for this cable is the Fresh Air Flap on the Right Rear of the Fresh Air valve. Simply reach back there with a 90° screwdriver, loosen the set screw for the sheath grip, push the lever into proper OFF position and re-tighten. Hope this helps Enrique
-
Fastest method that shouldn't damage properly applied decals and stripes: Wax and Grease Remover. You should be able to buy it at your local Auto Paint store. A gallon runs approx $35 or so, and a spray can approx $8 or 9. The use is straight from the Karate Kid: "Wax ON-Wax OFF". One hand applies, the other removes. Use a clean rag in both hands initially, eventually substituting the remove rag for the apply rag with a refresh of solvent. Use a clean towel for removal every time. Don't use synthetic cloth, use cotton rags; t-shirts, baby diapers both work great. The other product, is plain old Mineral Spirits. Not as good nor as effective as W&G Remover, but cheap. Like $10-12 for a gallon. Of the two, I like W&G more. Last item, a heavy concentration of Dawn dishwashing liquid. Palmolive works also, or lastly Pine-Sol. All of these have the grease-cutting strength to cut the wax, however, copious rinsing is recommended afterwards. I use this stuff FIRST to remove any oils on the car, then follow up with W&G-R to get to a clean base. FWIW E
-
IIRC ground the wire that connects to the sensor and turn the key to "ON". The temp sensor should max out. If it does not that may indicate problems with the gauge. But as Stephen has said, it's more than likely the sensor. 2¢ E
-
Once it's pliable, and be careful doing that, hair dryer ok, heat gun...very iffy, torch definitely out, then the top flange the one in the gas fill area gets pushed IN to the body, and then it gets slipped off the tank neck. Once you slip it off the tank, then you can remove the lower flange that seals the bottom portion. HTH E
-
Doug; No doubt you've fed the monster plenty, the car looks sharp. IIRC this is the same car that Carl mentioned some months (years?) back. However, don't forget that the monster cares not how recently nor how much it's been fed....wallet on the console equals immediate craving for expense. Heck, I would wager that he would at least need .... I don't know... fuzzy dice? The caution is more to alert Joel than about needing to spend the money. Joel, just remember, do NOT put your wallet or any other money or credit device on the center console. Call it superstition, call it tom-foolery, call it an urban legend, but somehow the car knows and the stories by other members are NOT made up. E
-
Check an industrial supply house. 2¢ E
-
Congratulations! You mentioned "jinxing" yourself, so in order to avoid that, please read the following: http://www.classiczcars.com/forums/showthread.php?t=22084 Hope this helps; E
-
Sydney Moon as a navigator, wearing that orange plaid outfit. FWIW E
-
OR you can do a SEARCH on this site and see just how much information IS out there. I did the same search and found several references that would allow you to deduce what to do. No diagrams, but several point by point descriptions. Use the terms: "Heater and Control and Cable" in the Search window (including the word AND) and you'll get a couple of pages worth of posts. Some of the information will be for the Early and some will be for the Later Z. Not sure if yours is strictly cable controlled or if it also uses the Vacuum system of the later cars. I'm suggesting you do it this way rather than just posting the results of the same search so that you can find out just how MUCH information is in the archives. FWIW E
