


EScanlon
Free Member
-
Joined
-
Last visited
Everything posted by EScanlon
-
You forgot to "carry the one". You have current being "supplied INTO" EACH " bulb through the thinner wire" then "coming OUT of" EACH "of the high beamS onTO the thicker wire" where BOTH High Beams then merged to return to the combination switch. Without the allegory, simply put, you may have a smaller current going into each bulb independently of each other, but when they join to return to the combination switch, you now have TWO small currents (making one bigger one) returning at the same time. Make sense now? HTH E
-
Sometimes it's easier to get forgiven AFTERWARDS than to get permission beforehand.... What you do is up to you... E
-
The Red/White wire is the RETURN wire for the HIGH beam circuit. The power TO the lamps is the Red (for the Right) and the Red/Yellow(for the Left). BOTH lamps have their return circuit joined at the front of the car for either beam. (Red/Black for the Low). The original headlights were 45w/55w (if memory serves) which means that the higher wattage circuit (the high) would have required the heavier gauge. FWIW E
-
It's a simple check. Disconnect the vacuum hose, remove the dizzy cap and look at the points plate. Then (sorry about this) suck on the vacuum hose to simulate engine vacuum. The more vacuum you generate, the more the plate should rotate. Then, release your hold on the hose and the plate should counter-rotate SMOOTHLY AND PROMPTLY back to it's zero position. Repeat a couple of times, try to emulate a sudden vacuum to see how well it reacts. Both on the intake and release it should have smooth and prompt response. If it hesitates, or seems sluggish, check the plate. HTH E
-
Don: A "dizzy" is shorthand for a "distributor". On the subject of the dizzy having been swapped for a "newer" electronic one, it is possible and more than likely probable that the replacement came from a boneyard car, which would make the Vacuum Advance Bearing Plate (under the "points" plate) questionable. Both the electronic and points dizzies use that bearing plate to allow the points or sensor to be rotated by the Vacuum Advance Diaphragm. When it goes bad, due to lost ball bearings, or rust, it causes the vacuum advance to operate erratically. One time it will advance properly, but not return to un-advanced normally, other times the other way around. When mine went bad, years ago, it would not let me accelerate properly, it would take slow and careful throttle action to get the car up to higher speeds. Once up to speed (and therefore no or very little advance being required) the car performed normally. FWIW E
-
Excellent pics Dan! Those should almost go into some sort of sticky for future reference. In fact, I'm going to annotate a set of them with information from this thread as well as a few others. E
-
-
I would suggest folks look at it not as what color to "RESTORE" to, but what color is best when REFURBISH-ed or REFRESH-ed? Consider what would sell quickest and what would generate the higher ddollar sale. I say that knowing how many folks take the word "restore"; to them it means to take back to original condition, which would answer the color question. But to address the question in the manner that you meant: car colors tend to follow cycles that I can't cite but they are noted by the car industry. Years ago, burnt orange, copper, root-beer browns would not have been popular, today they abound. At one time pastels were strong, then metallics, and lately, opalescents or "pearls". Z's from their introduction had "odd" colors that did and did not develop their advocates. The original "red" was seen as being "orangish", the "orange" was seen as "reddish", the "gold" was seen as "mustard", and the "yellow" was either too pale or too neon green. In fact, some earlier owners ended up with cars in colors they wouldn't have opted for originally, but that later grew on them and now they love. With all that being said, my personal vote is for a non-stock color that both draws attention and is considered a color "in vogue". FWIW E
-
You can confirm the engine replacement by checking the engine # with the vehicle data tag that is on the strut tower in the engine bay. But from what you've posted, it sounds as though it has been replaced. There was a time there when obtaining a rebuilt 240 engine wasn't available and you had to do with a 260 and then later a 280. It isn't bad unless you were hoping to compete for a gold medallion. E
-
At the risk of being too obvious, has anyone checked with the dealers? There are still numerous parts available for the S30, and I've no doubt for the S130 also. I don't have the part numbers to see, but while the car does go back to the 80's, someone with the FAST system may be able to provide the numbers. Parts reproduction is at a money disadvantage with regards to already produced parts. It isn't until all back-stock and good used parts have been generally exhausted, and only then do owners dig down and pay more for the parts and make reproduction parts feasible. No one wants to invest tons of money to produce parts that cannot be sold for a premium that allows for a quick return on investment. Find the correct part numbers and then check with the likes of Courtesy Nissan, or even your local dealer (with the P/N they'll be more willing to work with you). You may be surprised to find what IS available. FWIW E
-
Look at the underside of the steering column. You'll see a small oval hole right about where the Comb. Sw. mounts. That is the hole for the tab on the switch's body. I don't recall if the small tab / pin is on the Turn Signal side or the Wiper/Light side but it's a definite bump of the same material as the body that is located on the curved part of the body. Don't have the camera handy for a pic, but once you see it you'll not forget it. Align the body half with the tab into the hole and then tighten the 4 screws and everything lines up perfectly. The two stalks should be at the opposite ends of the vertical axis. If you have one or the other higher than the other, then you may have a mismatched pair of T/S & W/HL halves. E PS If I get the camera out this weekend, and nobody beats me to it, I'll see if I can post a pic of the tab and hole.
-
I had a bit of slipage on mine, and one day while working on the turn signals I pushed on the tire and noticed that the whole steering rack shifted slightly. A little investigation showed that the rubber bushings holding/ clamping the steering rack in place had deteriorated and allowed up to 3/4" of play in either direction... for a total of 1.5" AT THE RACK! That explained why the car would wander erratically while holding the steering wheel straight, one time it would be pulling to the right, next time to the left and then other times... straight. R&R the bushings, cleaned and tightened them and the problem went away. Check that before you go disassembling the whole front end. FWIW E
-
Blue, if any of those situations exist, then the wiring has NOT been placed properly. I guess another way of saying it is: If that location screw is difficult or impossible to install, then you've got a problem with the wiring or the location of the switches. In all the Z's I've disassembled and re-assembled, that little set screw has been a very key indicator. The only way the T/S or Wiper/Light stalks can be mounted in too far or at the wrong angle is if you ignore the little set tab that is supposed to insert into the steering column body to position it. In fact, if you ignore that tab, you'll find a LOT of trouble in trying to get the combination switch assemblky to both tighten down AND stay in place. And there is yet another point, if you mix-match the Wiper/Lamp half with a different year T/S side, there have been reports of mis-alignment of one or both stalks. FWIW E
-
With everything having been refurbished, wouldn't you be better off with NEW seals rather than trying to reuse someone else's old? Just a thought... E
-
Blue, you might also mention the one very small screw that aligns the "clamshell" (fancy name for the steering column surround pieces) to the ignition lock. If you look carefully, you'll see that the ignition lock has a small (4-40? or thereabouts?) screw at the bottom of the lock's body. If you use this as a guide, it will position the clamshell bottom half perfectly, and you can then tighten the rest of the clamshell screws. FWIW E
-
Just tell everyone it's still on the rotisserie... They look real good! E
-
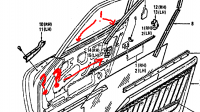
I don't know why they would change the location of the rollers from the 240 to the 260 as there are few differences between the two door styles (aside from interior trim), but the microfiche I have shows the SAME part number pairs for both vehicles. See fiches 6/8 G16 120-3 Item 26 and 7/8 G8 142-2 igtems 14 & 15. E
-
I couldn't find any info on it being superseded, but then again, although the CD microfiche does list the 77/8 model in the model listing, the parts listing only says "From Aug 73". Does anyone else have a parts breakdown for the 77? What about a more recent version of the FAST? FWIW E
-
Probably more of a mis-aligned drawing where the perspective line is easy to misconstrue. I've attached a snapshot of the respective sheet of the club's CD with the locations annotated. While the vehicles arrived from the factory with only ONE, there is provision on the door for TWO. Many users have found that having both rollers greatly reduces window rattle when the window is only partly lowered. The rollers ARE sided. HTH E
-
What I recall from the discussions on the Roadster's gauges is that they require a pulsedd voltage at 8v. That explanation there will probably make more sense to Steve and PSDenno than me, but if I understood it properly, it was reduced voltage (8v) at intervals that allows the gauges (fuel and temp) to check the status of their sensors and therefore "read" the position required. That is, if it had 12v continuously, it would either max out the gauge (like when we short the lead to see if the gauge is working) or simply not register at all. Having had a VR go wanky in my Roadster, I can tell you that both gauges will give you all sorts of weird and inaccurate readings... meaning, totally useless. With that thought in mind, is where I make the possible connection to the contacts in the Z's gauges. I'll send both those guys a PM and ask them to look at this and offer their 2¢ E
-
I think this is where we need folks like SteveJ and PSDenno (and I may have those names completely wrong) but I'm referring to those guys who are actually working in Engineering fields and preferably Electrical Engineering (or at least a good knowledge of electrickery). With the knowledge I've gained from the Roadster, I'm wondering if that contact isn't an attempt at replacing the Voltage Regulator (not the one in the engine bay) that the earlier vehicles required for the Fuel and Temp gauges. Thoughts? E
-
And I must tender an apology to you as well. I "A...ssumed" that you had already checked the light bulb sockets for schmutz. It just goes to show that you should always start at the SIMPLEST method and work your way out. Glad you found the problem and had it resolved. I don't know whether Dave can repair or replace the switch, but it's worth a try. Good luck E
-
I'm going to have to dig into the harness in the garage which might take me a bit. The R/W wire is pretty unique as it only pertains to the High Beam circuit. The only other extension of that wire in the schematic goes to the Speedometer's High Beam Indicator Lamp. E
-
1) You mention that it kills the Flasher fuse (which incidentally covers several of the gauges as well. 2) you have turn signals on one side only This points to a problem (short) inside the switch itself and possibly a mis-connection in the steering column, which your "puff of smoke" doesn't make me feel too good about it. That is a sure indication of a short or a bad connection (things plugged into the wrong circuit that in turn cause a short). Remove the switch and carefully unbend the tangs holding the contacts in place. When you remove the contact board, be careful as there are a couple of small springs inside that toggle a pair of see-saw contacts. Check the condition and placement of all. Clean off any schmutz from the contact surfaces and re-assemble. Then check where the smoke escaped from. FYI, the Turn, Stop, Hazards all get routed through BOTH the T/S and Haz. Switches, and as you've noted there ARE two flasher units involved. As to why you would have had a problem replacing one of them... hard to guess at. FWIW E
-
It's your Hazard Switch that needs refurbishing. E
