


EScanlon
Community Member
-
Joined
-
Last visited
Everything posted by EScanlon
-
You mention that it will accelerate OK in the garage, but not once it's in gear and under load. One item that can escape notice is the Vacuum Advance Plate. This is the sliding disks underneath the Point Plate inside the Distributor that allow the points to be advanced by the vacuum. Simple enough to check if it's working properly. Disconnect the Vacuum Hose that is connected to the Vacuum Pot, remove the Distributor Cap and suck on the hose. You should see the Point Plate rotate and once the vacuum is released, rotate back. First movement should be noticeable and smooth, return movement should spring back easily. The other test to do with the Vacuum Pot is to suck on the hose, and then hold it either with your tongue or a finger. If it is leaking or won't hold a vacuum you'll see the point plate return (make sure you're making a good seal on the hose). FWIW E
-
The wires going to the door switch provide a ground to the circuit they belong to. Period. To check it, just ground the individual connectors going to the door switch. One of them is probably going to the "Door Open" circuit which even the 240 had as part of it's circuitry. The other will be the Dome Light, which also is the Courtesy Light circuit. Typically on the 240, the Driver's Door Switch had 2 wires going to it (per above) and only one on the passenger side. The 280's may differ. The earlier cars had the Courtesy Light Circuit in the wiring, but no lights. (Those are the lights that would have been mounted on the door itself, or you can mount in the kick panel.) The leads are found on the ends of the Dash Harness as it gets closest to the Door Switches. They'll be taped off with Blue Tape. If the Positive lead of either one of those pairs makes contact with the ground, you'll blow the circuit's fuse. You might want to check both pairs. The Door Open Circuit will only cause either a buzzer, a chime, or Bitching Betty to sound. (Depending on your vehicle and if it's connected and if the key is in the Ignition Switch.) Now, I'm referring to the Door Switches at the door jamb, the forwardmost portion of the door opening and not the wiring going to the Dome Light. The wiring going to the Dome Light has a Positive wire (always hot) and a ground connection. One won't cause a problem, while the other will spark and blow the fuse. While making this distinction may seem unnecessary, it's best to err on the side of caution. Wiring meltdowns are nothing but a MAJOR PITA. HTH E
-
Jonathan: By the time you remove the dash, pull out the burnt portion of the wiring harness, unwrap what's left, and try to decipher what wires were melted and therefore now shorting out....you'll have so much more time and energy involved into it than simply finding a replacement harness for the dash. Look at the right hand side of the dash, near where the connectors to the rest of the car are. You should be able to find a label with some numbering on it. Then post those numbers here. Arne did a lot of research on dash harnesses and he should be able to answer questions on what (if any) alternatives you have. Then, with that information, you should be able to locate a replacement quickly enough that will work correctly and not have you second-guessing and making poor connections that may cause even more problems. 2¢ E
-
Graeme; In that same diagram, look towards the top. You'll see an item labeled "Cooler". Trace the wiring that goes there and you'll see that it is what is controlled by the Accessory Relay. (As well as the Rear Window Defog.) The wiring you mention is fed directly from the Ignition Switch BEFORE the Fuse Box AND the Accessory Relay. Now, try reconciling that with later diagrams and you can see why this can be very frustrating. 2¢ E
-
Dylan: You asked for "serious" opinions. Here is mine, without any B.S. padding added to it: You're dreaming. Many of us would admit that if we WISHED for what you've expressed ... we'd be dreaming too. Now, here's a plain unvarnished truth: 200mph+....figure on spending $3000 to $5000 for every 10mph over 80mph. That's between $36,000 and $60,000, and all susceptible to go down the drain the minute something breaks and .... let's not go there yet. While there will be folks who will tell you it's "doable" for less than the low figure ($36,000) understand that those guys will be guys who have years of experience behind them, under them, and all around them. That is, they either know and can do the work themselves, or they know someone that can do it for them inexpensively, or they have friends that can help them do it. The upper figure ($60,000) is based on a very broad GUESS-TIMATE of what it MIGHT cost to have some of this work done by others. I'm only guessing at the numbers myself, but if you're having to save up for an $1800 car, you're looking at saving for every $500 upgrade. Which in turn delays getting things done, which in turn means other expenses creep in. Some of these upgrades you are planning are very time consuming and what's more, put the car down until most of it's completed. Were you planning on driving this car? You won't be able to after a point. Have you got a place to store it? Where it won't be exposed to the elements and doesn't require Mom and Dad to park in the street while your project collects dust in the garage? All of these can be deal breakers. Period. Now, if you're looking for a sharp looking car that will be a BLAST to drive and more than likely can beat many Honda's, then it CAN be done. However, the drifting and drag-racing will create problems....and those problems WILL cost money. I'm not just referring to the broken mechanical parts, I'm also saying don't get caught racing, speeding, or any kind of infraction. Did I mention insurance? The car is classified as a Sports Car by most insurance companies. Are you planning on using Mom and Dad's policy? Have you bounced it off of them as to how much it will cost to insure you...in a SPORTS car? Again, the plain truth is that at 19 and Male.... it's EEK-$pen$ive with a major bullet. Which nut are you planning on giving up? (They don't take legs, nor first borns at your age.) So, sorry for the bucket of cold hard facts. But you did ask for serious opinions. 2¢ E
-
Note that those are for the ZG front end and not the "standard" Z. E
-
ALL methods of paint removal need to be understood as to their values and their shortfalls. Where Soda Blasting has a problem in the residue it leaves behind, regular Sand Blasting or other method has the problem in media being left behind in nooks and crannies as well as possibly warping the metal if too high an air pressure is used. One individual commented on how it can peen the rust crater's edges over and "trap" the rust (encapsulate it). Another mentioned that if the blast stays in one spot too long it can heat up the metal that way. Paint Stripper has it's use as well. However, it too can seep into seams and cracks and come "bubbling" up once the finish paint job is on. D/A sanding has it's advantages in that it can be very mild, but it is very labor intensive. I've also seen where an individual compounded a "washboarding" problem all the way across a panel and caused much more work to be done. My point in bringing the quoted text and the links is to allow others to evaluate for themselves and be informed as to the +/- of the process. E
-
Brooks: Sorry to bear bad news, but if the metal (now rust) that's visible is ANY indication of what is under the remainder of the tar mat that you have yet to remove, as Steve pointed out....those floors are gone. Finish removing the tar mat. Then just go ahead and check into buying a set of floor pans from Charlie Osborne. The passenger side is already showing way too much rust to just patch. Add in that the frame rail below is also gone and you have major problems. Patching is simply out of the question. The driver's side is probably just as bad. The only good side to this is that you came here where many of us have been through that pain and can help you out with the details. E
-
Mark; Just finished my reply and noticed yours. Sorry to disagree, but poorly applied POR is a bad idea. The temp and humidity at this time of year, especially in the Midwest makes it a real crapshoot as to it's performing properly. Then most of it won't adhere properly and what does will make it harder to address in the spring. POR is a great product, and I use it and recommend it often. However, one of it's biggest downfalls is that it does require strict adherence to it's instructions for application. Skimp or try to short-cut them and you'll literally peel it off like a decal. FWIW E
-
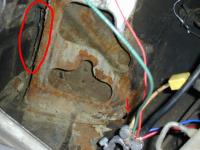
It's definitely do-able. From the one picture you post the two areas I've noted with red are the most concern. The arrow shows a definite hole. The circled area is difficult to ascertain whether that's lifted caulking or something else. Simplest solution for now (due to it being winter in Indiana) is to wire brush it as best as possible to remove all the flaking rust etc. and then apply something to slow the rust down until spring. A simple shot of metal paint (not primer), even a good spray of WD-40 for the time being will help set your mind at ease. The temperature outside right now is not the best for removing fenders, sand blasting, or applying POR or any of the other rust encapsulating methods. Almost without exception they'll require 65°F and higher. Once the temperatures climb, then you can get in there and properly address it with either sand-blasting, some acid, POR, Zero Rust etc. 2¢ E
-
This is from the 311s.org forum. I'm posting what Nissanman posted there and I presume it's the same Nissanman as here: Replying to the following: I followed the links given and there seems to be enough there that this should be posted for anyone considering this as a method of paint removal prior to their paint job. It's hard enough to do a good job without it peeling off the car later. Here's the link to the thread there: http://www.311s.org/phpBB2/viewtopic.php?t=6977 2¢ E
-
Dave: Shouldn't all this "communication" that only serves to "bump" the thread be done via PM's? This post already goes beyond what the non-commercial posting rules state and this "bumping" makes it SPAM. Should we allow the 8gb camera sellers and all the other spammers free access as well? ??? E
-
You might also consider that it is a paint for HARD surfaces and it doesn't mention Vinyl. Many of us have discovered that the SEM brand does quite well without additional topcoating. 2¢ E
-
Chris; Your club name is way too similar to an already established group: http://www.northwestz.org/ By the way, tried to access your site and the page wouldn't load. I'm not a member there, nor am I trying to cause trouble. Just thought you'd want to know. With you being in La Center, you're just a few miles up the road from me. Might be interesting to see what you have to offer. FWIW E
-
In Iowa, Illinois and Michigan I observed many pick-up owners who would put on a snow-plow blade so that they could plow their own driveway and access roads to their farm buildings. Then they'd drive around all winter long with their blades on. The county eventually gets to the gravel roads but the cows / pigs / horses still needed feeding the day after the snow fall. As far as the car in the auction, I queried the guys on 311s.org and one person suggested that he may have "dropped" a 1 in the VIN which would put it in the 67.5 year numbers. That being the case, there are people who would consider that specific model to be slightly more desireable due to the limited numbers of the half-year cars. 2¢ E
-
For your own protection, and not necessarily from the members here, don't post your e-mail address openly as well as your physical address. You're just inviting someone with bad intent to "mess" with you. As far as the offer to buy, it may be legit and it may be bogus. Which is a subject of various threads on the site. As a general rule, all of the following stink like rotten fish: 1) agreeing to pay your price but not knowing what it is you are selling "I am interested in the item you have for sale. I am willing to pay your asking price. Please reply with details and pictures of the item you are selling." 2) Overpaying with a cashier's or certified check that will be mailed to you and asking you to give the excess to an "agent" who will stop by to pick up the car and "ship" it to it's final destination. FWIW E
-
Ah....but don't throw them away. I've not investigated how easy it is to find the older style rubber door bumpers (the one with the aluminum rail) but I do know that the newer style is just taped on. There may be others who would like to replace a piece or two or are just looking for the end bits. 2¢ E
-
Dan: IF you use the heat gun to S-L-O-W-L-Y heat the part up you won't melt it unless you over heat it. The biggest problem is that you need to keep a very careful eye on the plastic and keep the heat gun far enough away that you don't blister (boil) the surface. (You'll usually note that it will begin to shine, but that's almost too late...just take your time.) Sometimes if you use a hair dryer instead of a heat gun you'll get better results and you'll get a good idea of the plastic's "memory" (It's willingness to return to it's original molded shape.) Some plastics (Plexiglass for example) will readily take a heat induced bend and will spring back when re-heated. Others will immediately begin to "shine" and are literally melting in front of your eyes. Try the hair dryer. You'll be able to heat it a bit slower (due to the wattage) and you should readily note if the corners are beginning to spring back. If they do begin to bend back on their own, then continue with the hair dryer. Additional heat and faster won't necessarily help (and in fact may be totally disastrous). If it seems that the corners "want" to return, but that you haven't heated the plastic enough, then do switch to the heat gun but be aware that it is literally a heat TORCH. If you have some UV ray (sun light) damage, it may be impossible to heat the plastic back to shape. UV tends to carbonize plastic and it gets brittle. But I'm wondering what map light you're referring to. Aren't they on opposite sides of the Heater Control Panel? But that aside, if the plastic has literally been "melted" into a new shape and completely lost shape, it might be easier to break off that portion and using simple molding techniques restore the piece. E
-
Randy; It is fixable. Haven't heard a definite date on the article in Nissan Sport. E
-
Pics won't load. Any ideas on how to fix that? E
-
Car is an early 67 from the VIN, but has later style doors (67.5). Dash is also from a 67.5 (3 toggle). Interestingly it also has the cutout for the larger Brake Master Cylinder used in the later cars. $3k would not be a bad price at all for one of these. However, be prepared to spend a bit just getting things perfect. Rust is also a problem with these just like with the Z. Rockers, both Front and Rear ends of the rockers just in front/back of the wheels are notoriously prone and very hard to get to. Floor pans as well. If you think the Z is small and hard to work in, the Sports will REALLY drive you batty. There are numerous items that will leave you wondering "Why?" Stuff such as having to remove either the exhaust or the carbs to be able to remove/replace the starter...or if it hasn't been done already, removing a section of the sheet metal on the body (splash guard). Poor caulking, leading to rust in weird places. But as far as a fun little car... it is. I am only now starting re-assembly and have only finished the paint/buff. There are lots of items that you have to keep in mind before you go on to the next section so as not to remove what you just finished. With luck I'll have it back on the road soon. E
-
Excuse me, but that's not true. Even the earliest Z's had at least ONE fusible link. That one link is from the Starter to the wiring harness. If you blow that one it disconnects the complete electrical system of the car....completely and thoroughly. It's the main connection for the Positive terminal of the battery to the fuse box. Disconnect this and even the clock won't work. Later Z's gained more fusible links as the electrical system grew in complexity with Seat Belt Buzzers and Starter Interlocks etc. Eventually, these were located in a central box on the firewall. With the blurred definition of model changes through the years it is very difficult to ascertain exactly at what number VIN changes were in fact done. Even with the best of records, 30+ years of maintenance and repairs can lead to a very fuzzy definition of what a car should and could have. 2¢ E
-
Not necessarily. A 4 wire Tach is more common on these...except for the LATE year 73's. E
-
This presumes that you can re-wire the ignition system of the car to do away without the "troublesome inductive loop" that is an integral part of the ignition system. While this may have worked for you, this is neither as simple nor an all-encompassing a fix as it sounds. 2¢ E
-
The car starting DOES mean that you have a good connection between the battery and the starter. However, if that were the ONLY reason for discharging the battery, then I wouldn't have mentioned the OTHER grounds. I had a car that KILLED 4 Die-Hard Batteries in a period of about 6-8 months. Since I worked at the mall at the time, I got a lot more leniency than an off the street customer, but even with me they finally sent me to a "specialist". This is after having replaced a voltage regulator and having had the alternator pass each and every one of Sear's tests EACH time they replaced the battery under warranty. The electrical specialist removed ONE screw, sanded down the metal where it was and replaced the screw. Cost me $20 bucks and it fixed the problem. Never replaced a battery in that vehicle again. The problem? No ground to the body chassis. All of the vehicle's electrical components NOT attached to the engine were draining the battery because their load wasn't registering THROUGH the battery but rather through the engine. The regulator just kept the switch to the engine and NOT to the battery. This is simplistic, but it illustrates my point. The problem you are having is that not enough juice is being sent to the battery...OR...you're not producing enough juice. That points to either the Regulator or the Alternator. One of them is NOT functioning ... OR ... is not connected properly. 2¢ E
