EScanlon
Free Member
-
Joined
-
Last visited
Everything posted by EScanlon
-
Here's the original post here by AZCARBUM, who is purportedly the one that originally got burned. Why not PM or e-mail him and find out what the exact spelling should be? http://www.classiczcars.com/forums/showthread.php?p=181577#post181577
-
You might as well start looking for another car for your daughter. Several reasons for this: Your post ALREADY implies that you've fallen in love with the car.....you're not going to give it up. That you're already loving the car, you are going to wince every time she slams the door or the hatch or scratches the tires or....Lord Forbid....scratches the car after you put a fresh paint job on it. (I did mention that you're already in love with the car, didn't I?) She'll notice the attention you give the car and will, as most women do, resent it. She may be your daughter, but she'll think you're going to be watching her every move / use of the car and ..... buy her another car. She'll be happier for it in the long run, and I DID mention that you're already in love with the car didn't I? Welcome to the club, and you can try denying it, but the fact that you looked up this site.....well, I DID MENTION THAT YOU'RE IN LOVE WITH THE CAR...... Enrique
-
You might also look at where it drains to. Check out my gallery for my fix. E
-
The whole debate about deer whistles reminds me of a joke I heard some years back. A visitor to a mental asylum in Minnesota is out walking the grounds with one of the doctors. As they pass a bench, one of the inmates is seen vigorously waving his hands back and forth above his head. The visitor asks the doctor what the inmate is doing, and the doctor replies that he doesn't know but he'll ask. Approaching the inmate, he says, "Excuse me, but what are you doing?" To which the inmate replies vigorously, "I'm scaring rhinoceroses away from here." The visitor, unable to contain himself, exclaims "But there aren't any rhinoceroses for thousands of miles from here!" To which the inmate replies......"See how well it works?" Could this be the story behind the deer whistle? Put it on your car, if you never hit a deer....it worked. If you DO hit a deer, then it was a defective whistle. Kind of like advertising, if the promotion works, you take credit. If the promotion doesn't work....the target audience wasn't receptive. Enrique
-
I'll admit I missed the point. Then again, the manner in which you presented it implied the need to duplicate a process that, for the most part, leaves a lot to be desired as opposed to how to prevent chipping paint. The lack of paint under the cowl panel, the thin layer of primer between panels that doesn't prevent rust, the brush painted black-out paint in front of the radiator support, may have been inexpensive and quick for the factory during production. But for you as an individual taking the time to do it right, you may be taking a short-cut that won't really pay off. While I can understand and even laud the intent of using the pre-assembly technique to avoid chips on panels and having to touch up bolts and other surfaces, I'm wondering if you aren't making a bigger problem out of it. You'll have to mask many areas that might otherwise benefit from a good shot of paint. A partial assembly of some items may be possible, but there are others that simply won't be without really exacerbating your masking headache. Pre-mounting doors, hatch, and hood are all a good idea, expecially if you take the time to mark (scribe) bolt locations. However, leaving the hatch, hood and doors on the car while it gets painted will now require that you mask the seam opening to prevent a dry-line on the inner surfaces. Additionally, when you paint the jambs and other inner surfaces, you'll have to determine what to do with your overspray out or mask the outer surfaces....and invert that mask when you spray the outside. Then again, a good shot of paint on the underside of the fenders, the front support member, and the contact surfaces between panels will do a lot to keep the metal from rusting. That doesn't even include the fact that you'll have to maintain SOME degree of separation between the panels in order to not let the paint bridge the gap and then crack if the body ever does need adjusting or you remove and replace a panel, such as the front valances. But all of these are different TECHNIQUES, and the job at hand will dictate a lot of the conditions for the job. If you're addressing a re-paint in the same color, but not a disassemble/recondition/reassemble process, then you needn't address re-aligning panels.....unless that's a problem before hand. Then again, throw in a complete color change and you need to address the jambs and how to paint them and whether or not you'll be removing doors or other items to complete the color change. Are you just going to mask off the windshield and it's rubber gasket? What about the metal window frames? Door Handles and locks? Emblems? Can you see that the conditions by which you're working aren't the same as those at the factory? So, I'll apologize if you misunderstood MY point, but YOUR technique in painting and your technique in re-assembly are but two different parts of the refreshing process. The technique you mention to avoid having chipped paint is a good technique....but it also has other drawbacks which you should examine. Enrique
-
Are you referring to the Brush Marks in the Black paint on the forward part of the radiator support? Also on the floor area around the seat supports? If your intent is to paint the car, but at the same time try to maintain an air of "it's the "original" paint", then this might be an area you might investigate. I'm not sure if they used a nylon brush or a natural fiber, then again, I'm not sure of the brush width or thickness. I can't figure out any other reason for wanting to duplicate the factory's methods in this respect. The ONLY people that would be able to notice that would be, you and an unsuspecting future owner. This is the first I've ever heard of someone painting "just like the factory did". Tongue firmly in cheek.... E
-
Well...... The "book" (read as FSM), does not call out for any. For the most part you should not NEED any. The gasket seal and the shape of the metal are such that the gasket / window will fit in very neatly into the metal opening and grip the metal flange wel. Mounted properly, (i.e. no kinks or tears in the rubber, and the corners aligned right) on a hatch that hasn't been tweaked out of shape or alignment, you shouldn't have any leaks. But here's one of the areas where, depending on the condition of your hatch, I vary from the book. If the flange had to be worked on due to damage, rust, or simple repair, then I would use a small amount of sealant. But...., this is a judgement call, and it's been years since I used any sealant and I wouldn't feel comfortable recommending one over another. But, as far as characteristics.... -Try to find one that does not need to be exposed to air to cure. It is going to be sealed around the edges. -That stays soft and supple (i.e. has give) after cured. You don't want it to be hard after it cures. It will only cause problems when you're exposed to the sun and the glass expands. (Not to mention the hazzle if you should ever have to remove the glass/seal). -"Liquid" enough to be pushed into the space(s) available by the pressure of the glass/weather, but not so liquid that it runs and drips. I'm sure some of the other members will have some suggestions. The key thing here, is to remember that it is DESIGNED to not need any type of sealant other than the weatherstrip. If the basic integrity of the hatch and rubber have NOT been compromised, then using it is more of an "overkill" situation. Sometimes it's desireable, sometimes it proves to be it's own problem. 2¢ Enrique
-
It is decidedly different. Whether it is to your liking or not, is what modifications are all about. Some please the eye, some punch it. As far as mods go, it's definitely not stock looking, but I wouldn't call it a disaster either. (That's a toss up between the 4x4 260 and the Boom Box Speakers with car mounted underneath) IMO, the side pipes and the whale tail push it past "possibly functional" to "wannabe Vette". The hood and fenders and blacked out chrome actually don't look too bad. But then again, that's in MY opinion. Undoubtedly the owner of that car feels happy and proud. At least it's not in a boneyard. E
-
Stephen; You missed the whale tail and the blacked out chrome...... E
-
Put the rubber seal on the glass first, then carefully install the chrome strips, then mount on to the hatch. When mounting onto the hatch, wrap a rope around the rubber seal, where the hatch flange fits into. Place the glass/seal onto the hatch in the right location. Have a friend give firm but careful support to the glass as you, from the inside, begin to pull on the rope. As you pull on the rope, you'll be pulling the rubber lp to the other side of the metal flange. Work your way around the opening, making sure that you don't cut the rubber, nor allow the curvature of the window to pop the back side out. FWIW E
-
Excellent point Darrel. The rest of us missed it. If there's nothing wrong with the tank, then why go through all the trouble and hazzle in dropping it / and / or replacing it. E
-
Ok, not to be too picky, but this is either a very Freudian Slip, or..... Did you mean: arm? If so, then a healthy scrub with some LAVA soap or Orange GoJo or some other scrubbing type soap SHOULD remove the stuff in a few weeks. A month and a half wait kind of says you are having a very severe and prohibitive water shortage (as in, no showers or hand-washing) or you don't shed skin like the rest and are waiting for molting season. Did you mean: ear? If so, then you're REALLY slapping that POR around the place. Try to duck when the droplets fly! Did you mean: arse? If so.....well, we don't want ANY pictures........ Just Kidding E
-
I recall that the Zhome production figures cited how many AT's in the Series I and II had been produced. IIRC it was in the yearly production figures. I went to Zhome to verify and post the URL, but the production article has been changed. I'll check and see if I printed a copy of it. E
-
One of two possible things to happen to cause what you mention: The window handle has stripped out it's spline but the clip is still holding it in place....replace the handle. But, from what you mention, it's more than likely: The window regulator....the big gear lever inside the door...may have stripped IT'S gear that operates the large lever. Only solution is to replace the whole unit as it's riveted and spot welded together and nearly impossible to separate. Then even if you could separate it, finding that little gear is....fruitless. Open up the door and check everything out. If nothing else it will confirm what you read here. Preventive maintenance for those of you who have your regulator out is to make sure that the grease around the gears and rollers is stll soft and greasy and not rock hard rubber cement from 30+ years ago. When you inspect the gear that the window crank handle attaches to, check for play. A little is to be expected (i.e. you rotate the handle up to one "hour" in each direction before it starts to move the large lever), but excessive play or even a wobble to the rotation is something to check out. 2¢ Enrique
-
The tach with the wiring still attached is a "4 wire" tach. Note the white wire that "LOOPS" around the screw on the right hand side of the case. This white wire has two connections in the connector visible there. These connections are to the Black/White and Green/White wires that go to the coil. It is through these that the tach senses the discharge at the coil. It is these two wires when NOT connected that cause problems with the ignition, and give rise to the myth that the car will not run without the tach IN the circuitry. The other two wires are the ones that provide the power for the tach circuitry. The second tach looks identical to the first but with the wiring removed. 2¢ Enrique
-
Will, make that 3. E
-
Welcome to the club! You'll find much information available to you that's been written by many members going back several years. For that you'll need to use the "Search" feature, there's both simple and advanced. Look in the very center of the blue band just above the chalk drawing of the Z and you'll see it. The Feature is quite advanced and allows you to combine words into phrases or for individual value. Here's the search for "Floor Pan", which yielded 219 posts: http://www.classiczcars.com/forums/search.php?searchid=264600 Here's the search for "Replacing Floor Pan" which yielded only 20: http://www.classiczcars.com/forums/search.php?searchid=264602 Not trying to give you the bum's rush, but trying to help you with the TONS of information we've managed to compile here. If you started reading today, and did nothing but read, you'd still be here in a couple of years. So, don't think of this as a rude brush-off, rather, think of it as a helpful insight into the wealth located here. By the way, Charlie Osborne is where you want to go; his web-site is: http://www.datsunzparts.com/ You can try many things, or even think you can buy them cheaper elsewhere, but you will find that the majority of Z owners will refer you to him right away when it comes to floor pans. In fact, he sells them to the major re-sellers. FWIW Enrique
-
Inside: Go for it. Anywhere....literally. Excellent stuff, that's what I did. Outside...NOPE. POR is EXTREMELY hard once cured. It becomes VERY difficult to sand...not that it cannot be done, just that it is extremely laborious and time consuming. This is where their GOOD properties actually work against you. You CAN use their Tie-Coat primer over the POR to give you a base to accept either paint or additional primer, but to me, the limitations in how you can apply POR (Brush preferred) makes it a major DON'T for exterior panel work. But that's just my 2¢ Enrique
-
You mentioned Lower Calf in a PM (I'm putting it here so that others may benefit also). With that being the area I would first look at the Cowl Drain Tube, and then the Windshield Gasket. The Cowl Drain Tube enters the passenger cabin at a point closest to the kick panel, and just aft of the Fresh Air Vent Valve. That's the funny looking 90° rubber cone at the very front and top of the kick panel. The Drain Tube on the other hand, has the metal sleeve projecting from the Cowl Bucket, to which it connects and then effects it's 90° curve before exiting the cabin out through the kick panel. If that rubber tube is cracked or mis-placed, the cowl will drain onto your feet. (Same thing on the passenger side.) If it's the Windshield Gasket, that may be a bit more involved. First off, it's going to be hard to determine exactly WHERE it's leaking. It could be leaking at one corner and traveling several inches before it drips. So look and examine carefully to determine if it is indeed the windshield gasket. I'm not a fan of just lifting the edge and squishing silicone into the space between body and gasket as I think it causes more problems later than it's worth. I would remove the dash, in order to remove the windshield AND gasket without tearing/breaking either one. If you happen to have a new gasket, simply cut out the old and remove the windshield. Then look for rust and other signs of the water having broached the seal. Address whatever rust damage is there and also look at whether it was a bad gasket fit or a bad gasket or.... and fix that. These are the main ones for a leak in that area. Let us know what you find. Enrique
-
You need to be more specific on "water drips on my leg on the driver side". Is it only in the lower calf area? Is it in the knee area? Ankles? That would help bring the area down to a generalized area. Possible problems: Whale Tail weatherstrip rubber is too hard and not making proper seal with the door frame. Could also be that the door isn't adjusted in the opening properly and the water gets past it. Door Weatherstrip could be mounted incorrectly and not making pressure. Windshield Weatherstrip gasket mounted incorrectly and / or torn / cracked allowing leak past windshield frame. Cowl Drain Tube could be cracked and / or missing. Cowl Bucket could be rusted through. Fresh Air Vent plenum could be holed. FWIW Enrique
-
Out of curiousity, how did you effect the search. When I did it, it limits to the last 500 posts. E
-
In case the search does get bogged down; here's the link to the best of the Dry Ice articles. http://www.classiczcars.com/forums/showthread.php?t=16546 Enrique
-
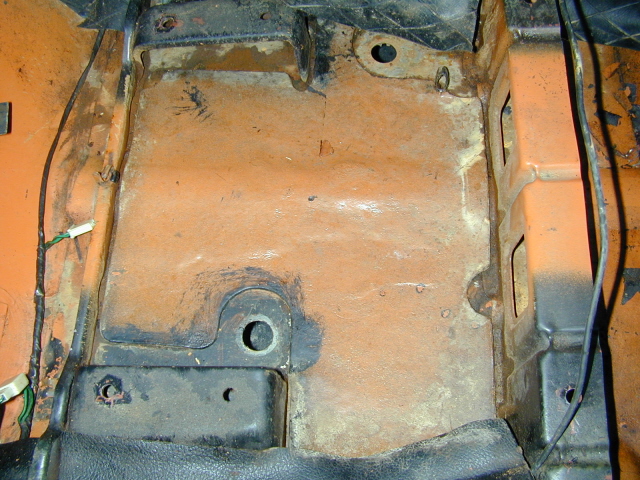
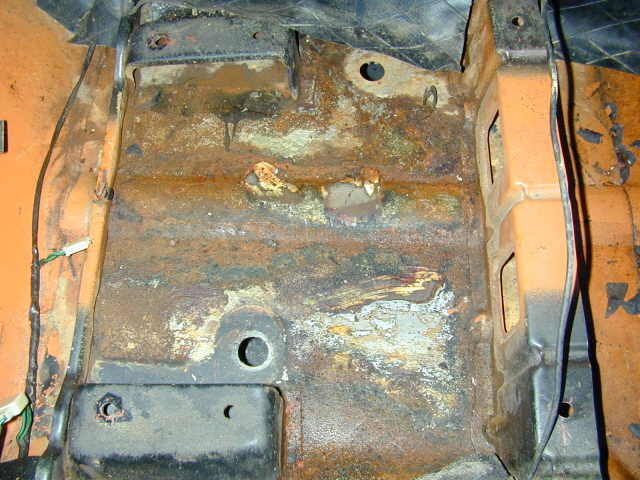
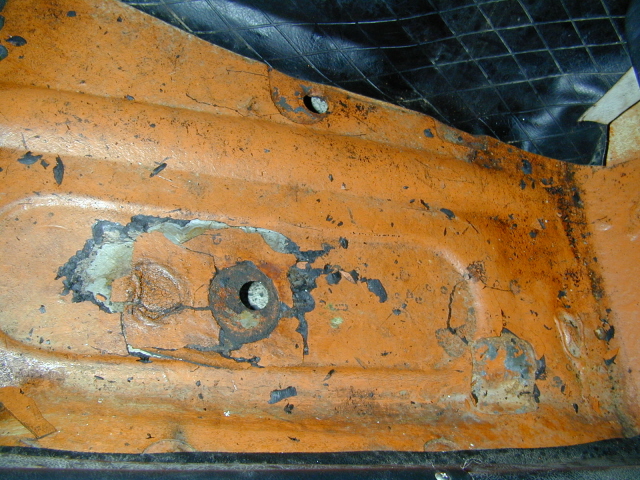
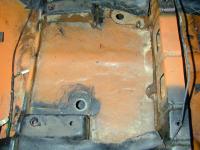
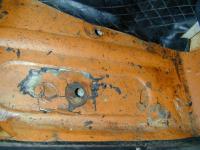
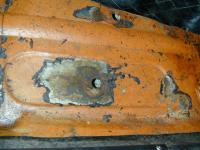
Here's a link to a search with "Dry Ice" as the terms used. Hopefully it doesn't bomb out on you: http://www.classiczcars.com/forums/search.php?searchid=260504 If it does, just key "Search" above and type in Dry Ice. That's one of the EASIEST and QUICKEST ways of removing that Tar Paper that's attached to the floor panel. That answers the "HUH?" part. However, you won't know if in fact you have "YAY!" until AFTER you remove the tar paper. Unfortunately, there have been countless instances where the Tar Paper looked great....but the metal below did NOT. Here's a couple of pictures to illustrate what I mean. The Left Most is the area below the Passenger Seat...didn't look TOO bad. There was some rust to be expected (look at the forward side edge) but as you can see from picture number two.....YIKES! Then look at picture number 3...."OH NO! More of the same?" Then take a look at number 4...."OH! Not as bad as I thought it would be". All of that damage you see, is quite easily repaired. It's when you start seeing holes that you have problems.... Hope I didn't burst your Yay bubble too hard. Enrique

-
I think my first question about 9545T1 is whether it's water-proof once it dries...otherwise with the first spill of anything that has water (coffee, soda, ...) you're looking at a gooey mess. Otherwise it sounds ok, but I've no experience with it, either industrially or with cars. Sorry couldn't be more help. Enrique
-
You might post the number of the item in question. There are several items on that page. I used Q-Pads by Evercoat which are an asphalt based sheet with adhesive over the POR I painted on the metal. A friend used Brown Bread, another Dynamat. Different products, basically same function, dampen the harmonic vibration of the sheet metal, which reduces the sound transmitted through the metal. FWIW E