2ManyZs
Free Member
-
Joined
-
Last visited
Everything posted by 2ManyZs
-
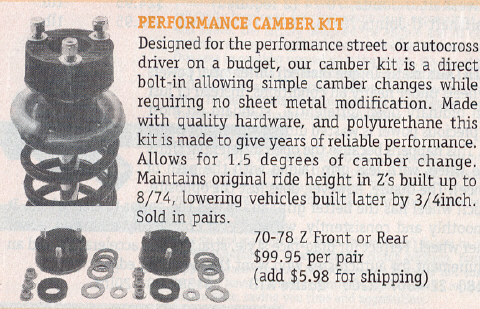
Besides the camber bushings you can also get a kit from MSA and possibly Ground Control that gives you a camber adjustment at the top of the strut without slotting the mounting holes. It is a block of urethane that is slotted that takes the place of the strut insulator on the top, as Rick states, that is what prevents much movement at the top of the strut if you just slot the mounting holes. I used the set-up on the rear of the IT car I had along with the adjustable bushings in the rear. I purchased it from Ground Control, and it looks to be the same set-up that MSA is now selling. 100 dollars(US) a pair for these and they will give about 1.5 degrees adjustment. For another 200(US) you can get the adjustable lower bushings and that should give you another 1.5 degrees or so. Here's a pic of the set-up from their catalog, so you get the idea of how easy it is to use. The next thing that would be the hold up for more adjustment would be the springs with this set-up, the spring would hit the inside of the strut tower.
-
Compression on number 4 is 0? Eek, that isn't good. :sick: Sounds like number 4 is more than likely the cause of most if not all the problems then. Hard to say what it might be until you get the head off, but I'd say that a pressure test on the radiator isn't going to do much good. You might have a cracked head after all or a holed piston. If it were a head gasket blown you should at least find a little compression on the cylinder. Even a cracked head should some compression, it just wouldn't hold compression but for a very short time. I guess pulling the head would be your next step to find out how bad it is....:disappoin
-
There is also the slight possibility that the water could be getting in through the carbs if the car still has the flat top carbs with the water still connected to the carbs. The late carbs had water going through the carbs and the intake, so that is another possibility, albeit a very slim one. I have never heard of anyone having water enter through the carbs/intake but it is another place to look. If the smoking stopped after the engine warmed up, it could be the carbs as the thermostat would have closed on the intake and carbs (if it is still in working order that is) and that could explain the smoke stopping after the engine reached operating temp. It would be a one in a thousand chance that this could be the problem, but a possible one just the same if the car sat outside with no antifreeze in it and it got near freezing..... course it all depends on what area the car came from....
-
The only way to check the block at home would be to completely strip down the engine. You can buy a kit from someone like Eastwood's to check for cracks in the block. I find it kind of odd that the smoke quit after driving it for a while, usually it will still have a bit of smoke or vapor out the exhaust if the headgasket is leaking or the head is cracked/warped. Before you start taking it apart I would do a pressure check on the radiator, just to make sure you do have a leak that requires immediate attention. You might also do a compression test if you have the tester available. After you do the pressure check on the radiator, and it does lose a lot of pressure, pull the plugs and turn the engine over. You might be able to see which cylinder the water is gettting into and then you will have a good idea of where to check the head and/or head gasket when you do remove the head. This way you will know which cylinder is giving you the problem and if the head checks out OK and the gasket doesn't look to be blown, you will know where to look in the block for any problems. Don't know how well your toolbox is stocked, but most any decent shop could do the pressure test and compression test for a small charge. This could save you from a lot of head scratching later when you start taking the engine apart..
-
Z Kid, that's what I was wondering about. Since we only got the 260 for one year and you guys had them till 78, I was wondering when yours converted over to the Fuel Injection. The first year for our FI cars was 75 with the 280, I was thinking your 260's converted to FI in 75 also, or were all the 260's equipped with carbs? Our "carbed" 260's didn't have the fusible links like this so that was what had me confused.....
-
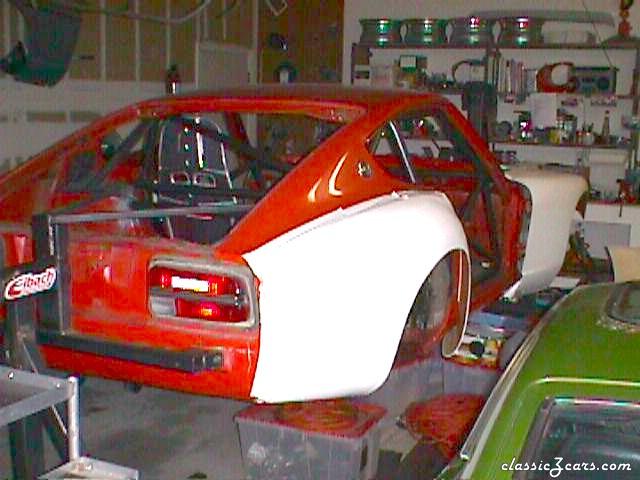 Nice cage work. This going to be a BSP car? Or a road racer? Like the rotisserie too!
 -
Guess the first thing would be to put her up on jackstands and drain the gas tank, blow out the lines and change the fuel filter. While you are doing that, you can replace any of the rubber fuel lines that look a bit dry-rotted in the engine compartment. Then after that, you could go with a full brake inspection, replacing the rubber lines if they are cracked, then on the each wheel one at a time. Once you have replaced and/or inspected the brakes, then it would be on to any other engine related things that need to be checked/done before you try to drive it. Such as a good flush of the radiator and block, changing the oil and filter, new plugs etc.... The tires would be the last thing on the list, not much sense in spending the money on them if the car isn't ready to drive.... I wouldn't worry about any surface rust on the outside of the body until you are ready to take it all back apart for a re-paint or repair. While you are on your back under the car whild it is safely on jackstands, take the time to look over the underside carefully for any hidden rust pockets or any spots which may need attention soon. Make a list of things you want to do, and just cross them off one at a time, that way you don't forget anything and have to take something apart after you have put it together.... For instance, don't put the wheels back on until you have checked to make sure you have no leaks in the rear brake cylinders after you service the brakes and bleed them. Saves a lot of time and aggravation.....
-
That's the one! Remember, if the price gets too high, you can always get one at Sears that will work just as well.....
-
Nigel, The only reason I questioned the original induction system is that I have not seen the fusible links mounted on the inner fender like that except in FI cars. I know my 75 280 with FI and a/c had the same set-up as yours, just don't remember seeing the fusible links located there on even the late 260's here. I'm thinking that the car might have had FI and has been converted to carbs. In which case, they might not even be needed at all as I think they were for something in the FI system....... Have to do some more research on the microfiche since I no longer have my 75 service manual...
-
Great site Nigel! I especially liked the Today's date in History idea. After seeing the fireworks on the news tonight, doubt you guys will have to worry about crime for a while "down under", you should have a shortage of gunpowder for a while!:cheeky:
-
In fact, the more I think about your problem, I'm almost convinced it is all in the distributor. This would explain why you are having to set the timing at double what is normal to get the car to run right in the first place. And if it is the advance plate hanging up, it is possible that it came loose when it revved up and is now where it should be....I guess we should have thought about this one a little sooner:stupid:
-
Never had one "magically" cure itself, yet.... Now that this has happened I am wondering if the problem may rest solely in your distributor. It is possible the small bearings in the distributor plate and/or the plastic cage that holds them is bad and it is hanging up the advance plate and this is causing most if not all of your problem. I think if you do a search, you will find a post by EScanlon that describes the distributor cure. Easier still would be to take a look at this link for the distributor problem.. http://www.geocities.com/zgarage2001/probs.html
-
Perhaps one of his parents might have been a non-sterile Pyrex test tube...... :devious:
-
Sorry, the shroud for the 280 radiator is larger than the one for the 240. The 280 radiator is a couple inches taller and a bit wider than the 240 rad. The mounting holes on the 280 shroud will be nearly at the outside edge of the 240 radiator. You might be able to fab up some flat pieces of aluminum or steel scraps to mount it up, but then you will need to make sure you have it centered over the fan correctly. It won't be exactly "pretty" but it could be made to work if you can't find a 240 shroud, which are kinda hard to find.
-
Well, I can't remember the exact name of the two switches in the yellow box, but they are for the A/C system. The other two are your fusible links for the engine harness. They should have a cover over them though or did you remove it? Did this car have FI at one time and has been converted to carbs?
-
Here's a scarier thought, they can vote for someone who could have something like this hiding in their garage!:dead: In which case........."Beam me up Scotty, there's no intelligent life down here!":alien:
-
If you are using urethane bushings the outer sleeve is not really needed at all. In fact, the one time I did this, I was planning on leaving the sleeve in the mustache bar as it is a PITA to get it out. The urethane bushings I had would not fit inside the sleeve so out came the air chisel and after much cussing, the sleeve was out. One item you can do though, before you put the new bushing in is to spot weld the mustache bar end. It is merely rolled into a cylinder but it is not welded and it will have a bit of give to it. If you really try you can actually open the end of it to let out the outer sleeve. If you are planning on any racing with the car you ought to at least spot weld it in a couple spots to keep the bushing in place securely. If it is just a street car, it isn't necessary to weld the end, but you can if you want to to give yourself peace of mind. One other thing, be sure to lube the new bushing before you install it, lube it with a heavier type grease such as wheel bearing grease inside and out to prevent any squeeks in the future.
-
Positive proof of what I have been hinting at isn't it? Someone, somewhere has definately been "peeing in the gene pool":tapemouth :devious: :stupid:
-
George, the Dremel might work best if you only use it in the little "nooks and crannies" where a larger wheel won't go. Yeah Daniel, I have seen your car, and if you post those pics everyone can see it too! :cross-eye It's a toss up as to whether or not to clear coat it, a lot would depend on the coating you use. Where Daniel uses a "wadding" polish to touch it up, with a coating it might only need soap and water. Guess it's up to what you really want and if you can find a coating that will take the heat and chemicals such as gas and oil without discoloring.....that's the reason I suggested the mag wheel clear coat, it should be a bit more resistant to the elements and to chemicals since it is designed to stand up againt the brake dust etc. Some clear coats will yellow over time (at least the cheap ones do) so it's a judgement call...... BTW, I used to use a product called Quator(sp?), which is a wadding with the polish such as the Mother's is, and it works fantastic although it takes a lot of "elbow grease" to remove. I used a little tacum powder or even regular flour on a rag and it came off a lot easier......
-
It is possible to weld up a new mount, you could just remove the rubber and replace it with a block of steel and weld the two sections together. As far as replacing the rubber, it would be difficult to get the kind of bond that the stock rubber to metal has.' You could also have one made from a block of aluminum, such as what the front diff mount available from Motorsport Auto is. I'm basically lazy, and used one of their solid diff mounts with good results on a car I used to race.
-
I would try a clear coating such as you find for polished aluminum wheels to keep them from tarnishing. You should be able to find them fairly easily, Eastwoods here in the US has a couple of products in aerosol cans for coating polished aluminum. If you go through all the work to get a great shine, you ought to try to protect it. Even heat and the atmosphere will dull the finish over time.
-
You won't realize much if any benefit by changing the cam to the L-24 version as the cams from the L-24, L-26 and L-28 were very similar. You might be better in the long run to go with a performance grind cam that will give you the low end power you are looking for. Perhaps part of your lack of acceleration is due to the automatic, your torque converter may be slipping, or your trans bands may be worn and slipping. I think I would explore the transmission possibilities before you go tearing into the engine as the stock cams were all designed for a wider torque range than most specialty cams would be. Actually, most of the L series are a bit weak in the lower rpm's, but that is due to the smaller displacement and the lower torque of the engine itself. Most all the cars seem kinda weak until you hit 2500 rpm's or so. But, like sjcurtis said, the rear end ratio, tire and wheel package and your induction/ignition system can make a huge difference as well..
-
I get the feeling he is partial to red and yellow Z cars....
-
So Jeremiah, what did Santa bring you? Wasn't like this one was it?

-
Is there any car that hasn't been shamed? Bad enough to do an El Camino or something like that, but do Z cars and seriously collectible cars have to be put through this? This truly isn't funny, except for the fact the person who did it should be in a "funny farm"!!! Perhaps where he was kept didn't have enough padding on the walls? http://cgi.ebay.com/ebaymotors/ws/eBayISAPI.dll?ViewItem&item=1875856359&category=6409