2ManyZs
Free Member
-
Joined
-
Last visited
Everything posted by 2ManyZs
-
Alarm system.... or a coil wired to the body....:devious: Glad you got it back in one piece... guess they must have read my post 6 minutes before you posted its return. Hmm, be a good time to post this old Clifford alarm system for sale that I found in my closet a couple weeks ago huh??:devious:
-
Like mperdau said, a lot of people selling parts don't bother or care to shop around for the best prices on shipping or the quickest shipper either. I just sent a box of parts to Atlanta from here, took 2 days Priority Mail for under 5 bucks. Yet, I bought something on Ebay in Kansas that is costing me 5.75 shipping by UPS and it still isn't here(shipped the 27th) even though the tracking says it should deliver today. The parts I bought could have gone into a padded envelope and gone by USPS Priority Mail and been here in no more than 3 days. I only use UPS when the package is too large for USPS... If I remember correctly, USPS has a deal with FedEX to deliver their time critical shipments.....
-
Let's hope it can be recovered intact, or with a little body damage. Better that than finding it piece by piece on Ebay.... FWIW, the thieves ought to recieve a full frontal lobotomy, prefereably with a "scalpel" of no less than 9MM.....:devious:
-
Uh, er, well Enrique... If you think about it, that bolts threads into a captured nut that is on the inside of the inner rocker... so how could you put any lube on it ,that is until the outer rocker suddenly opens up like a rotten can of tuna fish.......All the other bolts were finger tight:ermm: Yeah, this one sat outside for years before I got it... looks like it's a goner.:disappoin I think the last time it was registered was 91 or 92 and I didn't get it till 98:ermm:
-
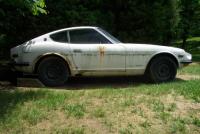
Forgot the pic...:stupid:
-
Car looks a lot better from a distance of 250ft or more... Right Ken? The only thing keeping the car from folding up in the middle is the transmission tunnel and the roof. The floors and frame rails are gone, as well as the frame rails inside the engine compartment (someone tried to weld on C channel to keep the swaybar from falling off, it didn't work), inner hatch is rusted through etc, etc, etc..... Sadly this one is too far gone to fix.. gonna end up in pieces this summer.
-
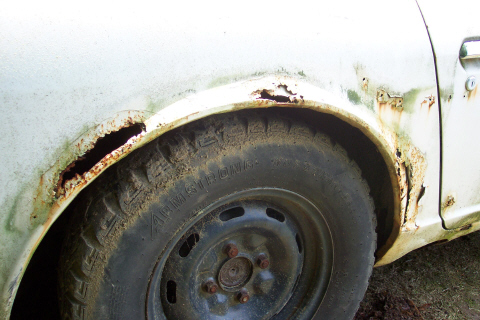
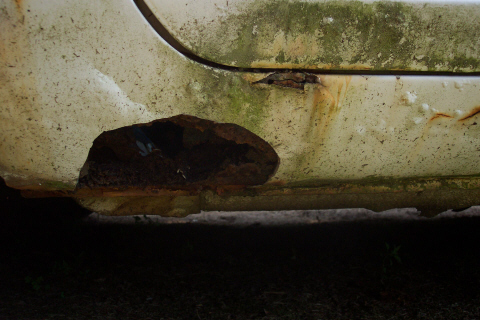
Shot of passengers side quarter panel, inner and outer are completely rusted through...

-
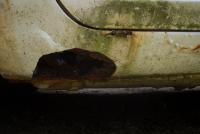
Here's a shot of what the same area looks like from the outside... With a little digging, I could probably take the whole lower door jamb out with just a screwdriver or putty knife.
-
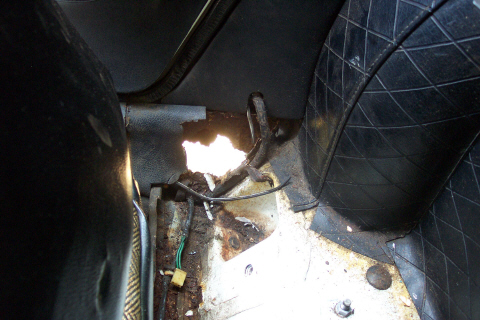
I was trying to remove the bolt for the passengers seat belt and this is what happened.. removed more than I expected... Rust has gone through both the inner and outer rockers, and has gone up the door jamb.

-
It's also rust in one of the worst possible places on the roof:disappoin
-
I can't stand to go back and look... P.T. Barnum said, "There's a sucker born every minute." Today it's more like one every second....:stupid: :stupid: :stupid:
-
Mostly a buyer beware:disappoin If the lumps are near a body seam of the chassis, outer trim on the vinyl roof, or if there are any cracks(or a lot of heat checking) in the vinyl, you can be pretty sure it's rust. Situation could be not so bad, or not too good...but you'd have to strip the vinyl off to find out for sure.
-
Hmm, sounds like it has more problems than just the obvious ones... I got to laughing too much and couldn't wait long enough for all the pics to load... after I saw the ball on the back bumper I couldn't help rolling on the floor.... ROFL :stupid:
-
Well, 240zx gets the chocolate cigar..... that looks so silly it stands out like a wart would on JLo's derriere..
-
Well, he does do a good job of hyping a car that isn't in the greatest shape, that's for sure. I went back and looked at the pics a little better the second time, bondo cracks in the hood, rust showing through inside the hatch, wonder how much else has been painted over... The absolute funniest thing, is the trailer hitch ball in the back bumper.. and it isn't even in the center....:stupid: :stupid: :stupid: But you are still missing the one that stands out like a sore thumb....:devious:
-
Let's see how many of you can pick up on the obvious problem with this car, not only what is wrong, but where did it come from??? http://cgi.ebay.com/ebaymotors/ws/eBayISAPI.dll?ViewItem&item=2417219841&category=6187
-
As far as I know the 70-73's are all the same, while the 74-78 are a little different. MSA used to offer rebuilt racks for about 350 and you had to turn in the old ones for a core.
-
The early A model trans has what is commonly called a "monkey motion" linkage. It is not as good as the later linkage which was part of the transmission case. You can still get the solid aluminum bushings for the early A model, but it still won't be quite as slick as the later B model. Not only are that, but there are a couple pins that could possibly need replacing as well, they are held in place by "C" clips if I remember right, similar to how the later stick is held in place. You might be able to do some work there that will get rid of a little more play.
-
PB Blaster is a pretty good penetrating oil. Be careful you don't end up snapping the J-bolt off as well as messing up the strap, they aren't too easy to find either... I soaked mine with PB for a day or two before I tried to get mine off. You will need a fair bit of play to get the strap out of the rear "T" mount, so every little bit you can loosen the nut will help, so if you get a little more slack each day, that will help. If you get real close, I guess you could always bend the J-bolt bracket back towards the tank just a bit if you need just a little bit more slack in the strap to get it loose.
-
No, "we" are saying two in the rear makes little sense. One on either end is fine if you choose the sizes correctly and don't overdo it and get bars that are too big on the front or rear as it will adversely affect the handling.
-
If they use some sort of acid to get the garbage out, yes, I'd put some type of sealer in it as the acid is going to etch the metal and take off any type of sealer that might have been there in the first place. It's going to rust much faster if it is etched with an acid than it would if they just steam cleaned it. If you are going through all the trouble to remove the tank and have it cleaned, it's probably best to seal it with one of the selaers on the market, you should never have to worry about it again and you'll have piece of mind that this is one think that won't cause problems down the road. No sense it taking the tank out a second time if it does cause problems with surface rust after you have it cleaned.....
-
I usually look at what new or reproduction parts are going for and base my prices on that to some extent. The harder the part is to find, the higher the new price is going to be, and the used parts are worth just a little more than the run-of-the-mill easily found parts. Gives me an idea what the "market" will bear.... I normally don't ask much more than 1/2 what the new price is, unless it's something that is really tough to find new.
-
I've never seen new straps advertised, so your only solution might be finding a set of used ones..... The padding can be replaced with a plain piece of rubber. Buy that at the local hardware store and cut it to fit.
-
First thing I would do is to put the front up on jackstands and while someone is turning the wheel back and forth see it there are any strange noises. Also, check your tie rod ends for any looseness, ball joints for play and look at the steering rack itself and see if it is moving in the bushings. Look to see if there are two grease fitting in the steering rack housing, one on each side in the front of the housing. If you see a plug with a slot for a screwdriver, take those out and put a grease fitting in there and place a small amount of grease in the rack. Another often overlooked item is the bearing in the top of the strut itself. It is sandwiched between the coil spring seat and the top hat that mounts to the inner fender. These can over time collect a lot of dirt, water and rust. All you would need to do is to pull the top of strut assembly apart and thoroughly clean and re-pack the bearing with grease. Also, you'll find a bushing in the steering shaft below and in front of the brake master cylinder, check to see if there is play in that after you put the wheels back on the ground. It could be a combination of a lot of small things, or just one problem that is in dire need of attention. I wouldn't drive it too much until you find the problem, as it could be something serious enough to cause an accident if it were a bad ball joint or tie rod end. If you don't find any mechanical problems, it could also be something as simple as the toe out is not set correctly, but this would show up as uneven tire wear which you didn't point out....
-
MSA has a kit but you'd be just as well off to go and get a short piece of exhaust tubing and get a cone shaped filter that fits it and do it yourself. That's basically all the kit is is a short piece of tubing with a cone shaped K&N filter. Just have to find the right size tubing to fit into the rubber elbow in front of the AFM and go from there. http://www.zcarparts.com/store/merchant.mvc?Screen=CTGY&Store_Code=TZS&Category_Code=PFFC12