
DannDZ
Free Member
-
Joined
-
Last visited
Everything posted by DannDZ
-
That's really it. Looking at an inexpensive set of wheels to add to my collection. Will a wheel and tire combination of this size fit? Thanks!
-
Good thought, it could produce a mark like this. But, I did not transport it with a cover. I do wish I could determine the cause, but I don't expect that I'll be able to figure it out. The detailer did offer to hand correct it to the extent possible for not cost. I have no doubts about their integrety.
-
Just wanted to close this thread. While exactly what happened is unclear, after talking with the detailer it is apparent that they DID NOT damage the vehicle. I'm checking other potential sources of the blemish. I want to call out Hagerty Insurance. I did contact them and they were very helpful. They suggested that I first work through the detailer, much as many of you on the forum. But, had the detailer and I come to an impasse, Hagerty may have been able to provide some services in the area of assessing the damage. I'm not suggesting a claim, just that they seem to have a good support structure for the enthusiast community.
-
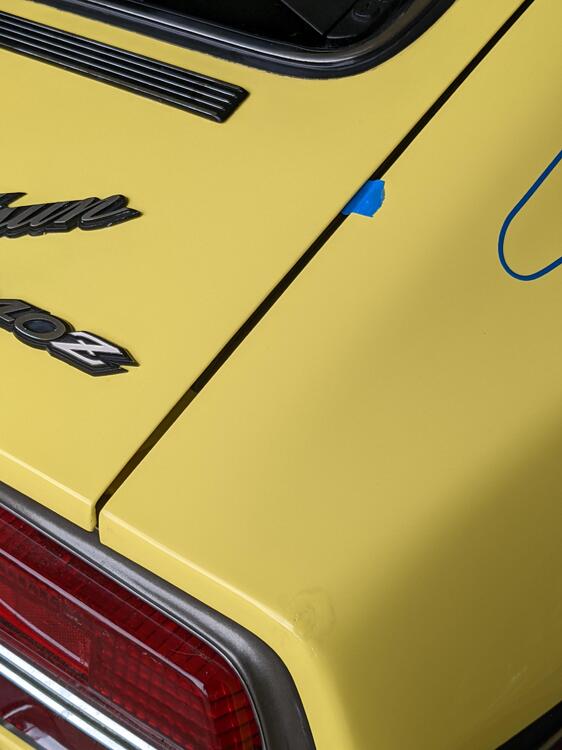
@mailnome detailed before pictures. It is SS over SS with a very light dusting of primer in between. I don't know what's going at the bottom. A mess. Maybe a dealer or dock fix before it was first purchased? I'm the second owner, purchased in 1975 and painted around 1980. @Patcon A major disservice indeed! It is single stage, so clean repair is probably not possible. I'll get an estimate, if I can find someone to give me one, and then talk with the shop to see what we can work out.
-
I'll see what I get for an estimate. The full panel includes both rear quarter panels as well as the roof. I do plan to put it up for sale, which makes this mistake's timing very bad. I'll go in and have a talk with them next week.
-
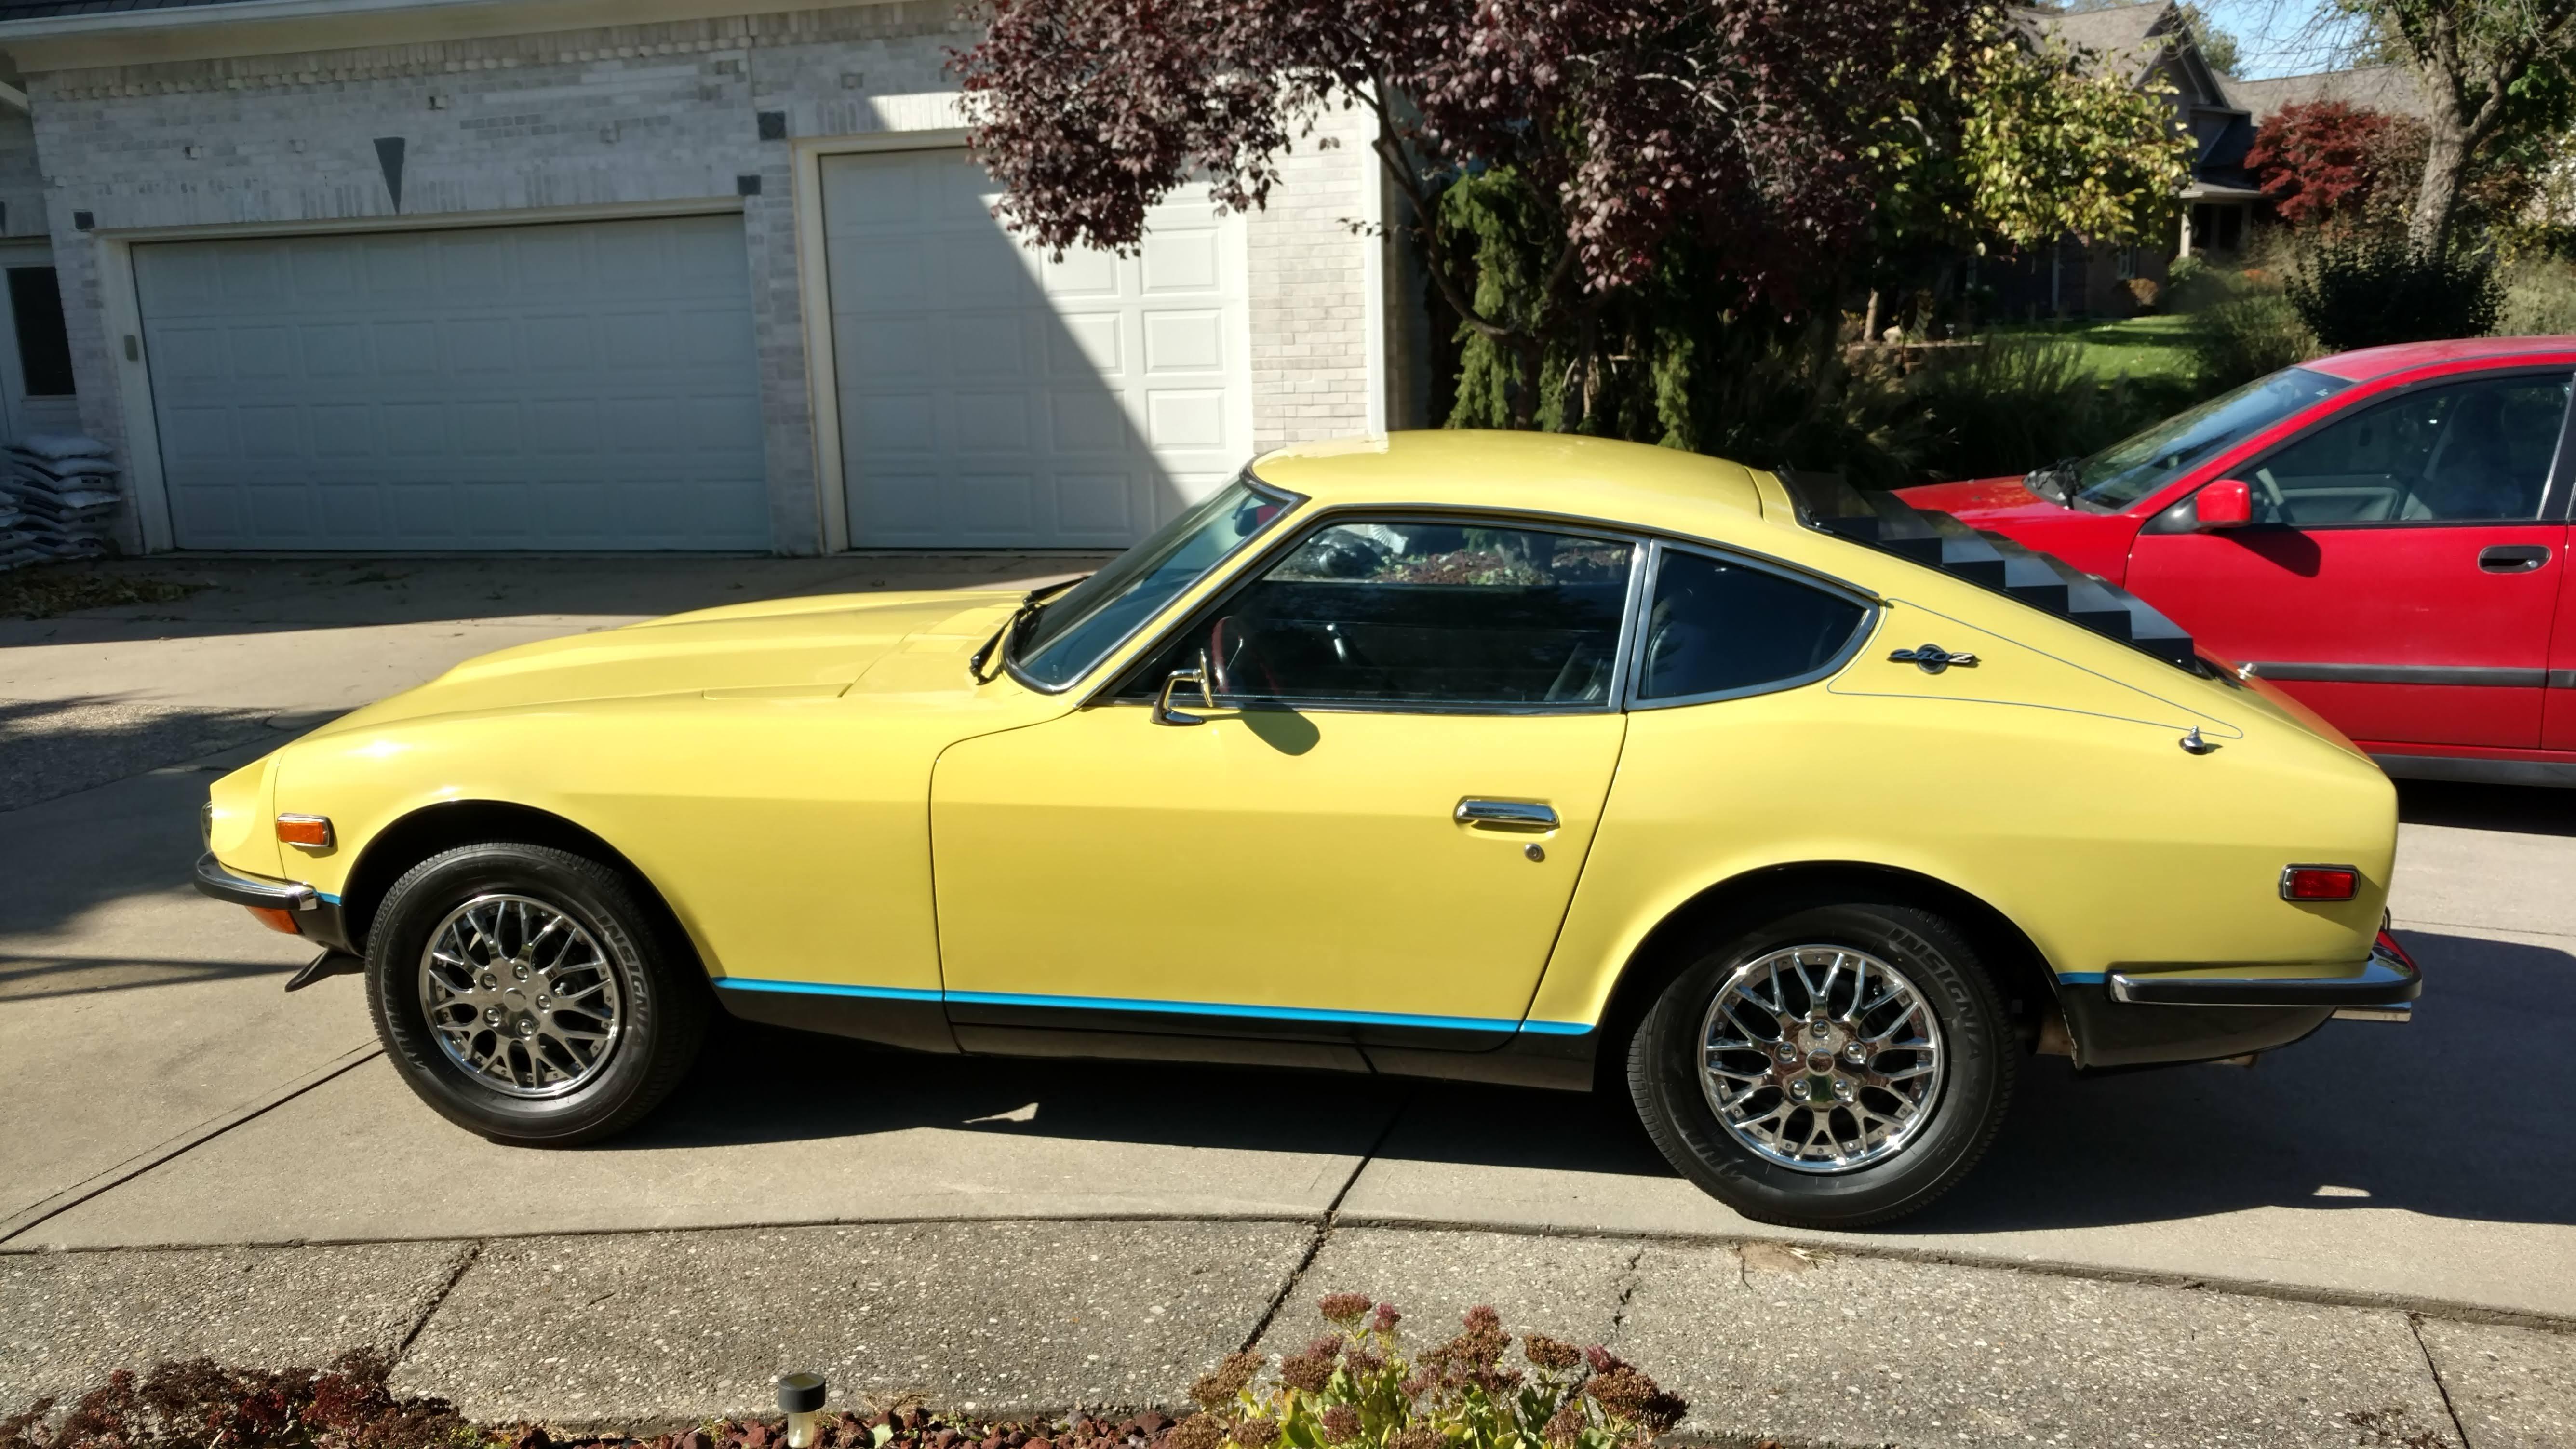
Photos-001 (1).zipPhotos-001 (1).zipPhotos-001 (1).zipPhotos-001 (1).zipPhotos-001 (1).zipI am working with a detailer who proposed a paint restoration job on my 1971 240-Z. It was last painting in the late 70s and they did demonstrate that they could improve the finish of the paint. However, after I got home I notice that they had also burned through the rear passenger side quarter panel where it meets that hatch. That compound curve is through the repaint and down at least t the original. That piece of metal includes the roof as well as the left and right quarter panels. I don't know how to approach this. I am prepping for sale and this just put a MAJOR hit on value of the car. Any suggestions on next steps? What's reasonable to expect? Thanks

-
Unmolested. As in it's been stored since it was purchased? Not restored?
-
Note the "Friction Modified" line on the label. Very important. Honestly, not sure. But it's what I put in my very early transmission based on information from this site. People were recommending it. Limited experience, but it seems to work well.
-
This is what I am using. Note the "Friction Modified" line on the label. Very important.
-
@dmuzial, Glad you are able to get back to work on it. It's great that the Chicago winter doesn't stop the work. Kind of a silly question, but did you glue and screw your stands together? My buddy and I are discussing if we want to make wooden wheel crates for next years work or to just rely on jack stands at the four jack points. A bit off-topic, but I'd like to hear from anyone following this thread.
-
@dmuzial I don't see much activity on this thread, so I thought I'd ask where you are in your project. Are you planning? Are you able to work through the winter?
-
I've spent about 10 minutes looking for where I can update my sig, but no luck. Can you tell me where to make the update? Thanks.
-
Very true. The screw that holds the arm rest to the door has actually "pulled" the metal into a slight cone shape, preventing the piece from laying flat against the door. I'm playing with an extra one that I have to try to figure out how to fix it. It's hard to work on metal with no real backing. I am currently trying to pound it flat using a socket as a base. I think it may work. I will also need some spray foam to fill in what I have removed. I'd love to hear from anyone who has successfully restored arm wrests from early Zs.
-
Sorry. Realized that I wasn't clear. It's an early 71. It is the "door arm rest" that is having the problem. They are basically foam filled vinyl with a small embedded metal plate that accepts the screw from the door panel. If I'm not careful, one of these days I'm going to give it a tug and it will be separated from the door.
-
My driver's side door handle is pulling loose from the door. The metal plate embedded in the handle and used to connect it to the door panel is starting to pull away from body of the vinyl handle. Does anyone know how to repair this problem? I have some handles that I can practice on, but I don't know how I should approach it. -Dann
-
That's how I took it. In fact, I have two new gaskets on the way. I'll install them next year. I took the car out for a 20-mile ride this afternoon. While it still needs tuning, I am very pleased that with all the help from the community I was able to rebuild them and get the car running again! I've never been good with carbs. I hope to have a detail show clean the undercarriage next week and then it is ready to be put in the CarCapsule for the winter. I'd like to keep it out longer, but I'm having some surgery on Nov. 6 and I won't be driving the Z for a few months. Thanks for your help.
-
I think you are right. However, I don't have ready access to a gasket between the insulator and the engine, so I am not trying to change them now as I am getting ready to store it for the winter.
-
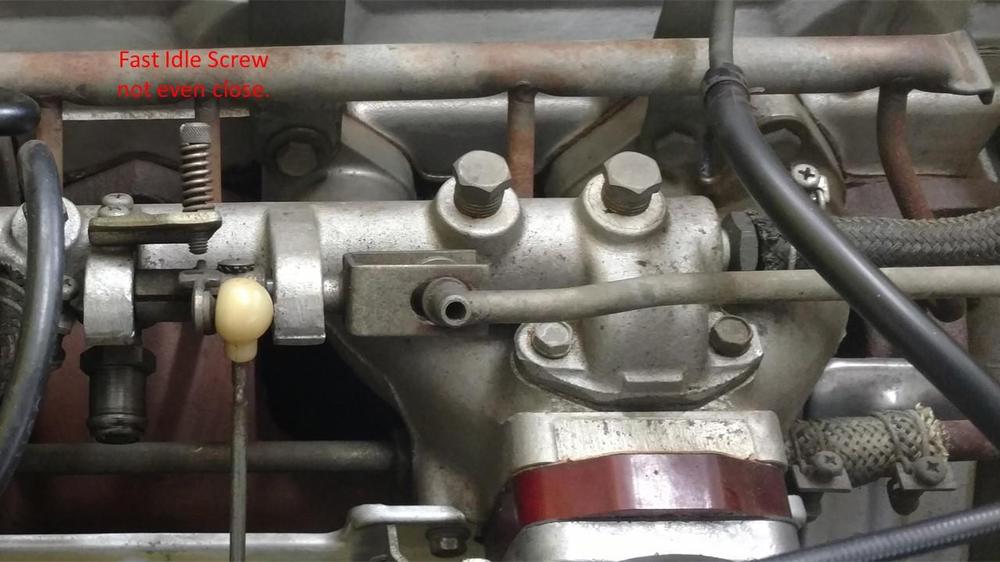
I went out to the car and checked. You are exactly right! All the comments are helpful, but this is (I think) the root cause. The rest is tuning.
-
Yes, while I wasn't bothered by it, I was idling at at 3,000 RPM. Not a problem on a well-worn engine. Thanks to all. Lot's of information to process. I do wish someone had produced a manual with this information. I guess I should not have forgotten how it was put together in the first place!
-
@CanTechZ @siteunseen I just uploaded a 1:17 video of the areas of concern. Don't know if will bring more suggestions to mind, but it will probably help. Please forgive the sound, just off of my phone and I am squeaking against a fender protector!
-
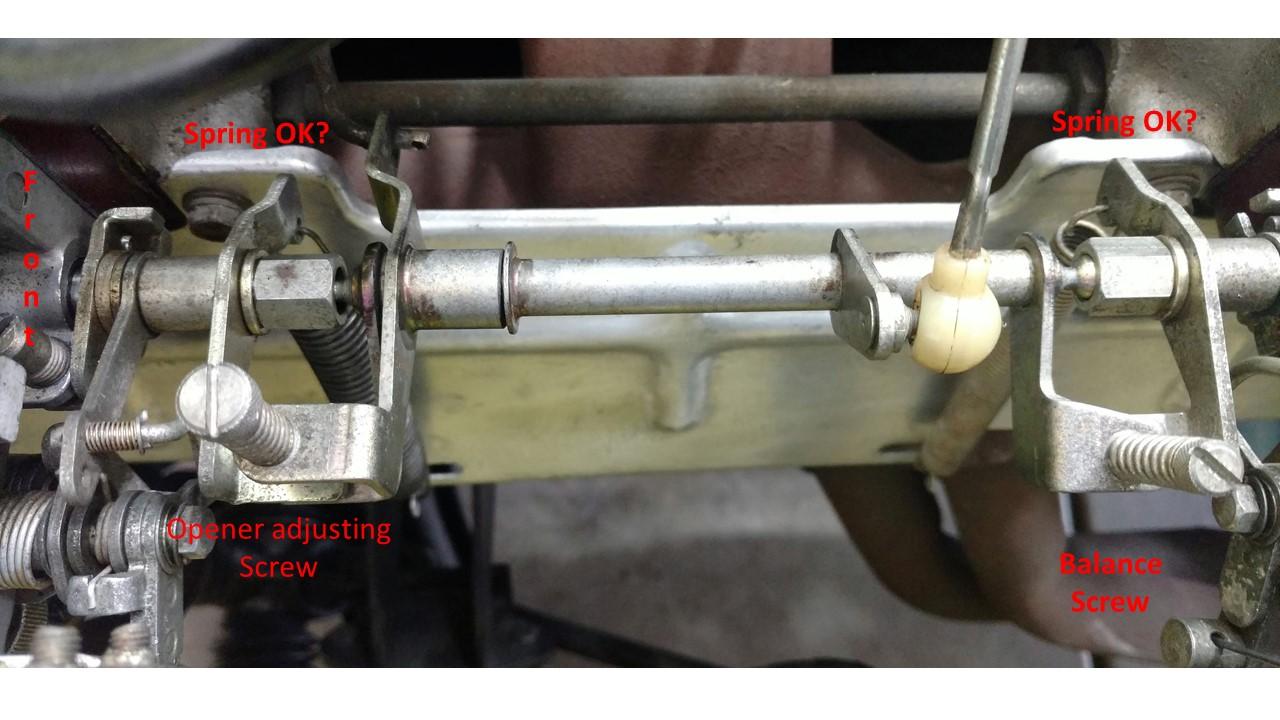
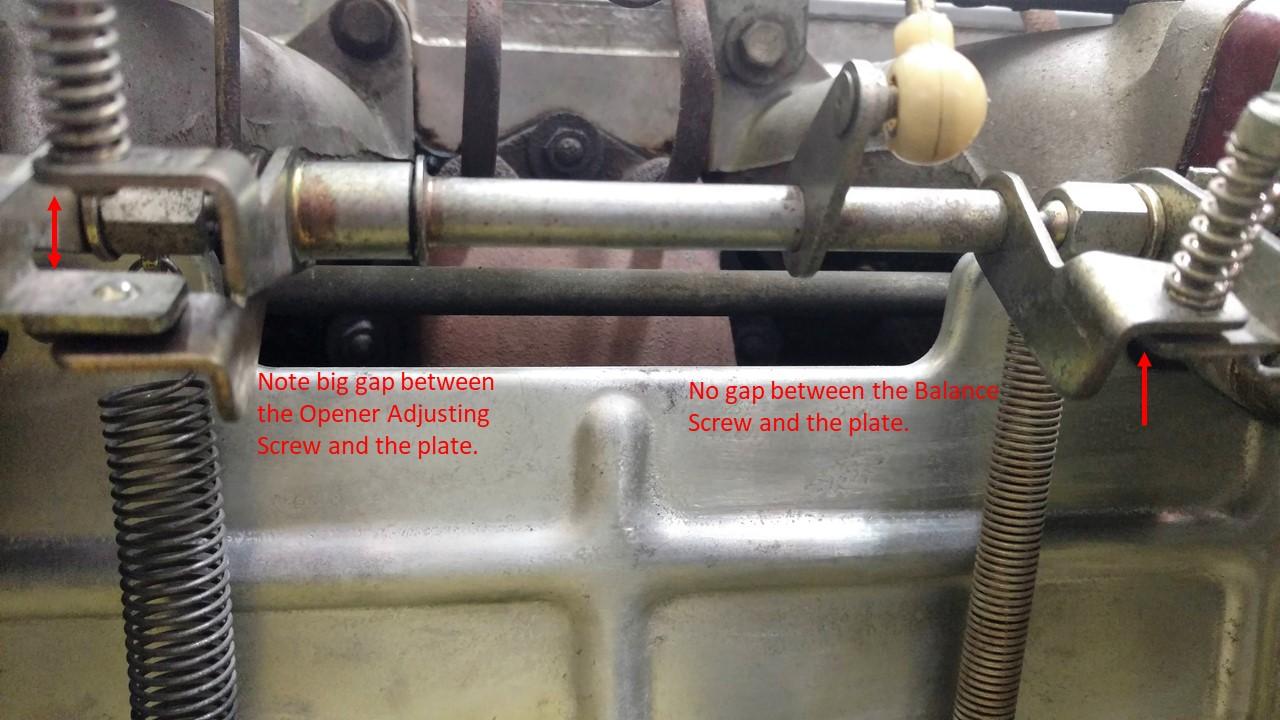
@CanTechZ I thought I'd start by showing you the things that I don't believe are right. You might be able to just tell me what I did wrong or you may have to post some pictures of your own. Thanks again.


-
A few pictures of the area between the carbs would be very helpful. In particular how the pieces that connect from the throttle mechanism that remains on the car and the linkage between the carbs is what I am looking for.
-
This looks helpful. I should be able to step through it and get some good ideas. My challenge is connecting the parts that stayed on the car with those that were removed with the carbs, that is the linkage between the two carbs. BTW, you have a great looking Z. The video will be a good reference for detailing my own engine compartment.
-
I've rebuilt my carbs and am now reinstalling the pair on my '71. I should have taken better pictures! I am having difficulty properly installing all the the linkages. This thread has some good diagrams and even better pictures. But they are for the 510. I have the Factory Service Manual, I've search a number of forums but have not seen a picture or exploded diagram that will allow me to ensure that it is reassembled correctly. Can someone point me in the right direction? Thanks
-
Both carbs are rebuilt and back on the car. It took a bit to get the fuel supply, but it fired up nicely. Of course, much tuning still needed. You are right about the needle jet lengths. I found that someone had replaced the rear jet with the long jet! The one that came in the Walker kit were right. They were the shorter version and I now have them in both lids. After a lot of discussion help and trying options, I have to say that the Walker 15566 is the correct carb rebuild kit for my early Z. The gaskets fit and the jets are the right length. I tested three fuel lines. 1) Braided fuel lines were a failure. Too large and inflexible. 2) The set of ZTherapy lines were supple and easy to install. 3) The kit's fuel lines were only slightly stiffer than those from ZTherapy. I recommend that you give them a try.