Arne
Member
-
Joined
-
Last visited
Everything posted by Arne
-
 I guess it depends on your motivation. Are you after appearance, or improved lighting? I've been using E-code lights (mostly H4) exclusively, in every vehicle I've owned since 1976. In the 7" round size the Zs use, I have personal experience with Marchal, Cibié (pre-Z-Beam, Z-beam and BOBI), Bosch, Hella, Carello, Lucas, Wipac, Stanley and now Neolite. While the Marchal and Cibié were both quite good, all of the best I've ever used (in any size/shape) have been Hella. Good range, and most even, shadow-free pattern. So if improved lighting is the goal, I recommend Hella. On the other hand, while I am always after lighting improvements, for some cars I factor appearance in as well. The Wipac Quadoptics mentioned above are British, but have a convex lens as opposed to the flat lens of the Lucas lights. To me, the Wipacs looked much more appropriate than the Lucas on my restored early MGB. Similarly, when I removed the Koito sealed beams from the red 240Z for safe-keeping, I wanted a convex lens that was as inconspicuous as possible, and was willing to accept lesser quality lights to achieve that look. I ended up with some really affordable lights made in India (Neolite). The light output is good, but not great. But they are much less obvious than Hellas would be.
 -
Yes, although the lens pattern is not at all optimized for H4 bulbs. The attached screenshot is from Daniel Stern Lighting.

-
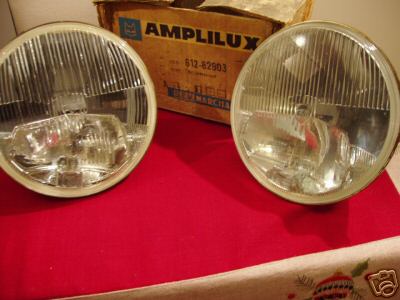
What I'd really like to find is a nice pair of Marchal Amplilux headlights. Each lamp used a pair of H1 bulbs, one for low beam and one for high beam. Each bulb had a separate reflector. Since the H4 bulb was not introduced until 1971, Ampliluxes were the high performance choice for 7" headlights for early Zs. I'd love to have a pair.

-
Not tri-bars, those are easy to find. We are talking about headlights with lenses that dish inwards, not outwards. Much tougher to find.I appreciate Her Majesty's kudos, Chris. I try hard to be useful.
-
Not an Enkei, but it is a Gotti-replica. My memory tells me that it was probably made by Ultra Wheel in So. Cal. in the mid '80s. American Racing may have made them in the '80's as well.
-
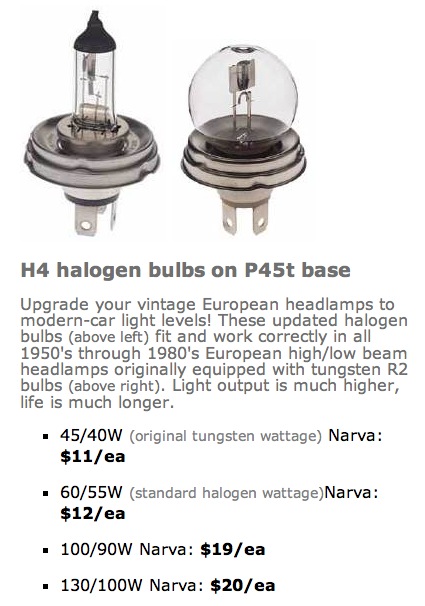
I know what you are talking about, I've seen them now and then in the past. But those are old, vintage tungsten bulb headlights, not halogens. I'm pretty certain they've been out of production for years, but there may be a few sitting on shelves somewhere. They are going to be hard to find, and likely expensive. (And frankly, the light output won't be very good either.) To hunt them down, you'll need to look for places that cater to owners of vintage '50-60s European cars, as that's what they were originally designed for.
-
The 240Z fenders will work fine. The holes to mount the emblems may be slightly different. The marker lights you now have will fit fine. But I suspect that the rust you see in the fender itself is not the end of the issue. There is almost certainly matching rust in the rocker panel extension behind the fender. Replacing the fenders alone is only going to hide the main problem, not fix it.
-
Depending on the year and condition, a stock 2.8 will give 20-25 more HP than a stock 2.4, and will have considerably more torque. If you are going to stay with carbs, it's pretty much bolt in job using all the L24 exterior parts. The only catch would be if the L28 you will be using is '77 or newer with round exhaust ports. If so, you'll need to get a round-port header, or use the L28 exhaust manifold, neither of which will mate up with your current exhaust. Is it worth it? Only you can decide if 20 HP is worth the work. I personally have found that a good running L24 is quite acceptable for normal street driving, but many others will disagree.
-
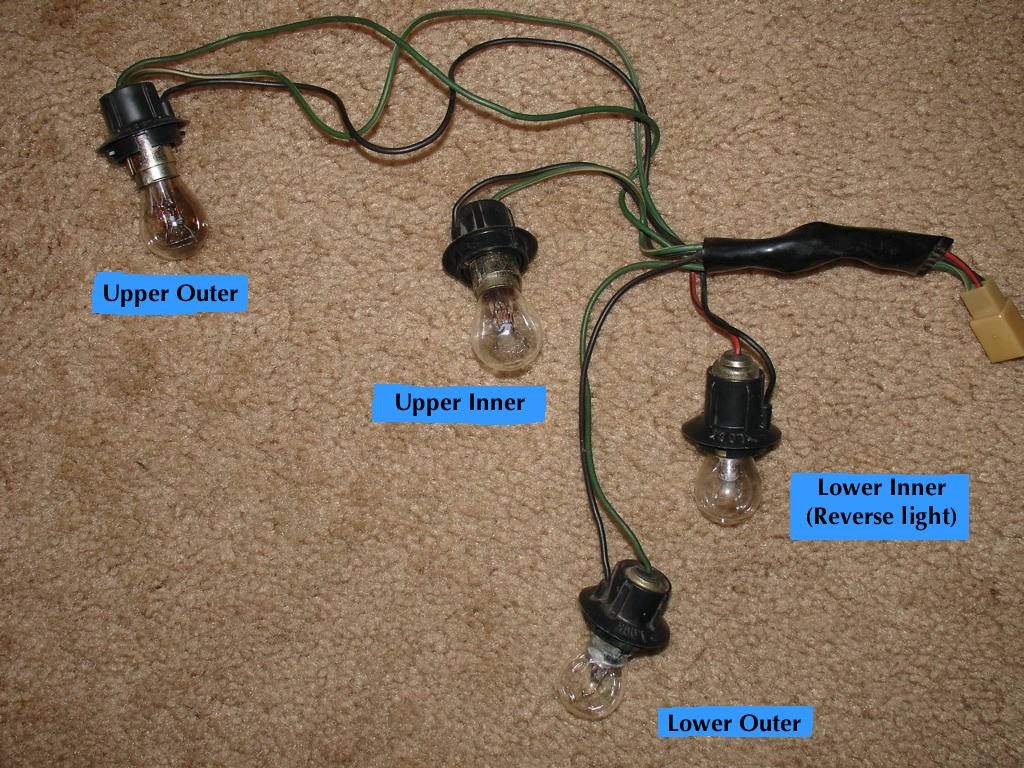
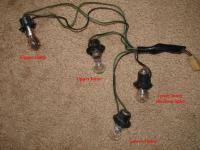
Man, I'm sorry people! The red captions seemed like a good idea at the time, but they're darned hard to read now. Try this one instead.

-
The tach looks like an aftermarket unit fairly well fitted into the stock housing to me.
-
All 240Zs came with 175-14 standard. either SR or HR depending on the production date. That size pre-dates the current sizing conventions, and most closely equates to 175/80-14 in today's terminology. The following 14" sizes are within a couple percent of stock height: 185/75-14 195/70-14 (stock size on 280Z, and what I have on my red 240Z) 205/65-14 (rare size these days) 225/60-14 (only a couple choices) Another issue is wheel width. 240Zs came with 4.5" wide wheels until '73, when they went to 5" wide. For best handling and wear, you really don't want to go wider than 185 on the 4.5" wheels. For 5" wheels you can use anything up to 205 wide, although 195 is better. For 5.5" aftermarket wheels 175-205 width are fine. For 6" use 185-205 widths, and 6.5" should be good with 195-225 widths. For 7" or wider, use 205-245 widths.
-
Stephen's on the right track. I attached a picture of the left taillight harness from a 4/71 240Z (same one used from 1/71 until the lights changed for the 260Z).Note that all bulbs have a black ground wire. The upper outer bulb is the only one with two hot leads - plain green for brake/turn sig, and green/white for tail. The lower outer has a single green for brake/turn, and the upper inner has a single green/white for tail only. But here's the interesting part. While the upper inner has only one hot lead, the socket is still the same as the other upper one, and the bulb IS a dual filament bulb, even though only the dim filament is used. So Stephen's post from the fiche is correct, though the fiche could be misleading if you don't look at the rest of the wiring. My Series 1 car (10/70) has the same bulbs, but the upper inner has an additional plain green lead for brake/turn and so uses both filaments. The early taillight harness has a 4 pin connector with full-size blades. The later cars use a 4 pin connector with mini-blades instead.
-
Victor, I'm also pretty certain that American Racing didn't make true Libres wider than 5.5", but I seem to recall seeing the same style from other manufacturers in the 7" wide. Not common, but I suspect there may still be a few out there.
-
I believe that the only 14" size was 5.5" wide. They work on Zs quite fine, assuming you are OK with moderately narrow rubber.
-
First, remember that those specs are assuming stock height tires. If your tires are shorter than stock, your measurements will be shorter as well.Tokico springs are reputed to lower the car about an inch, even when used with gas shocks. With new US-spec springs from Courtesy and KYB GR2 strut inserts I would expect the ride height to be 1/2" to 3/4" higher than stock due to the increased spring-rate effect of the gas shocks.
-
Wouldn't be a bad idea at all to replace the springs, and yes, now is the time to do it.Courtesy Nissan sells both repro stock US-spec springs, and also repro Nissan Euro Stage 1 springs. Thing is, both will raise your ride height if used with gas shocks, and the Euro will raise it even if you use non-gas (hydraulic) shocks. The thread below will tell you more than you want to know about ride height: http://classiczcars.com/forums/showthread.php?t=21115 FWIW, I plan to use NOS Mulholland non-gas shocks with slightly cut Euro springs in my red car.
-
I just changed the rear springs in my yellow 240Z yesterday. I did not remove the housings from the car. I have done the rears on Zs this way many times in my prior career. Loosen - but do not remove - the three nuts at the top of the strut tower, and also the center shaft nut.Jack up the car and support on jackstands. Remove wheel.Disconnect and plug the brake hose at the chassis end. Unbolt the halfshaft, disconnect the parking brake cable. If you have one, disconnect the rear sway bar.Now remove the three upper strut tower nuts. Pry the strut down and out of the strut tower, then down a bit farther and pivot it outside the wheel opening. Be careful not to scratch the fender lip when you bring it out.Now the strut is out in the open. Compress the spring, remove the center shaft nut, disassemble the spring and upper spring seat. You can now un-do the gland nut and replace the strut insert.Reassembly is the reverse. Be sure to orient the three upper studs correctly before getting the strut back into the tower, and again, be careful about the fender lip. Fronts are easier, because removing the housing from the car is a simple bolt-in job. Loosen - but do not remove - the three nuts at the top of the strut tower, and also the center shaft nut.Jack up the car and support on jackstands. Remove wheel.Disconnect and plug the brake hose at the strut end.Unbolt and remove the brake caliper. (Not required, but makes the strut housing lighter and easier to handle.)Remove the two bolts going up from the bottom that attach the strut housing to the steering knuckle.Using a pry bar, dislodge the steering knuckle from the housing by prying the knuckle and control arm downwards. Once free, remove the three upper nuts and pull the housing from the car.As with the rear, reassembly is the reverse. Granted, I have done this process more times than I can count. But doing it this way, with hand tools only (no air tools), I can do all four in a day, easily. I swapped the rear springs in the yellow car yesterday in 2 to 2 1/2 hours. The biggest part of that time in a spring swap is compressing, then un-compressing the old springs, and then compressing and uncompressing the replacement springs as well. Takes a while with hand tools, but otherwise no sweat.
-
About $10 at Harbor Freight.
-
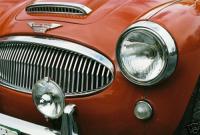
Car #1 is correct for US and Canadian Series 1 (1970 production) cars, car #2 is correct for all other 240Zs in the US and Canada. I have one of each car and can confirm this. I strongly suspect car #3 has a pair of bad bulbs in position 1. (Cars for the rest of the world were different, obviously.) Here are links to a couple of pictures that show this. Series 1 (Note vents in hatch) - http://classiczcars.com/forums/attachment.php?attachmentid=14692&d=1161633558 Later Z (in this case a '73, but I can confirm my late '71 is the same as this one) - http://classiczcars.com/forums/attachment.php?attachmentid=14712&d=1161635105 I know I've seen a copy of the factory document to dealers that pointed out all the differences starting in 1/71 in which this was listed, but can't find that right now.
-
Ah, Series 1 keys. I have a pair of those for my yellow car. I suspect the ignition lock, tumblers and keys for the Series 1 are far more durable than the later two-sided keys, as my ignition key is also original and not worn. The ignition lock in my yellow car doesn't let the key come out unless it is off, either.
-
A good shot of the carbs from the air cleaner side, with the air cleaner removed. Showing as much of the bottom of the carbs as possible.
-
On round-tops, there really isn't any adjustment to speak of on the choke system. Either the nozzles move with the cables or they don't. I sure wish I could see them. Any chance you could post pictures?
-
Not the whole bumper, just the over-riders are upside down.
-
If they are round-tops (with separate float bowls mounted on the sides of the carbs), the choke system is very simple. When you pull the lever, the fuel nozzle in the bottom of the carb should move downwards, which richens the mixture. So the first thing to test is to have someone move the choke lever while you watch the nozzles in the bottom of the carbs. Make sure that they move down when the choke lever is pulled, and also that they go back up when the lever is released. For reference, the nozzle is just to the right of the vice-grips in the picture from ZTherapy linked below. http://ztherapy.com/images/JapCarbPage_Pix/GasTubeDissassHelp.JPG
-
Welcome, Don. A RHD Z is a cool thing to have, but not so great to use in the US as a general driver. Not being able to see around traffic gets old after a while. But if you don't buy it, you might want to share it's location in case others here on this board want to consider it.