Arne
Free Member
-
Joined
-
Last visited
Everything posted by Arne
-
 It's obviously injected, but it would help if we knew more about your car - like the year, engine, any mods, etc.
 -
There are two screws at the very back of the console, and one in the coin tray. It is also held down in the front by the top screw for the fusebox, and the screw for the lighter bracket. The lower screw for the fusebox must be loosened as well, as the fusebox pigtails are normally routed over the console mounting bracket. Once you have the console and choke assembly out of the car, it will be easy to see how to replace the cable.
-
Well, in that case I'd lean toward a defective or improperly wired gauge. Since it blows the fuse when you rev it, I'd probably start with the tach. The only other likely candidate is the ammeter, but I don't think it is wired in such a way that it could blow the fuse. None of the other gauges fluctuate directly with the revs.
-
I guess now we have an idea what his reserve must have been last time. But by this time, he should be getting an idea of what people might be willing to spend for it.
-
Fuel pressure? Just a thought, because stalling is far more often caused by fuel than ignition.
-
Got any pictures of your rims? I can better advise if I know exactly what you have.
-
Same finish as used on the early Fuchs Porsche 911 mags. The spokes and lips of those were clear anodized as well.
-
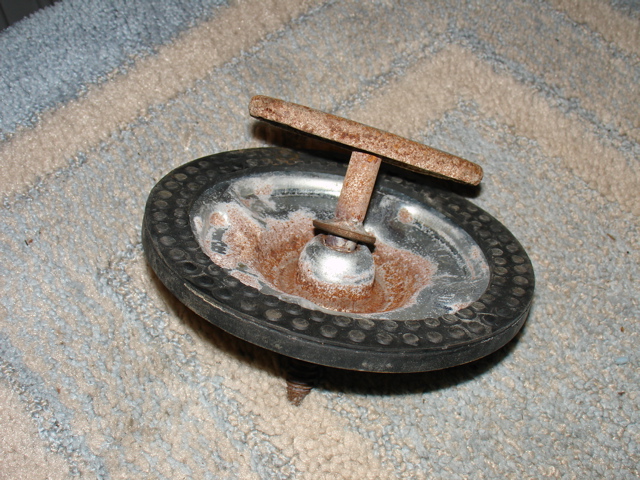
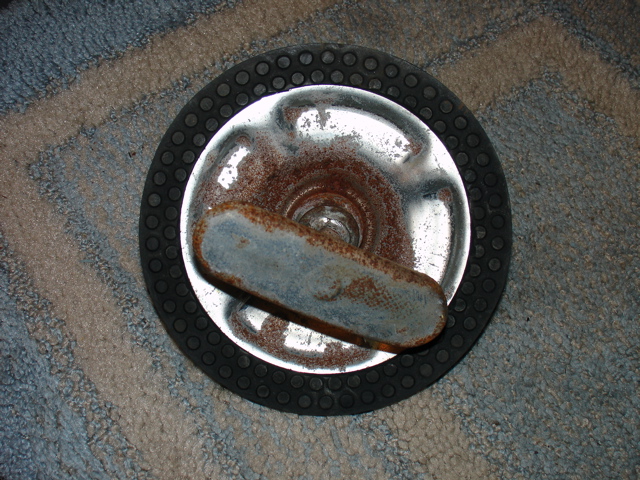
I strongly suspect mine is original, so I went out to the car and grabbed it for pictures. A bit of surface rust on it (no surprise), but seems to be intact and proper. Then again, I don't know for sure because my car has a 5.5" wide slot mag in the spare well, and so my fiberboard won't sit flush because of the rim. Gotta find a cheap steel wheel for my spare some day.
-
If they are Enkei 92's (which is what they appear to be), and if the finish is still original, the outer rim would have been rolled, then polished, and then clear anodized. There should not have been any clear coat on them at all. The lips should have a moderately polished finish, but not quite as shiny as a normal polished aluminum rim. If you de-wax the centers, you should be able to paint right over the gold finish. I'd probably scuff it with a scotchbright pad first, but that's all.
-
 Cool! Who drove to Mitty from Oregon? Did they drive it, or trailer it?
 -
I'll second the pedal height thing. I just finished my auto to 4 speed swap. Installed the pedals the weekend before the actual swap, and adjusted the pedal height right then, before anything other than the pedals and master cylinder were in the car. For a series 1 car like mine, the FSM states the face of the pedal should be 8" (+ or - a touch) from the floor.
-
For the factory injection you'd not only have to notch the ports, but you'd have to drill and tap new manifold stud holes. I don't know if it would be worth it.
-
Those Enkeis would not have had a clear coat on the lip, the lip is anodized. If the finish on the lip is still good, avoid using any harsh acid or alkali cleaners on them. If you want to keep that anodized finish on the lips (and you should if it's still good, it's very durable), you will have to paint, not powdercoat.
-
As for the tach part of the question, I had little or no problem getting the tach to work in my '71 with the ZX/E12-80 combo. I'll have to take another look at the wiring on mine when I get home, but I don't recall doing do anything special. Jumped the two wires from the ballast resistor together, and connected the other to the coil. I think that was it.
-
Loren, is yours a true euro-tube, or did you have it welded and dressed?
-
If they used shank type (and back in the day, most did), you can NOT use acorn. But shank type lug nut should not be all that hard to find, unless they are a special length or diameter of shank. Can you post a picture of the wheel? And any data on the dimensions of the shank will help.
-
Vacuum advance is not required. If the rest of the advance curve is suitable you can eliminate the vacuum advance.
-
See this thread, it has an attached scan of Datsun's magazine ad on the Zzzap. http://classiczcars.com/forums/showthread.php?t=19999
-
My first thought is that perhaps there is a vacuum leak somewhere. If extra air is leaking in that could cause a higher idle. If you try to drop the idle by closing the throttles, suddenly there's no fuel flowing and it dies. So that would be my first step, to look for possible vacuum leaks.
-
Black Dragon sells repro body parts. So for their repro hood, there probably is no difference. But if the dealer says there was a difference in the factory parts, I'm sure that there was. I'd bet it isn't major, though. Probably something like how the support rod works, or something like that.
-
A different view (dirty and not polished): http://home.comcast.net/~e21graymarket/240z/picframes/newcarbs.html
-
Try beandip, nwcubsman, or escanlon for starters.
-
Absolutely. They aren't attractive, but they weren't designed to be attractive. They were designed to prevent damage to the car. In my case though, the bigger (and undeniably better protecting) bumpers aren't part of the Z that I see in my dreams. You see, I still see Z's in the context of the brand new 240Z's on the local Datsun dealer's lot that I drooled over as a 16 year-old with a brand new driver's license. This means that my 240Z will be far more vulnerable to damage. It is a risk I have to accept.
-
Dave, I recall my owner's manual and FSM both say 15.8 gallons. I've got a copy of the data sheet from the original Road & Track road test here at work, it says 15.9. So just under 16 gallons should be right.
-
Thanks for the nice comments, guys. If anyone sees anything I missed or got wrong, let me know and I'll edit it.