


Arne
Free Member
-
Joined
-
Last visited
Everything posted by Arne
-
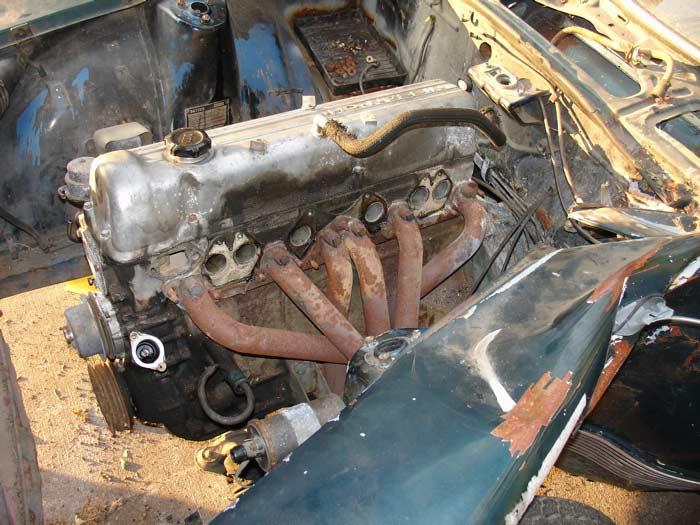
 21 Aug 2006 - Swap Prep, Part 1 This past weekend I spent some more time getting ready for the upcoming engine swap. Which, by the way, I have decided to do over Labor Day weekend. Preparation for this event was the focus last weekend, and will be for next weekend as well. On Saturday, I re-installed the heater box. Or rather - re-installed "a" heater box, not the original heater box. I had pulled the one from my car a while back to refurbish it. Coincidentally, the prior owner of the parts car had done the same shortly before the car was totaled. It turns out that he got farther along in rebuilding his heater box than I had, and his was in better shape to begin with. So the box from the parts car went into mine. I also started stripping the paint off the spare wheel. A lot of work, but it's my own fault. I really hadn't planned on doing that much prep just for a spare. But I did want to prep it for a fresh coat of flat black paint, so last weekend I sanded it lightly, and shot a coat of black on it. And as the paint dried, I remembered that I had used up my flat black paint, and the paint I had thought was flat when I just applied it was really gloss. After it dried, I got some more flat black and gave it a coat. And of course, the two different paints were incompatible, and so now I had a wrinkle-finish on my spare wheel. That led to me applying paint stripper on Saturday. On Sunday, I primed and painted the spare wheel, and late in the day remounted the tire. It now looks right, and the finish - while not perfect - is plenty good enough for a spare. But most of Sunday was devoted to getting the engine in the parts car ready to be pulled. I've got it pretty well stripped now, most everything other than the header is off. As I pull things, I look it over carefully, and so far everything looks really good. I'm really feeling pretty optimistic about this engine. Of course, I've been wrong before. On the parts front, I've got a couple more parts for the swap on order from Nissan, they should be here any day. I bid on and won a jack and tool set on eBay, it was shipped earlier today. And I have started selling a few parts from or freed up by the parts car, the proceeds of which will be plowed right back into my car. Next week, final prep for the engine swap...
-
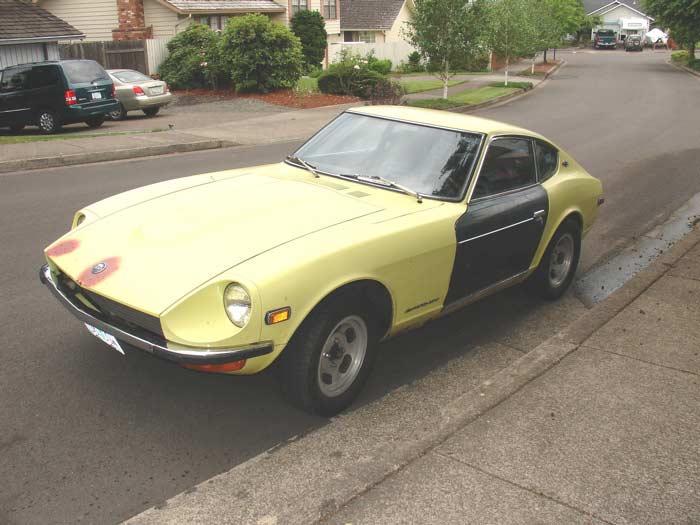
14 Aug 2006 - Win Some, Lose Some Well, less has happened since the last update than I had hoped. But that's pretty normal. I picked up the new radiator and and the new cooling parts from the dealer last week, but that's about as far as that went. Except that the new stuff looks so good, and was surprisingly affordable, so I ordered a couple of final parts today. About all that's left now for cooling replacement is the waterpump itself, and that was supposed to be almost new on the parts car, being replaced just prior to the accident. The water pump is pretty easy to get to on these engines, so I think I'll let it be for now. Had some other commitments on Saturday, so I didn't want to get tied up on anything major. Rather than pick up on the spring swap project, I took a look at the driver's door. The door off the parts car still had the blue car's door lock, the window had issues, and had no mirror. (The blue car's prior owner had installed fender mirrors.) I removed the interior door panel so I could look into all these items. Swapped the yellow car's door lock in, so now the car is keyed alike again. Then I found that the door was missing the lower window stop, so I used one from the passenger door of the parts car. I re-adjusted all the window mechanism and tracks, too. Last, I found that what was done to plug the mirror mounting holes in the door was easily reversible, and got the original mirror installed. On Sunday, I got back to swapping springs. That also took longer than I had planned. (See any recurring themes here?)But I did get it finished. The car sits a bit taller than I had hoped with the new springs, but a test drive showed that the ride is just about what I was expecting - a bit firm, but not harsh. Of course, not everything can be good. During the test drive, another of the numerous coolant fittings that were capped off during the installation of the later motor sprung a leak. I wasn't far from home, and made it back without trouble. But it illustrates why I've been gathering the parts to replace ALL of the cooling system during the engine swap. It also means that the car can't be driven now until I do the cooling system, which won't happen until I swap the engine. Soon, I hope...
-
7 Aug 2006 - Long Weekend I had three days off this weekend, and was able to spend a lot of that time working on the cars. Saturday Finally got the front carb off the parts car, the strut tower was pushed so far towards the engine that there wasn't enough room to slide the carb off the studs. I had to unbolt the driver's side motor mount so I could shift the engine to get it off. As a test (prior to selling them on eBay) I bolted both carbs on my car as is and fired it up. And they aren't too bad. It started right up and ran fairly well. Seemed a bit lean to me, but that's probably to be expected, they were tuned for a stock L24 but mine is (for the time being) 400 cc bigger. The piston in the front carb sticks at one spot, looks to me as if the bell got bumped in the accident and may have ever-so-slightly dimpled it. If they were the only round-tops I had, I'd probably send them to ZTherapy and let them do it right. But since the ones I already had on the yellow car both work and look better, the new set is eBay fodder. Then I got the engine compartment wiring harness out of the parts car, which was more work than I thought it'd be. I had to really work to get it from behind the master cylinders, I feared the body damage may have pinched it. But I was able to get it out intact. Comparing it to what is in my car now, I keep finding more small differences between the manual and automatic wiring. Nothing major, just little things here and there. I still suspect that I will eventually swap the entire harness into my car, fusebox and all. Some of you may remember that I didn't plan to put my new Euro springs in until next Spring or later. Well, like it has in other parts of the project as well, the acquisition of the parts car changed that. You see, the parts car has a fairly fresh set of Eibach lowering springs, that I will want to sell. To sell them, I need some other springs to put on the parts car so that I can keep it mobile enough to haul to the crusher later. The obvious answer is to put the new Euro springs on the yellow car, then put the 35 year old stock springs on the parts car and sell the Eibachs. The shocks on the parts car are Tokicos, and are supposed to be pretty fresh. But I don't think I really want to use Tokicos, and a couple of them may have already started to leak, so those are probably not worth taking off the parts car. So late Saturday afternoon, I started on the spring swap. I got the Euro spring installed on the left front, and the stock spring into the parts car. And that was where I left it at the end of the day. Sunday I continued the spring swap project on Sunday. It was sunny and fairly warm, but not unbearable. I finished the front springs on both cars, and got the Eibachs out of the rear of the parts car as well. Swapped a few other parts around while I had the suspension apart, so that the yellow car's front is now the best of both cars - it's actually pretty good. Eventually I'll want to replace the strut cartridges, but they will do for now. Monday Accomplished a little less on Monday. Had the radiator out of the parts car looked at, and decided to order a new replacement. The damage would have required it to be recored, and a new one was about the same price. I also ordered a number of hoses and cooling system parts from the local Nissan dealer, they should be here in a week. It is a little surprising how many parts are still available from the dealers. Last thing for the day was I dismounted the spare tire from the parts car, and prepped the wheel for paint. I'll paint the wheel soon, and next weekend I'll start final prep for pulling the parts car's engine.
-
30 Jul 2006 - Some Disassembly Required Spent most of Saturday disassembling the parts car. About the only thing I did to the yellow car was to install the freshly re-painted turn signal switch from the parts car. Looks and works almost like new, much better than the old switch. I also pulled the steering knuckles off for a fellow Z owner in Washington state. His 240Z is very early production, and replacement ball joints are not available to fit the knuckles on his car. But the knuckles from my parts car will fit his car, and replacement ball joints are still available for them. I then stripped most of the interior of the parts car. About all that is left inside is the dash pad itself. It did not have nearly as much useable stuff as I had thought. But then again, I don't need all that much in the interior anyway. I am removing the entire wiring harness, and may end up putting it all into my car at some point. While I have already replaced the dash harnesses, the engine harness in my car is still a bit suspect, and the one from the parts car is pretty nice and un-modified. Shoot, it still has points in the distributor! The clock is still running, it is now +2 minutes over the entire 7 days, which means it has gained 4 minutes in the past five days as it was -2 after 36 hours. I'll reset it tomorrow and let it go another week and see what it does.
-
23 Jul 2006 - Working Indoors With the temperature pushing 105º F (40º C) both days this weekend, I saw no reason to risk heatstroke slaving away outside. So I did a few things outdoors on the cars early Saturday morning before the heat got bad, and spent the rest of my car time this weekend here in the house. First thing yesterday was to re-visit the front bumper. I removed the mangled over-riders, and gently straightened a few of the tweaked spots. After doing that, it bolted back up to the car very nicely. It looks pretty good now, and will definitely be repairable by a chrome shop. I then pulled all three of the center gauges out of the parts car, and put the amp/fuel and temp/oil gauges into the yellow car as they are much nicer. I took the clock into the house, where I disassembled, cleaned and lubed it. Took a couple hours, including all the testing. When I finished it, I put it into the yellow car as well. And the work appears to have paid off - it has been running for over 24 hours so far, and actually keeping fairly reasonable time, too. I now have something almost as rare as the hubcaps - an early 240Z clock that works! Pretty much everything else I did happened in the house. I've cleaned and prepped the heater control panel from the parts car in preparation for getting all that stuff in place. The original heater panel isn't bad, it's better than most, actually. But the one from the parts car is better, so in it goes. I also cleaned up the heater box from the parts car. You might remember that I removed the heater box from the yellow car a while back to refurbish it. Well, the prior owner of the parts car had done the same to it - the heater box was sitting on the bench ready to go (with a new core and control valve) when the accident occurred. So it didn't take much to get ready, and is also nicer shape than the one from the yellow car. I also looked over the turn signal switch from the parts car. You may recall that the switch in mine looks good, but has a very sloppy stalk and is not very positive in its action to the right. After looking the one from the parts car over, the only thing I could find wrong with it was the finish on the stalk. So I refinished it. It now looks and feels like new, inside and out. I'll have to wait until I install it to see how it works. That's about it for this weekend. I'm going to start looking over the engine in the parts car to see what odds and ends I need to get before attempting to swap it into the yellow car. Mostly things like hoses and clamps and such. But getting the engine swapped is my next priority.
-
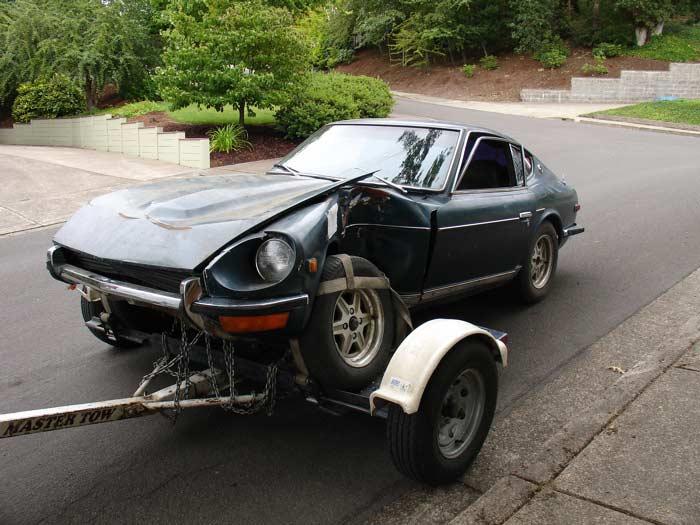
16 Jul 2006 - Car 2, Day 2 It's the hot part of the day now, so I'm inside where it's cool, making notes and plans. But first - a bit of advice for anyone looking to do something like this: Car dollies are not the best choice if you are going to need to back the car into place. I'd never used a dolly before, and while I had been warned that backing was difficult, I really didn't understand that trying to back a car on a dolly into place is not just difficult, but virtually impossible. You see, dollies have a pivot so that the vehicle tows nicely. But that pivot makes it so that attempting to back up (especially uphill and around a bend, as I was attempting) creates a wonderful zig-zag jack-knife as the car goes one way, the dolly goes another, and the tow vehicle is helpless to do anything about either. We spent almost two hours fruitlessly trying to figure out how to beat the system, since the car doesn't run and really doesn't even roll well with broken steering. Eventually we gave up, dumped it in the street, and used the winch on the front of the F-350 with a pulley block anchored to a fence post to tow the car into position. That was yesterday. Today I began pulling parts. All sorts of them. The best finds so far have been the center console, turn signal switch, front bumper and surprisingly, the driver's door. Lots of little things, I've got to start boxing them all up as I go. Some of the other fun stuff includes: a fifth steel wheel in the spare well, complete with a nice 175HR14 Michelin XAS tire; various interior parts and tools; a nice replacement power antenna; and a heater box complete with a new core and control valve that is better than the one I have been working on. Obviously the big item is the engine. After looking it over, I'm going to stick it in the yellow car and give it a try. It is virtually the same as the one my car would have originally come with, even down to the semi-rare early head casting. I pulled all the plugs and looked into the cylinders, and found no sign of moisture or rust. The plugs were all clean and nice tan color, so it looks like it was running well when it died. I then pulled the cam cover off, and found that it was nice and clean in there too. No sign of even condensation rust on the cam lobes, everything looks great. The engine spins freely by hand, or with the starter. (Although the starter does seem to labor a bit. It is very rusty-looking, and the battery was damaged in the accident and soaked the starter with acid. So I suspect that it is trash anyway.) So as soon as it cools off some, I'm going to go back out and pick up tools and clean up for the day. The yellow car has already been equipped with a left front elbow vent tube (you 240Z owners know what I mean), the front bumper and the driver's door. It's amazing what a visual improvement even a tweaked front bumper makes. But of course, now the car has a dark blue-green door, so that doesn't help its looks any. (But at least this one's mostly straight.)
-
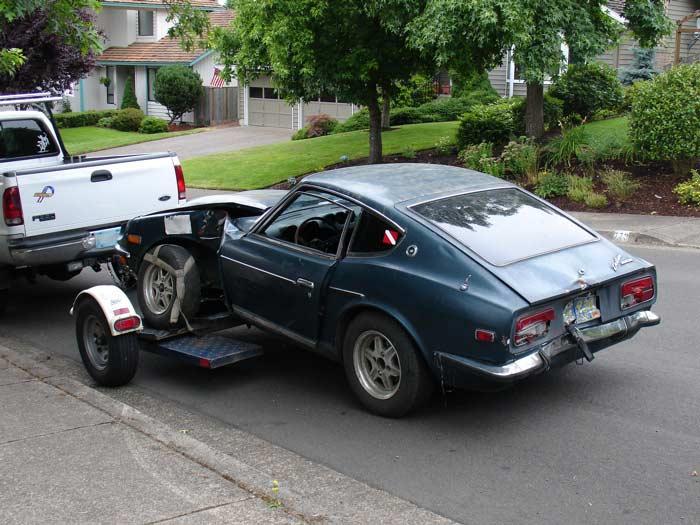
15 Jul 2006 - Second Z is Here I picked up the parts car today, and spent part of the afternoon looking it over. It is a later '71, HLS30-27602 built 4/71. It is seriously damaged, but still has a fair number of useable parts, some that will go on my car, some I'll keep as spares, and some I'll sell. Details will come as I pull parts off of the shell, but the engine in this car appears that it may be useable as-is, at least for a while. (Yes Dad, that means I'm going to need your cherry picker soon.) If so, the yellow car will be fairly road worthy in a much shorter time. I'm going to be checking into that more tomorrow, so my next entry (whenever I get around to it) will have more on that and other good (and not-so-good) parts.

-
9 Jul 2006 - I Need a Truck Again Yeah, I need to borrow a truck again. Because next weekend I'm going to pickup another 240Z, to be used as a parts car. This one is a later '71, and is basically totaled. It had a touch of rust under the battery box when the current owner's son spun it and slid into a telephone pole between 2 and 3 years ago. No body panels are undamaged, and the driver's frame rail is collapsed. So the body shell is trash. The engine is supposed to have been in great shape prior to the accident, but the fan was pushed into the radiator and so it hasn't been started in close to 3 years, and I have no easy way to confirm its condition. Until I have a chance to look into it in depth, I have to consider it to be a core. Besides the engine, it has an early Type A 4 speed that I could keep as a spare, or sell. The engine has a decent looking header and 2 1/2" exhaust. The rear differential is the one I want (3.36:1 to match my 4 speed). The console is darn nice. Rear glass is good, with the proper vertical defroster grid (that is said to work) and professionally tinted. The turn signal switch seems good. Nice gauges (although the clock appears to not work). The radiator does not seem to have been damaged by the fan, and was only a year or so old at the time of the accident. The front bumper bar MIGHT be salvageable. I'm told the springs and shocks are all Tokico, and fairly fresh. Dash is about the same as mine, one small crack in the center. A badly corroded set of 14" six spoke ZX alloys, and decent looking 4 screw carbs. Other miscellaneous parts too, of course. So next Sunday I go to pick it up, not nearly as far to go, only about 40 miles round-trip. Once I get it home, the first thing on the list is to try to assess the engine condition. Once that has been dealt with (one way or another), much of the rest of the summer and fall will be devoted to stripping everything useful from the wrecked shell so that I can get it hauled off to be crushed. Some parts may be transferred directly into the yellow car, others may be stored, and some will be offered for sale. But anyway you look at it, it changes the current emphasis of the project significantly. Pictures and more details after the car gets here.
-
3 Jul 2006 - Short Break It's been a while since my last post, but not a lot has happened in that time. I did finish re-finishing the steering wheel spokes, and I think it turned out pretty nice. I stripped and re-painted the spokes, but left the faux-wood rim alone. Trying to maintain its patina, I guess. Other than that, I'm still fiddling with the heater box, and I did order a full set of six exhaust valves. After thinking it over, I decided that if I'm going to have the head done at all, I may as well do it right. So my plan was updated to figure on replacing all twelve valves, and all the valve guides and springs as well. But all this could change soon, as there are other things in the works. Details to come later, stay tuned...

-
17 Jun 2006 - Still Slow Going Still fiddling until I begin the engine rebuild. (Soon, I promise.) We did attend both days of the meet in Canby, but didn't bring anything home. In fact, the swap meet was pretty lame. So in the future, I don't imagine I'll go to both days, just Sunday to look at cars. But for looking at old Datsuns, Sunday was pretty good. Lots of nice cars to look at, and I met a number of other Z owners with whom I've swapped messages on the Internet. So that was definitely worthwhile. Back here at home, I've got the heater box cleaned and the first coat of paint applied. I also have begun stripping the paint off the steering wheel, in preparation for repainting the spokes on it.
-
7 Jun 2006 - Small Stuff Since the last update I've been working on a few smaller things, as I still prepare for rebuilding and installing the 240Z motor. A while back I bypassed the heater so that I could remove and inspect the heater core. After reconnecting the heater hose at the engine, I got under the dash and removed the entire heater box. Happily, neither the heater box nor the heater core itself look too bad. The box is not rusty, and the heater core (which is all metal, unlike modern aluminum/plastic cores) shows no signs of internal leaks. The heater control valve is bad, but I expected that. All of the foam seals on the heater box are deteriorated or gone, so those will need to be replaced before I paint the box and put it back. The core had a fair amount of rusty coolant in it, so I will take it to a radiator shop and have them flush, test and repair it as necessary. Last weekend I actually took the Z to a small local Z show and shine, hosted by a local stereo shop. The invitees were members of a local Z group. My poor car would have won "ugliest Z" award, had there been any awards at all, but it was still fun to chat with some other Z enthusiasts. And this coming weekend Deanna and I are travelling north (not in the Z, it's not ready for a long trip) to a classic Datsun gathering in Canby, OR. Looking forward to the swap meet on Saturday, and the car show on Sunday. Who knows what I'll drag home...
-
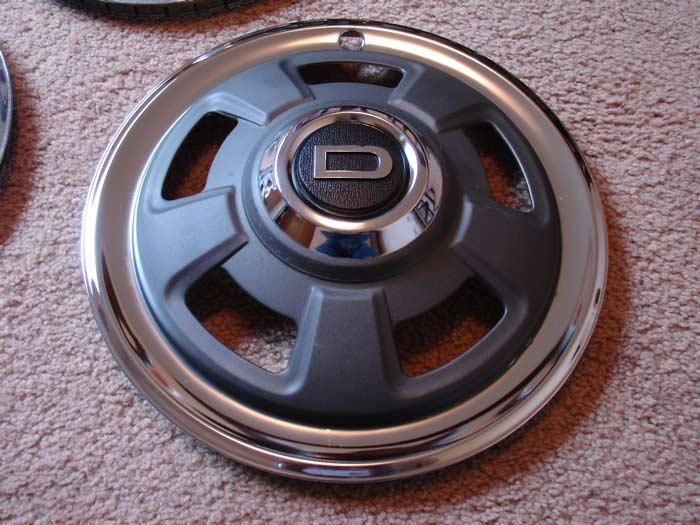
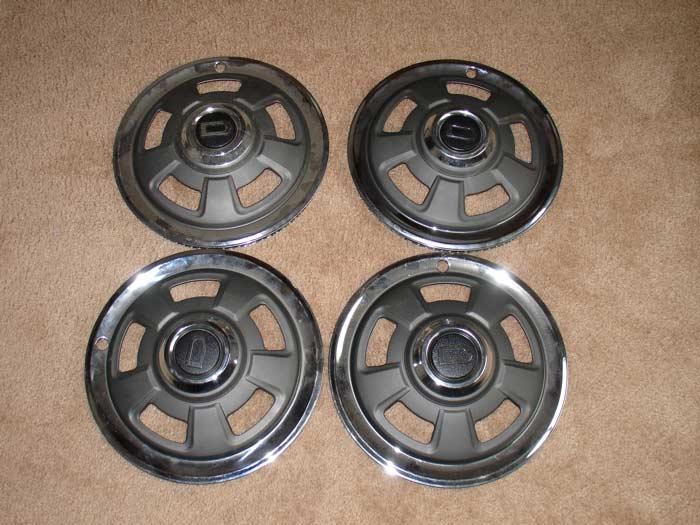
27 May 2006 - Lack of Focus Again OK, I did it again. This time I found something that sounded like it was too good a deal to pass up. I saw an ad in Craigslist in Portland for a set of four 240Z hubcaps and stock steel wheels, with an asking price that was very affordable. I e-mailed the seller and asked if they were the early or late 240Z hubcaps, and also asked if he had a picture. The seller (Ken) said he thought they were the early style, and the picture he sent confirmed that. Picture looked pretty good, too. So I sent him a check and arranged to have one of my new Z buddies in Portland pick them up for me. Bryan picked them up early in the week, and e-mailed to tell me he was keeping them. Ha ha, funny joke. He then said that he was jealous, they looked really good and that I got a great deal. On Wednesday, when he was down in Eugene on business, he delivered them to me. I got much more than I expected. This set of wheels and hubcaps were obviously removed from a late '71 240Z when it was brand new. The hubcaps are nearly perfect, and even pristine on the back side. The rims still have original Japanese wheel weights clipped to them, and again, the back sides are clean. (Just a bit of brake dust on the rear of two of them.) Now to be honest, I haven't yet decided what I am going to do with these. The stock wheels are only 4.5" wide, and factory size tires (175SR14) are very difficult to find now, and may be impossible later. But I could clean up the wheels and use a slightly wider size (such as P185/75R14) which would still be narrow enough to fit on the narrow wheels. While I have always assumed I'd end up with a set of period-correct mags on the car, having these hubcaps might be even more unique. Another option would be these hubcaps on a set of later 5 or 5.5" wide stock 280Z/ZX wheels with 195/70R14 tires. That would look about the same and give just a touch more width. On the other hand, this particular set of hubcaps are exceptionally nice - maybe too nice to be used on a daily driver, which is my plan for the car when it is finished. And frankly, they are worth a whole lot more than I paid for them. Selling them would go a long way toward cash for the engine rebuild. I have definitely got some thinking to do on this one, but I suspect I will end up putting them on the car. (But not until the car is pretty much finished.)
-
14 May 2006 - Head Games, Part 2 Still more preparation for getting the cylinder head rebuilt. After talking to several machine shops both local and up to 100 miles away, I have settled on one fairly close to me, about 20 miles. Unlike most of the "specialists" I talked to who want to do "high performance" work for me (at a "high performance" price), I found a shop who is very familiar with the Datsun engines, and more than willing to do normal stock spec rebuild work. So I am preparing to gather the parts I will need to give him with the head so he can get started. I will end up having him replace all 12 valve guides, and all of the valve springs as well. After I get it all to the machinist, he will measure the valve stems for wear, and let me know how many new valves I will need to get. My existing cam and rocker arms look fine, and will all be reused. And that was it for this week.
-
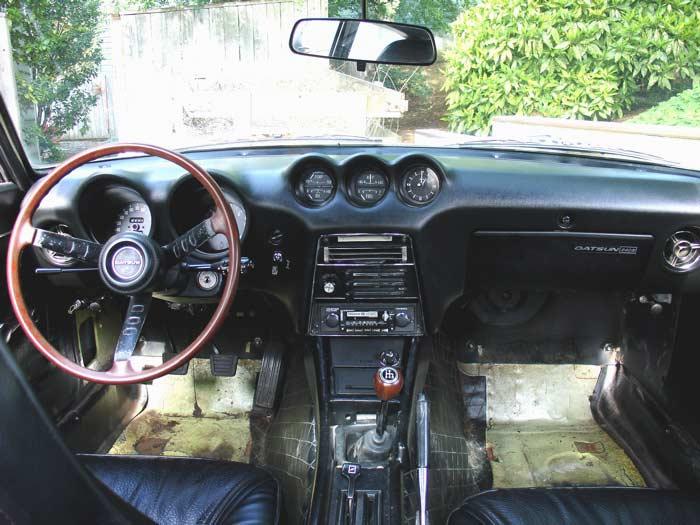
7 May 2006 - More Invisible Improvements Thursday afternoon found me under the Z installing the new parking brake cable which had arrived the day before. That job took longer than it should have, because at sometime in the car's life someone replaced the center clevis pin with a bolt, several washers and two self-locking nuts. (Grrr!) But I did get it done, and the handbrake now works well and I have already noticed that the foot brakes feel better since the self-adjusters are now working. In the middle of that job, I had a visit from another Z owner from the Portland area. Bryan comes down this way regularly on work, and was recruited by Gary to pick up the automatic transmission. Bryan also brought Gary's 'offerings' to my project - a pair of door hinges and the loan of his engine stand. Deanna and I enjoyed chatting with Bryan (who has a pair of '73 240Zs) for a while before he left for his trip back home. So yesterday I cleaned and primed the hinges, and then installed them. And while they aren't quite as good as new ones would have been, they are a big improvement over the ones that were on the car. The door no longer feels like it is falling off when you open it. Then I did some cleaning inside, and tracked down most of the rest of the wiring in the heater control area. I say 'most' because there is still one pair of wires that I haven't figured out what they should connect to. Still trying to think that through. Connected and tested the heater fan, too. At that point, since I was tired of the dash looking like an unfinished jumble of wiring, I put the heater control panel - complete with the Pioneer stereo - back in the dash opening. Neither the heater controls nor the stereo are connected right now, but it looks much better to me. And finally, I took the picture linked below. I haven't been taking many pictures recently, in part because so much of what I've done to the car so far is invisible. Sure, if you open the hood, the carbs look quite different than the injection did, and the 'new' tailgate is a different color than the one on the car when I bought it. But other than that, the Z looks much the same as the day I brought it home, even if it is much improved in a number of ways. The dash wiring, brakes and tranmission swap are not things that show (or don't show much, anyway). So I haven't been bothering to take many pictures lately. But the dash and interior looks so much better all assembled, that I thought it was time to show it.
-
29 Apr 2006 - Head Games Now that the transmission is in and all seems to be working, it is time move toward the engine. I have managed to get a few things done in the time since the last update. First, to allow me to test drive it legally, I finally registered and insured it. So it finally has an Oregon plate on the back, not the old Washington plate. I cleaned up the cooling fan I got a while back, and decided to go ahead and put it on the existing engine, so that I could remove the electric fan and all the cobbled-looking wiring for it. I did that after work one evening last week. I also ordered another batch of parts, mostly cooling parts (hoses, etc.) but primarily a new parking brake cable. Now that the car no longer has an automatic that I can put in Park, I figured I better get the parking brake fixed. And then today, I tore down the cylinder head off the spare motor. What I've found so far mostly looks good. The camshaft and rocker arms appear to be fine, and will be able to be re-used. And while I can't be totally certain until I get the head to a machine shop, the initial indication is that it is not seriously warped and may not need to be milled much, if at all. According to one of the reference books I have for this engine, frequently if the head is warped enough to need to be milled you'll find that the camshaft will no longer spin freely by hand once the head has been unbolted from the block. Mine spins quite nicely, which is encouraging. I borrowed a valve spring compressor from the local Schuck's parts house, and finished stripping it down. And I found both good and bad when I got the valves out, but mostly good. It appears that the head definitely has ben rebuilt before. Two of the intake valves and four of the exhaust valves are original Nissan, the others have been replaced. All the valves appear to be in good shape save one, an exhaust valve that must have a burr on the stem near the top as it doesn't want to easily go through the guide. Worked fine while it was in place, but removing or installing it is very difficult. I do suspect that a few of the guides should be replaced, so I may just do them all. Some of them definitely seem to have too much 'wiggle' when I test them with one of the valves. But the best news is that the intake valve seats appear to have already been replaced. This is great news, as if they were still the original soft bronze seats, I would have had to have hardened steel ones installed to prevent damage from lack of lead in the fuel. But it looks like this has already been done. So the cylinder head part of the engine project looks pretty well defined now. The thermostat housing opening will need to be welded and re-faced, some or all of the guides replaced, clean it all up, lap the valves and put it back together. I'll need to get my gasket set (with valve stem seals) before I reassemble it, but once I have those I can see about getting it done. Then on to the block.
-
19 Apr 2006 - Automatic Be Gone The job is done. The automatic transmission is sitting in the garage waiting for its new owner to come get it, and the four speed is in the car. I did my final prep last weekend, picking up some gear lube to refill the four speed with, as well as some brake fluid for the clutch hydraulics. Then on Tuesday (when an assistant was available - Thanks, Craig!) I moved the Z into the garage for the swap. Put the front wheels on my ramps, and supported the rear on jackstands. I started by disconnecting the battery and removing the starter. Then under the car to drain the fluid. The automatic is spoken for (a fellow 240Z owner who has a failing automatic in his), so I really wanted to try to keep it as intact as possible. So I didn't pull the pan, but drained the fluid by disconnecting the fluid lines to the cooler. While the fluid was draining, I removed the aftermarket oil cooler from in front of the radiator. Back under the car, I pulled the driveshaft and then unbolted the torque converter from the flex plate. (Only four bolts, I expected more somehow.) I disconnected the six wires (two each for the kick down switch, neutral safety switch and reverse lamps), the speedometer cable and the shift linkage. We then supported the transmission on a jack, unbolted the rear transmission support and pulled the bellhousing bolts. Lowered the jack, and scooted the transmission out the side. Well, it wasn't quite that simple, but close. While the car was transmission-less, I figured out which wires I had to use (for reverse lamps), which to ignore (kick down wiring) and which ones to connect together (neutral safety switch). We also removed the automatic shift lever assembly from the transmission tunnel. I removed the flex plate (and the spacer under it that isn't used with a flywheel), drove in the pilot bushing and installed the flywheel, disc and pressure plate. Had to make a trip to the hardware store as I found I had mis-estimated the length of the bellhousing to engine bolts that I needed. Putting it back together was pretty much the reverse process. Fewer wires, different shift linkage and other details, but pretty simple. It went together without drama, and that's about all you can ask. (A second trip to the parts house here too, both the harness in the car and the pigtail on the four speed's reverse lamp switch had male connectors, and I didn't have any female connectors on hand.) We remembered to fill it with gear lube, adjusted the clutch slave cylinder, and finally connected and bled the clutch. And here's where it came to an end on Tuesday. While bleeding the clutch, I discovered that the hose to slave cylinder connection was not a flare fitting as I had thought, but requires a crush washer to seal it. I didn't use one, and didn't have one available, either. And without one, it leaks. We were running out of time for the day, as both Craig and I had other commitments to meet. I test started it (mainly to test the used manual transmission starter), but of course, couldn't drive it with the leaking hydraulics. So that was where I left it on Tuesday. Went to work as normal on Wednesday, but picked up the crush washer before I went home. Got home, changed clothes and got back under the car to install the washer. Enlisted Deanna's help to bleed the clutch, and then got the rear of the car down off the jackstands. I started the engine, put it in reverse and held my breath as I released the clutch to back it off the ramps. It worked exactly as it should! I backed it up a bit, then forward, then back again two or three times. No problems. Buckled my seatbelt and backed it into the street. Put it in first and drove off for a little test drive. And it is good. No bad noises, shifts fine, doesn't pop out of gear. Clutch feels fine, not grabby and no slipping. The car feels MUCH stronger with the manual transmission. Still smokes a fair amount though. So this part of the project is done. I don't have enough miles on the transmission to know for certain, but it seems to be sound enough for now, so I won't plan to pull it out when I swap the engine later. And now the worst part - back to the garage to clean up the mess...
-
9 Apr 2006 - Transmission Swap Prep, Part 2 Did more preparation this weekend, and I think I'm ready to go now. I had the flywheel cleaned, bead-blasted and resurfaced during the week. The machine shop also pressed the new release bearing onto the bearing collar. Picked up another small batch of nuts and bolts too. Spent some time this weekend doing the final prep to the car itself. I installed the newly painted pedal box and clutch master cylinder, and also routed the metal clutch line. The pedal box would have been much easier to install if I had done it when the dash was out, but I wasn't about to remove the dash again just for that. And the clutch line is not mounted as I want it to be forever, to do it totally right I'll need to have the engine out. So that is another small task to add to the engine swap time. So the preparation is done, and I expect to do the swap itself some time in the next few weeks.
-
2 Apr 2006 - Transmission Swap Prep The transmission swap is getting nearer. Since the last update was posted, I have received the last batch of parts needed to make the switch. Everything looks good. I've been doing as much prep work ahead of time as possible, things like verifying that I have all the various nuts and bolts, cleaning and painting the pedals and pedal box, and things like that. This coming week I will take the flywheel in to be resurfaced, and have the release bearing pressed on to the collar. Next weekend I hope to get the pedal box changed over and route the new hydraulic clutch line across the firewall. Then later this month I will finally make the swap. The old automatic transmission (which seems to work fine) is already spoken for. I'm looking forward to this swap. I've also been working on other prep work (cleaning, extracting broken bolts and studs, etc.), on some of the engine parts. Once the transmission swap is complete, the engine work will begin in earnest.
-
19 Mar 2006 - A Fan and a Plan My new-to-me cooling fan and fan clutch arrived this past week. It looks fine, and the clutch feels good. I won't know for certain if the clutch is OK until I get it installed, but the Nissan fan clutches are rebuildable if necessary. I don't plan to install this until the transmission swap, at the earliest, and maybe not until I swap the engines. I spent a couple of evenings working on my spare taillights, disassembling and cleaning. They definitely aren't going to be mint, but are far, far better than the ones in the car now, and should be quite presentable once I get them cleaned up. You may have noticed that I have changed my mind about the timing of the transmission swap more than once so far, and I have changed it again. I am now planning to do the transmission swap separately from the engine swap, rather than waiting to do them both at the same time. The main reason is that I really have no idea how good the transmission I have is, it might be badly worn internally. If I install it separately, I can drive the car a bit to evaluate it, and then when I pull the engine out later, I can pull the transmission as well, if that seems necessary. If I wait for the engine swap to install it, I'll have to pull it separately later for repair (if needed). Since I already have most of the parts I need, I'm going to try to do this sometime next month.
-
12 Mar 2006 - Parts, Parts, Parts... As I predicted last week, this week's update is almost totally about parts. The cooling fan and clutch has been shipped, but it's coming from the East coast and hasn't arrived yet. But I did receive a used ignition module late this week. It is the one from the earlier 280ZX that works with my distributor, but doesn't require an advance input from the injection computer. A very simple swap, it took all of 2 minutes to do. This completes the update of the ZX electronic ignition for my car. I also picked up a set of inexpensive spark plugs that are 2 heat ranges hotter than stock. I'm hoping that these will run hot enough to keep the plugs from oil fouling when I start it to move it around in the driveway and garage. So far so good - it started fine with them, and they don't seem to have fouled yet after running it for several short periods. This probably wouldn't be a good idea if I were really driving the car, but for now I think it will keep it mobile while I rebuild the other motor. Earlier today we drove down to visit Danny again. I had a list of parts I wanted for both the engine and transmission swap, where used parts would be OK. Today's acquisitions were a pedal box assembly, rear engine plate, starter for manual transmission, the metal clutch line from the master cylinder to the hose, a stock exhaust manifold, and a complete thermostat housing assembly. The pedal cluster and thermostat housing are especially nice, no corrosion on the housing, and tight bushings on the pedals. A little paint on the pedals and such and it'll be great. I do have some work ahead of me on the exhaust manifold - every stud, bolt or fitting save one is rusted solid. I will be doing a fair amount of drilling, using an easy-out, and probably re-tapping the holes as well. No real surprise there, that stuff always gets very rusty. I could have avoided this by getting a new aftermarket header instead, but that brings other fitting and durability issues that I really don't want to deal with now. Plus a header would have cost a lot more than this manifold did. I also spent a bit more time assessing the block, so that I can plan what parts to buy. I was able to get the cylinders de-rusted, and the crank and pistons now turn smoothly. I can also see that the cylinders are definitely pitted from the rust, and may need to be over-bored. As best I can measure now (without a proper micrometer), it appears that the cylinders are the factory diameter, and have not been bored previously. The pitting is not very deep, so I need to take some accurate measurements see if I can get by with light honing, or if I'll have to bore it. I don't plan on buying many parts next week, but may try to begin disassembling the head.
-
5 Mar 2006 - New Engine Assessment, Part 1 As I suspected (and warned about in the last post), it's slow going this weekend. For one thing, I decided that I needed to refurbish my utility trailer if I want to be able to take the engine block to a machine shop someday. The floor in the trailer was pretty much rotten. And - just like any other vehicle project - the trailer is subject to the "WIAIT" syndrome. "While I'm Already In There" I might as well do "x". So the trailer floor replacement has become a bit more comprehensive. (Read that as complete disassembly and repainting.) Which is probably OK, because I don't have much to do on the engine until more parts are found/purchased. I did pull the cylinder head off the 2.4 liter motor on Saturday though, to get a better feel for its overall condition. The head itself is very good, other than some pitting around the thermostat opening. That pitting should be easy to have welded up. The valves and seats look great, assuming that the stems haven't rusted. I won't know about that until I get them out. The cam also looks good, what looked like surface rust on a few of the lobes wiped right off. My only other concern about the head is the valve springs, since a few of them have been compressed for who knows how long while the engine has been sitting. Later I'll get them off and measure the free length and see if they need to be replaced. As for the block, The crank is free and spins fine - up to a point. Then it stops as the pistons in a couple of the cylinders encounter the rust on the cylinder wall. A fair amount of water had gotten into a couple cylinders (as I had expected), and there is consequently a fair amount of rust. I don't yet know if or how badly the cylinder walls might be pitted. Seems a bit of a shame, as the clean bores still show factory honing marks. I am beginning to believe that this motor may truly have been low mileage when it was pulled out. At this point though, I'm working on the assumption that I'll have to bore it and replace the pistons. I did buy a needed part though this weekend. While eBay can be a horrible distraction, if one is patient and careful, good deals can still be found. And late on Sunday I won a cooling fan and fan clutch for a good price. It's coming from a long way off, I don't expect to actually see it for a couple weeks.
-
26 Feb 2006 - Another Slow Time Another weekend with not much Z news to report. I pulled all the spark plugs yesterday, cleaned them thoroughly, and put them back in. When I started the car, it ran quite smoothly. Once it warmed enough to run without the choke (only a minute or two), I set it at a rather fast idle (about 1600 RPM) and let it run that way for 10 minutes or so. By the end of that time, it was still running fairly well, although a bit rougher than when I started it. So I pulled the plug wires one by one and found that number 2 was missing again. So that's how fast it will foul the stock heat range plugs. About 10 minutes. I started it to move it again today, and it is obviously worse than yesterday. So how does this change my plans? Not much, really. The main difference is that I will probably not swap in the four speed transmission immediately after I finish acquiring all the parts, but may instead wait until I swap in the freshly rebuilt motor as well. I pulled the cam cover off the 240Z motor to see how it looked inside, and it looks very clean and good. Sometime in the next couple of weeks, I'll try to pull the head so that I can find out the condition of the pistons and cylinder bores. I will continue to gather the transmission swap parts, and then immediately start gathering the parts I will need to rebuild the smaller engine. I will replace the cooling system at the same time as the engine/transmission. So I expect for a while most of the updates you will read here will be lists of the parts I have recently received, and not a lot of change to the car itself. But once the parts are all here and the engine rebuilt, a whole lot will happen at once!
-
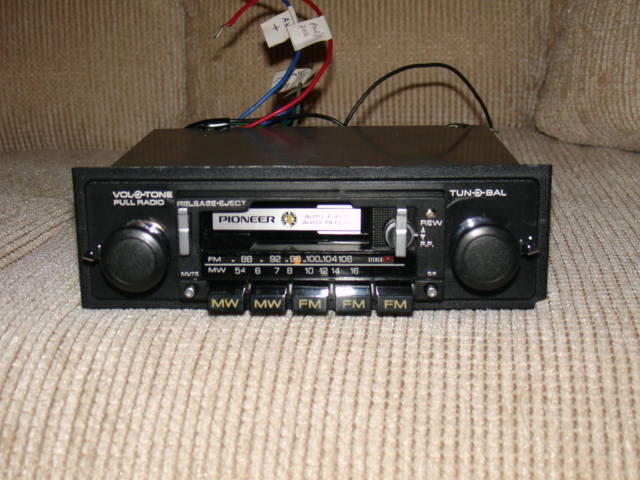
19 Feb 2006 - Wiring Complete I spent a little time doing some final testing on the wiring, and other minor electrical tasks. The good news is that after leaving the battery connected all week, it was still charged on Saturday morning when I tested it. So the replacement dash harness has fixed my major electrical problems. There are still minor things to look at electrically, though. I removed all three of the small gauges to re-install a set of the green illumination lenses since someone had removed the originals at some time in the far past. I also replaced all the dash bulbs, and generally just cleaned things up in there. Everything works well, except the clock which will run (once I get it to start) for between 4 and 20 minutes before it quietly stops. I also cleaned up several bulb sockets for the turn signals, which improved their function as well. I briefly tried to test the rear defroster, it looks like at least some of the grid might work, but this weekend is such low humidity that I couldn't keep it fogged enough to know for sure. I have not yet connected the heater fan, as I will need to find all the heater control cables before I am ready to put the heater face plate back in the dash. But on the whole, the electrical system is probably good enough to start driving it, although the rest of the car is not yet to that point. I plan to do some extra wiring sometime down the road to prevent the new fusebox and harness from suffering the same fate as the old ones did. The biggest offenders are the lighting system - using relays to reduce the current drawn through the factory fusebox and light switch is highly recommended, and I will do so before I really start driving the car. As time goes on, I become more convinced that the 280ZX engine in my car is not as healthy as I had once believed. Its main problem seems to be the oil control rings. It burns oil, and not just a little like bad valve seals, but enough to foul the plugs if I'm not running it hard. This appears to be why the engine miss is inconsistent. If the plugs get hot enough, they burn off the oil and it runs pretty good. But before long one or two of them will foul again, and the engine begins to miss. I may try a set of hotter heat range plugs as a stop-gap, but the cure is to tear it down and replace the rings. And since I can't see myself going to that amount of work just for the rings, we're talking about a total rebuild here. And here is the point that the spare 240Z engine I picked up a while ago becomes useful. You see, for the way I plan to use the car I don't need the extra 15 to 20 HP that the 2.8 liter motor will give over the 2.4. It would be much handier to rebuild the engine that is already out of the car, rather than pull the 2.8 and rebuild it. So at some time in the future, I expect my car to have a true 240Z motor in it again. And last, more evidence of the "lack of focus" which still continues some. I got a radio earlier this week. Since my goal for the car is not completely stock, but visually period correct (I want it to look like a typical mildly-modified 240Z as they were driven in the mid-70s), I decided a while back that a factory AM radio that most 240Z restorers lust after wasn't quite what I wanted. After all, large numbers of those AM radios got yanked and replaced by aftermarket AM/FM/cassette decks. So that was what I decided I wanted to find - a vintage shaft-type AM/FM/cassette deck, even though I no longer own any cassettes. Well, I found it, and it's near perfect. It's a Pioneer KP-8000 Supertuner dating from 1975 or so. It's in great shape. Don't know if the tape drive still works, and don't really care anyway. FM does work, and that's all I really need. The Pioneers from back then did have a power antenna lead, so I can replace my dead original antenna with a similar-looking full-auto unit at half (or less) the price of the OE unit. It also has only two speaker outputs, so that will go well with a pair of speakers in the stock locations. I won't be ready to install it until far later in the project, but when I get to that point, the radio will be here waiting.
-
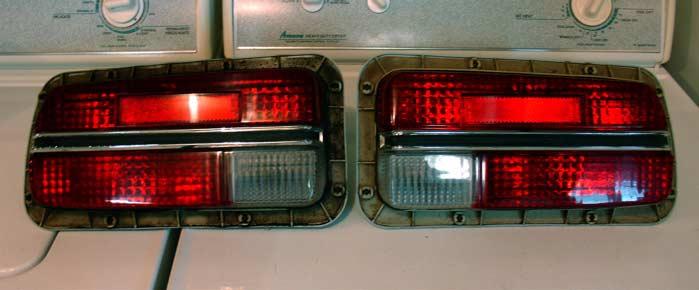
12 Feb 2006 - Quick Update Checked a couple of things briefly today. The first had to do with the wiring again, as I still worry that the dash harness may not be enough to fix all the car's electrical ills. But I have no evidence of that, all seems OK so far. For the first time since I got the car, I left the battery connected overnight, and the battery voltage did not drop at all. It still shows the same level of charge as it did yesterday. I will leave the battery hooked up this week, and re-test the voltage later. If it is still holding steady by next weekend, I can finally put this chapter to rest. I also cleaned up the pair of taillights that came with the spare engine. They are also of the same 1973 vintage as the engine, and cleaned up pretty well. The lights aren't as good close up as they look in the picture, but they are quite presentable, and much better overall than what I now have. As such, they will do fine for quite a while. The car is going to have to be pretty close to finished before I'm going to worry about finding any better ones, if then.
-
11 Feb 2006 - Reassembled Well, I swapped the replacement harness into the dash during the week, and put it all back together today. And boy, putting the dash back in the car is a whole lot more difficult than getting it out! But after much laying on my back, half in the car, I got it all back together. It turns out that the only difference between the early automatic and manual transmission harnesses is the wiring for the kickdown switch. So there is now one unused wire on my engine compartment harness, and I have removed the kickdown switch from under the dash. And how does it work? So far, so good. Everything that worked before still works. The clock even tried to go, but stops ticking after a very short while. I will test the rear defroster later. Still testing to see if there is a current draw pulling down the battery, but it doesn't look like it at this time. So far I'm happy. On another front, Deanna and I drove to Corvallis (about 50 miles one way) on Tuesday to buy a spare engine. I saw an ad from a lady there who wanted to sell what she thought was a really low miles, complete 240Z engine. She was asking $200 for it. I talked to her on the phone about it, and she admitted that her boyfriend said it was low miles, but she couldn't confirm that. She thought it was complete, but couldn't answer my questions about it as she knew nothing about engines. She lowered the price to $100 while we talked, and so I figured that the timing cover and flywheel were probably worth that much, so anything else good would be gravy. I found both more and less than I expected. Yup, it was an 2.4 liter 240Z engine from a '72 or '73. But it is far from the complete engine I had thought she described. It's not much more than a long block, actually. But it does have the flywheel and timing cover I need. It's not even close to being a runner, it's been sitting in the weather and I can see (through the sparkplug holes) some rust in the bores. So the motor is definitely less than I had hoped it might be, but that didn't surprise me. What did surprise me was when the lady told me about some other 240Z parts she found as well, that she would throw in with the engine if I wanted them. A miscellaneous bunch of engine and clutch parts for the most part, but also a pretty decent pair of tail lights, and a rear tailgate support strut that still has its gas charge! So the spare engine is still in the trailer while I figure out what I'm going to do with it. The tailgate support is on the car now (no more broomstick!), and I'm going to clean up the taillights to find out what I really have soon. (The chrome trim on the lights isn't perfect, but is much better than what's on my car now.) One last thought - on the way back with the engine, Deanna mentioned that this project seems to lack focus, when compared to other project cars I've had in the past. And she's right. I keep getting distracted by parts on eBay, or craigslist, or whatever. I need to stay on task, and not dilute my resources on getting stuff I won't need for months. ("Get thee behind me, eBay!") So before I move to the next task, I will wait until I know I've got the wiring handled. When that is done, then I will proceed with the transmission swap.