Phred
Free Member
-
Joined
-
Last visited
Everything posted by Phred
-
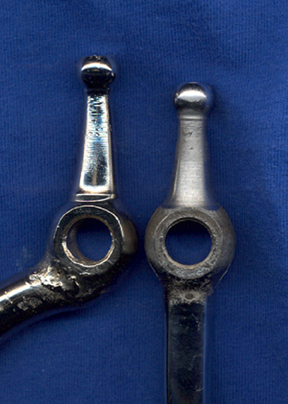
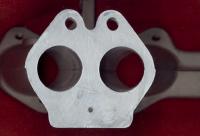
 The MSA shifter is shown with some solid bushings I machined and installed to replace the stock ones. The other pic shows the difference between the early and late 5 speeds. the shifter with the re-welded, angled arm is from an early box. The straight shifter is out of an 80'ZX. Phred
-
ctomkins, It sounds like you learned the first rule of engine assembly. Don't take anything for granted, and always do a mock-up with new pistons to determine piston to head clearance. It sounds like everythings together, unfortunately. Hopefully, those aftermarket pistons are assembled with a full floating pin. Because if they are a pressed on piston/rod assembly, its going to be a headache to press them off, machine them, and then press them back together again. Many oportunities to screw something up. The Minimum piston to head clearance you should consider is about .045. With .050/.055 prefered (small safety margin) . Which means with a stock head gasket compressed thickness of about .047, your looking to have an assembled deck height of about -.005. Meaning the piston is below the deck by .005 at TDC. The next headache you may want to avoid, is called valve to piston clr. Hereafter called V/P clr. Let me know what cam you have, and if your pistons have valve reliefs cut in them. Also, if the pistons are still in the block, Get a very good dial indicator reading on #1 & #6 pistons at TDC. Take the measurement in line with the piston pin. Take notes, and mark the underside of the pistons with there respective cyl. #. (1,2,3,etc.) Use an electric pencil, scribe, or metal stamps. If you stamp #'s, put the # on the pin boss, & do not stamp in line with the pin. Give me some more details, and we'll get you squared away. Phred
-
Dev, Since your in for a complete rebuild, buy a workshop manual. Haynes has good pictures and procedures, and is priced right. I have the factory manual too, which is all inclusive but expensive. The Chilton has its good points, But the Haynes has better pictures, and like they say, worth a thousand words. These will explain all the stuff you'll need to know about replacing the chain and cam gear, which has three holes for timing. The Datsun crank is a real good piece right from the factory. Its forged, hard, and most are balanced very close. I have balanced many Z cranks, and they require very little work to get them spot on. There's no need to replace the rods. If you have the money, replace the rod bolts and nuts, and have the rods resized to .0018 min. to .0022 max clr. for the street. Again, if you have the budget, bal the rods. If you replace the pistons, go with .5mm (.020) overbore. Go with flat top stock pistons. All this applies to a street Z, and should be considered my (experienced) opinion. Phred
-
What kind of rebuild are you doing? The whole engine or just the head. As far as the oil press. goes, its not uncommon to see 15 lbs. at idle on an older eng. The things that affect the ability to produce oil pressure are the oil pump gear clearance, which increases with age and wear. This keeps it from pumping as hard as it did when it was new. The next thing that limits oil press. is the bearing clearance, which also increases with age. An increase in bearing clr. as small as .001/.002 can cause the oil to flow past the bearings more than desired, causing lower oil press. So if its an engine out rebuild, replace bearings, and oil pump. If this is a quicky rebuild, at least replace the oil pump with a turbo oil pump. There reasonably priced, and have slightly taller gears, for more volume. The pressure is controlled by the relief valve (springs) in the oil pump. The solid copper .031 ( stock .047 compressed) head gasket has nothing to do with the valve clearance. It will move the valves a little closer to the piston, but stock cams have a lot of valve to piston clearance. The increase in compresson from a .016 thinner hd. gasket will only be about .3 or .4 of a point. What will have to be considered is the cam timimg. An old timimg chain tends to stretch, Which will slightly retard the timimg. A thinner head gasket will have the same affect. So if you don't replace the chain, Reassemble it using the #2 hole on the cam gear. This will advance the cam timing by 4 degrees, making up the retarded condition caused by the thin gasket and old chain. One last caution. Many people have had problems making the solid copper gasket seal up. The stock composition gasket allows the slight movement between the head and block which occures because of the different expansion rates of aluminum and cast iron. So the surfaces of the head and block must be perfect (freshly surfaced) because the solid gasket will not mold itself to an irregular surface. Beware. Phred PS Oregon's so nice why'd you leave?
-
clutchdust, The difference in C.R. between the L-24 & L-26 is only .3 (three tenths). Not worth fussing over. The reason the L-26 has more HP is simply a result of larger displacement, and a cam with 8 degrees more duration. To my knowledge all 260's came with the E-88 head. Which also came on the later 240's. The early 240's came with a E-31 head which had less cc's in the chamber. If you surface the E-88 head .020 you will gain a half a point (.5) of compression. If you do this, make sure to have a three angle valve job done at the same time. The extra compression won't do anything unless you can get the valves to flow a little better too. If you do all of this plus a good header & exhaust, make sure to run some SM needles in the carbs. At that point, I'd be interested to see some chassis dyno numbers, before doing anything else. Phred
-
Get the head Gasket to fit the block you have. I don't know what years the F-54 was produced, (80 to 83?). I have the same F-54 - E88 setup, and while its not assembled yet, its a perfect match. I have built several engines in the past with this combo, and always used the Nissan 11044-N4221 head gasket Phred
-
ZmeFly, Hang in there buddy. The one thing we all have in common is we're all on the same road. Some are just going to get there a little sooner than others. I lost my Mom five years ago. But I was able to spend the day with my Dad, who's 86 & has had three heart attacks. So I know whats coming. Hard not to be sad. But I chose to be happy, Good memories are something that won't die. Phred
-
2manyZs, I built and dyno'd several 240 ITS engines, and the most I ever saw was 172. This was on a SuperFlow computer control dyno. This particular engine won the Oregon Region Championship. I'm sure other engine builders have gotten more HP out of the L24. Up here in the Northwest we have what we call California Horsepower. Someone comes up from Ca. and says his dyno shows 185 HP. Then gets pulled down the straight by one with 170. This was similar with the formala ford engines. We would build one with 114 hp, go to the runoffs and pull a guy down the straight who claimed to have 118. In all fairness, dyno's in different parts of the country use different correction factors. Thats why you should not get too optimistic when you hear someone throw out some big HP numbers. Dyno's are great tuning tools, and give you a good reference point on how a particular engine is going to work. But its all relative. If you get beat down the straight, you need more! Phred
-
SteveK, Good post, I agree. Matt, The only other unanswered question you had was about ITA. The Sports Car Club of America, SCCA, is the major sanctioning group for road racing in the U.S. A group of classes is called Improved Touring. Broken down into individual classes A, B, C, and S. So ITS is where Zcars race. The rules are very restrictive as far as the allowed modifications. Basically, stock components must be used in the engine, but you can balance, adjust cam timimg, ign timimg, and carb tune as well as run headers. So these engines represent the peak HP that can be had with a stock engine. Phred
-
I dyno'd a fresh L-24 That was ITS prepped. It had 165 HP at the flywheel, and it was a front runner. Without headwork, cam, and other trinkets, you won't see 200 HP from a L-24. Phred
-
boltmans, I used to build L-28 GT-2 engines. The by-pass was removed, and the by-pass port pluged. Dry sump systems were used, which produce more pressure and volume than a stock pump. Different types of remote filters were used. None had a problem with blown seals. However, many had tank heaters, and all ran synthetic oil which is thinner and easy to pump when cold. Its been a while, but I think ITS rules don't allow dry sump sustems. So if you plug the by-pass on a stock system, that stops the oil from completing its circut. The way I see it, you would have to enlarge, and tap the by-pass port for a fitting to run to a remote, non by-pass type filter. Then run the return line back to the center pressure in port of the block filter boss. Would that be ITS legal? Theres a few ITS racers on this site who will hopefully enlighten us. I havn't built one of those in few years, but oil still has to flow out of the block, through the filter & back in again. Phred
-
Clutchdust, You know, were all just a bunch of hotrodders who like the Z. One of the fun parts is doing your own thing with your own machine. Many of us have been down the same road your on, and we just don't want to see you loose your wallet along the way. Thats why most of these posts have advised you to drop in a L-28 till your ready for something big. The L-28 would be cheaper, and have more grunt than a bored out L-24. So, do your own thing, have fun, and let us know how it goes. Then, you can say to us ,"see, it worked", or we can say, "see, we told you so!". Merry Christmas Phred
-
clutchdust, I explained what comp. dist. is in my first post, go to the back of the class. Your last post indicated the the comp. dist. between the two pistons is .1mm. thats only .004 in. Insignificant. The displacement of an L-24 bored out 2mm would be 2507.2cc compared to 2394.6cc stock. Not 2700cc. The pistons are not interchangeable between the L-24 & L-26. Remember they have different strokes. Therefore the comp. dist. is shorter on the L-26 to keep the piston from popping out the top of the block at TDC. If you can operate a calculator, use these figures to compute displacement. 1mm= .03937 1 cubic inch= 16.387cc divide millimeters by 25.4 to get inches multiply inches by 25.4 to get millimeters Displacement: bore x bore x 16.387 x .7854 x stroke x # of cyls (bore and stroke figures entered in inches) I used to hate math in school, but it comes in handy now & then. Phred
-
Just a few things to consider. When the factory increased the L24 to an L26, They did it by increasing the stroke. The 24/26 have the same bore. The 26/28 use the same crank. They all rev quite freely, and when you put in a fat cam you loose bottom end. the increased stroke will help increase torque in the low to mid range which helps balance everything out. Summary: keep the stock bore plus .040. The extra cyl. wall thickness will help maintain strength and transfer heat. Run the L26 crank, rods, & pistons. Your first piston question: 83mm=3.267inches thats the actual diameter of the piston. The stock bore is 3.270, which gives you .003 pist/wall clearance. The question concerning rings: The available oversizes are .5mm, .75mm, .1mm, & 1.5mm. Referance: 1mm= .03937 inches (or .040 overbore) The other specs you mention as 2-2.0mm and 1-4.0mm indicates the ring set includes 2 rings which are 2mm thick which would be installed on the 1st and second grooves. The other being the oil ring which is 4mm thick. The compression distance you indicated as 38.2mm (1.503inches) is the distance from the centerline of the piston pin to the top of the piston. The factor that determins how much you can mill the block deck is the distance known as "piston to head clearance". as an example, if you had a "zero deck" meaning your pistons were even with the top of the block at TDC, your piston to head clearance would be the thickness of the compressed head gasket, which is around .043/.047 for a factory gasket. This is the minimum that should be considered. Or the piston might smack the head at high RPM. And that will spoil your day. Phred
-
Hi Ed, A street engine will benifit from a similar treatment as far as break in is conserned. Get it out on the back roads as soon as possible. Accelerate moderately through the gears, then let it coast down, and repeat. keep your eyes on the gauges, and take a look under hood frequently, to make sure all liquids are where there supposed to be. Try not to hold it at a steady rpm for at least a couple hundred miles. Run petrolium oil for at least the first 500 miles. I think the factory replacement rings use a chrome top ring and a cast iron second. Which is a very durable combo. The problem many people have when they do a home rebuild, is replacing the rings without honing the cylinders. You might as well just hit yourself in the head with a hammer. To properly seat in, a chrome ring needs a honed surface with the correct grit stone and cross hatch pattern. There are tools called ball hones which rough up the surface and leave a cross hatch pattern. This is needed to allow the ring to "lap" itself into the cyl. While the cross hatch will microscopically hold oil to keep things from galling. But the ball hone will not properly "size" the cyl. like a ridged Sunnen type hone will. A ball hone follows the exsisting bore, while the Sunnen type will actually resize the cylinder. which is preferred. Even if your cyl. is enlarged a few thou., Its much easier for the ring to follow a straight hole than one that is slightly tapered or out of round. So when replacing rings, wether on a street or a race engine, have it properly honed. And if its a race engine, hone it with a torque or deck plate installed. Phred
-
I have spent many years "breaking in" ( I hate that term) engines. The method actually varies depending on the state of tune or specs for a given engine. Probably 90% of these engines have been "run in" on an engine dyno, but the rest were run in on the track. First and most important is never let a new engine run at a constant speed without a load on it. Do not run it rich as stated in an earlier post. If these two things are combined, the rings will never have a chance to seat. The extra fuel will do nothing but wash down the cyl. wall and accelerate piston/cly. wear. Typically, on a dyno , the engine is partially loaded and run in the lower rpm range while it comes up to temp. Then its accelerated still under partial load while the timing is verified. The engine must be under load to take out all the "slack" in the drive components so the timimg will be stabilized and verified with a timing light. Being under load also causes the engine to produce more work, (torque) which creates heat and pressure within the cylinder. this pressure is what actually seats the rings. Most racing rings have very little "static pressure" which is the outward pressure the ring places against the cylinder wall at rest. When the engine is running, under load, the pressure in the cylinder is forced past the upper ring land and into the gap behind the ring. this extra pressure is what helps the ring to conform to the cylinder. At this point it is most important to note that synthetic oil is NOT to be used during engine break in. Especially with chrome rings. Synthetics are so good at lubricating, they will not allow the rings to seat into the cyl. After break in, change the oil and filter, and then put in the synthetic. If you have to break in your new engine on the track, an exhaust gas analizer or an EGT (exhaust gas temp.) gauge is very good insurance, and will keep you from burning down your nice new expensive race engine. As with the dyno, accelerate smoothly, then back off and let it breath. The more times you can do this the quicker the rings will seat. Rings come in many different sizes and alloys. The break in procedure for a 1/16 chrome ring will be much different from a 1mm steel or cast iron ring. Finally, if you can afford a race engine, you can afford to have it dyno'ed. It will be cheaper in the long run, produce more HP, and cause you less lost sleep. Phred
-
Toplessz, I'm trying to gather funds to apply to my project, rather than gather more parts. But I will consider it, and see if I can think of something I might need. Thanks for the reply. Phred
-
OK!! Lower Price!! $80.00 and buyer pays actual shipping cost. Phred:tapemouth
-
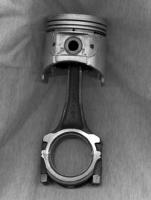
These were removed from an 81ZX. Unknown miles, however they still have the original bearings in them and they are in good shape. So it appears it had good oil as everything is clean. The rings have been removed, and they have been sprayed with marvel's to preserve them. I also soaked the tops with carb cleaner to remove the carbon. They are for sale for $100.00 and I will ship them for free to the lower 48. Phred
-
I have a set (12ea.) of new rocker arms from MSA for sale. Just for comparison, a set of OEM rockers is about $335.00 These are not OEM, but I'm selling for $170.00 and I'll pick up the freight charges. Will accept MO or Cashiers Check. fly.fred@verizon.net
-
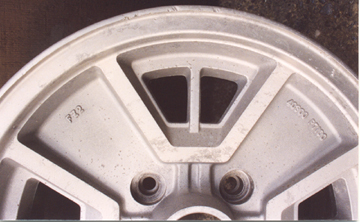
Wheels had some light corrosion, so I had them media blasted, and prepped to paint. Plans have changed, and these will not fit large front brakes on my project. Not perfect, but the right price. The close up pic shows the only curb rash. These are alu. 14 x 6 and are availible for only $100.00 for the set. I'm in Gresham, Or. and would rather not ship. But if you really got to have them, and you want to pay the freight, we can probably work something out. E-mail direct fly.fred@verizon.net

-
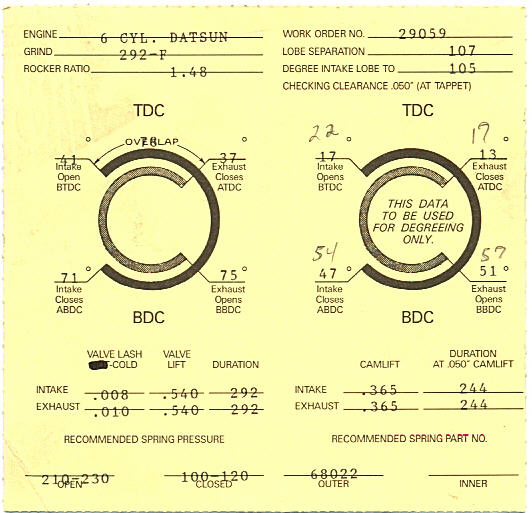
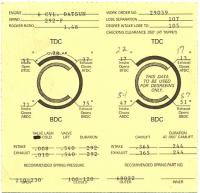
This one was direct from Schneider, don't know if its the same grind that MSA sells. But good for comparison. Phred
-
Atten. 2ManyZ's There is a formula I have around here someplace for computing throttle bore size. It uses displacement, RPM, and Volumetric effieciency, ( an educated guess unless actual #'s can be measured on a dyno) The RPM used is the max used in your particular application. which is tough to figure for a street car. The formula will give you the right size for say, 7000 RPM. But what about drivability at lower RPM. So, you have to use the SWAG method and experience to size carbs to an engine. An engine such as I'm building or the one Dreco has will produce more HP on the top end with 45's or 48's, but if you were to drive the same engine on the street, you'd need 40's to 45's to have some driveability in the lower RPM ranges. Thats why the 40's are so popular. but for best HP with high volumetric #'s. you need the carbs that will flow enough to match the capability of a prepared head and cam. That means bigger carbs. Also, the bigger carbs require proper jetting to get most out of them. Thats the great thing about Weber's ( or Mikiuni/Solex). You can adjust idle, main, and air jets, and choke size (venturi) all independently. For a race engine, this is critical to get max HP without damage from a lean condition. This is where the dyno is indespensible. Using fuel flow #'s and exhaust gas temp., proper jetting can be made quickly, or you can spend all day the track and still not get it right. Lots of things to consider, Thats what makes it fun. And expensive. Phred
-
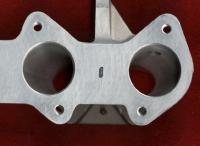
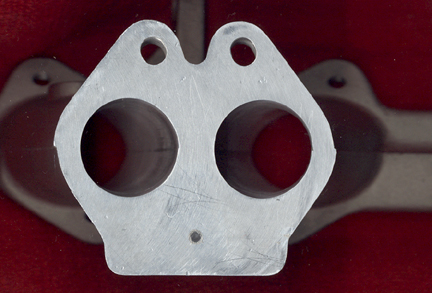
This is the head side.
-
FWIW I just set up a new TWM manifold with 45 weber's. All it took to match the 45mm throttle bore to the manifold was a small radius blended into the runner. On the head side, the manifold was opened up very slightly to 36.5mm which is the size of my intake ports. the manifold is doweled to the head for proper alignment. The nice round holes and radius were done with a milling mach., and then the runners were smoothed up. The manifold in stock form had a 42.5mm bore. The manifold runner length is only 4 in. and has a nice smooth taper down to the port dia. To maintain the velocity, and the lower torque, keep the head port dia. as small as practical. This setup is for a .040 over F54 with a stroker crank. Phred