Phred
Member
-
Joined
-
Last visited
Everything posted by Phred
-
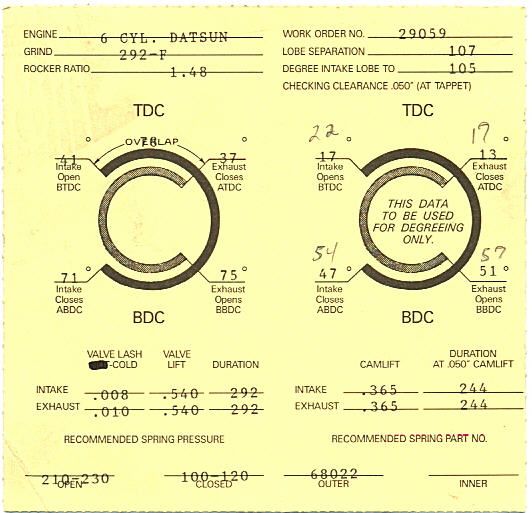
 There is a thread on HybridZ.org that details with what is required to degree your own cam. It is in the 6 cyl. Z forums heading. If you have never done this before, it can be very confusing. It is however, the only way to know exactly what the cam timing is. The other problem for the first time cam installer is, once you know where the cam is in relation to the crank, now what? Is it where it should be? If not, how do I change it? So many home builders get an aftermarket cam, put it in to the stock specs, and don't get the performance they thought they would. It's very easy to install a cam and have it off a few degrees, either advanced or retarded. And a few degrees one way or the other can change the way the cam performs. You should recieve a cam card similar to the one pictured. To realize the expected performance of the cam, you should be able to duplicate the numbers on your cam card, when it is installed in your engine. I have known many people who say,"damn, that's way too much work" and just install it, and hope for the best, it's a total crap shoot if this method is used. I have changed cam timing one degree on a dyno, and saw a significant change. So if you are two degrees retarded, and the cam needs to be two degrees advanced, You will have good top end, but not so good bottom end. which brings up another point. you can degree a cam any where you want. To get the most out of a cam, you need to know what other mods have been done, what your expected use will be, what rpm range you will want to enhance, etc. Then the cam can be installed to work in an area that will be most usefull. Other areas that are just as important are installing reground, or new rockers, and setting the contact area correctly. Then using the proper break in oil, and following that with oil that has the proper amount of zink and phosphrous to help the cam lobe/ rocker assembly live a long life. Truly, the failure rate of having a new cam survive is staggeringly high... if you don't do things right. I'm not trying to dampen your enthusiasm in building you own engine. Building your own stuff is very rewarding, and fun. But sometimes it's a very steep learning curve. Good luck, learn all you can before you start, and try not to swear too much when things get tough. Cheers. Phred
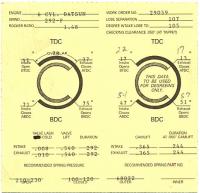
-
240ZNZ, Keep us posted on how you're doing. The news in Noth Amaerica hasn't kept up with recent happenings in NZ. And how are the roads around there? All passable? Fortunately, in the North West area of the USA, Mother Nature has been quiet as of late. Cheers from Oregon. Phred
-
As an engine builder, I restore some rare Porsche ( and my own Z's ) engines. When I take an engine apart, I just clean the hardware, some of which is not available anyore, and have it replated. There are plating businesses in every city. The Nissan stuff is generically called yellow zinc. Plus, there are are always brackets and tidbits that can be done at the same time. Most platers have a min. charge of around $50. but still much less than buying new. Something to consider. Phred
-
Does the gasket fit the port face of the head? If so, measure the I.D. of the Int. port in the head, and the I.D. of your man. at the flange where it contacts the head. Whats the difference? Two things coud be at work here. If the int. man. is new, the I.D. could be on the small side. Which is good. Or if the head has been hogged out too much at the flange, causing the difference in size/fit. It's ok to dump a small int. man. into a larger head port, but not the other way around. In fact, unless its a race car, you will probably loose perf. by opening up the int man. to match a large int. head/port. The key for a street car, is to maintain port velocity, and this is lost when a port is inlarged too much. Phred
-
Hi, and welcome. Your issues with the guides are common. First, the reason they fit befor install, and not afterward: Valve guides are an interference/ press fit in the head. Generally, guides should have a minimum of .0015 press fit, with no more than .0025 interference. Depending on the type of guide material/alloy, the valve should have a clearance min. of .001/.0015 for the intake, and .0015/.0025 on the Exhaust. So, when the guide is installed in the head, the I.D. of the guide shrinks almost the same amount as the press fit. Furthermore, the installed guide will have a pronounced taper on the I.D. The guide I.D. will be tighter in the area of the press fit. So frequently you may be able to start the valve in the top of the guide, but sticks when the valve gets down to the area where the guide fits in the head. this is not a good situation, as the valve guide I.D. should be as straight as possible. Reason: the valve transfers heat to the guide/head through the guide contact, and the valve seat. So after install the valve guides need to be either reamed, or honed to straighten the guide and provide proper clearance. Also if you installed the guides with a driver and hammer, the top of the guide will have the I.D. mashed down a bit, which can also be fixed by the reaming/honing operation. Take your valves and head to the best engine shop you can find, and have this work done. There are some hacks out there, so do yourself a favor, and get the best shop you can to do the work. Trust me, I'm old, and have been doing this stuff for a very long time. Cheers. Phred
-
I have removed several of those tubes. The dip stick tube can be removed without damage by using a properly sized pin punch. You must drive it out from the inside of the engine however. Otherwise, you will have to grab it with vise grips from the outside, and twist and pull. If you this method, slip a similarly sized small rod down the dipstick to keep the dipstck from collapsing. And yes, it will leave ugly vise grip marks on it. The side breather tube is a bugger to remove without damage. Try supporting it on the inside with a bar that slips in the tube to keep it from collapsing. Years ago these items were available from Nissan, but I havn't bought any in over 25 years. Probably NLA. Phred
-
Thanks for the helpful replies guys. I need a 240 pan to send off to be modified for an external pick-up race pan. But it seems new 240 pans are rare, so I guess I'll pull one off a stock 240 engine I have, (hiding under a tarp out back) that I will be restoring next year. So it looks like the resto will get the new pan. Cheers! Phred
-
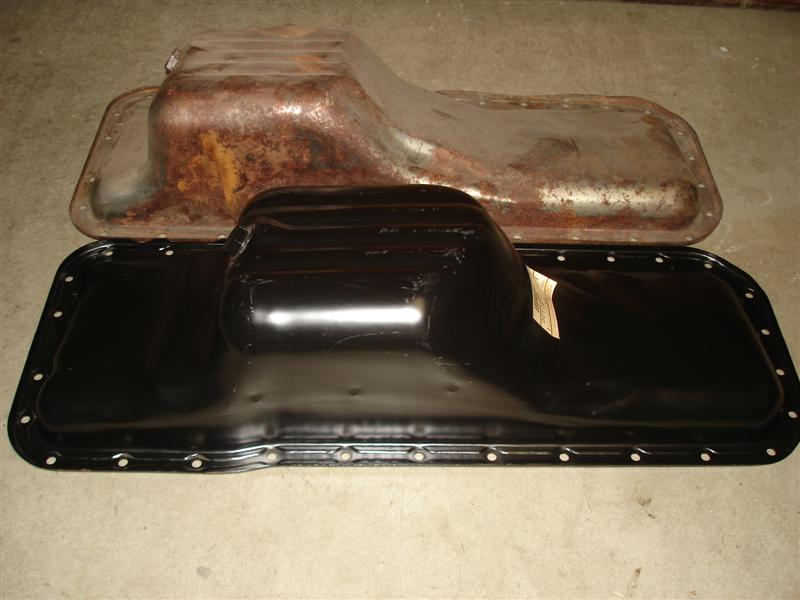
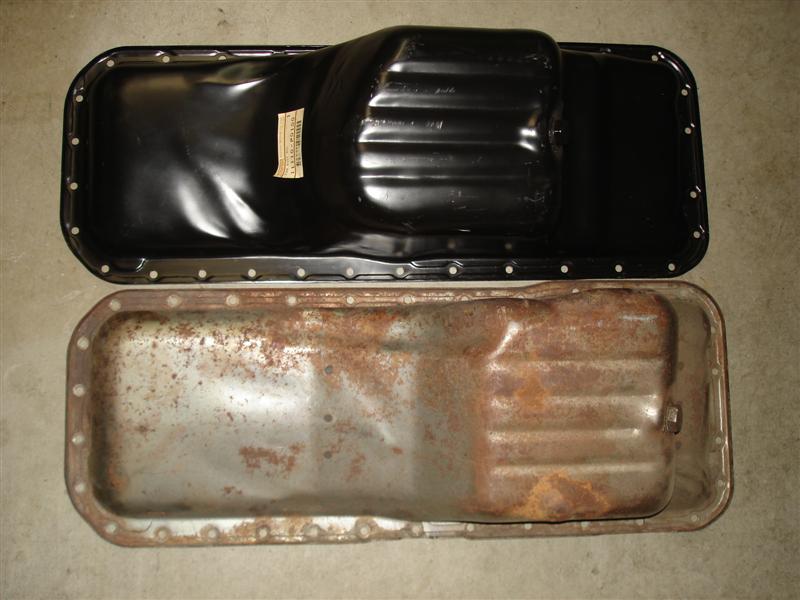
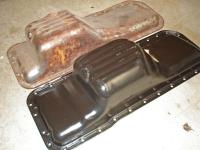
I have unearthed a new L6 oil pan I had stashed in the attic. Now I don't know what model it fit. Can anyone help ID this pan? The rusty one is off a 1979 L28, I think. The new black one has the Nissan sticker as pictured with part # 11110-P01000. You will note they have the sump in different areas. Thanks for any help in refreshing my mind. I have this medical problem, CRS. You know, "can't remember S__t" Phred


-
I have a set of new turbo bolts in the nissan packing. They have a very small '13' marking on the top outside edge of the bolt. I can't find my stock bolts, but as I recall they were plain on top. Phred
-
Where did you find the pic? I like it too, and I need to make a decision soon on which one I'll buy. Phred
-
I hate to send you to another site, but I remember reading about your situation over at HybridZ.org Phred
-
I bought mine from Quaife America. Autotech/Quaife America 32240-E Paseo Adelanto San Juan Capistrano, Ca. 92675 949-240-4000 There are two R180 ring gear sizes, 110 & 115mm. Make sure you know your size before ordering. The O.S. Giken is a good unit, the business I work for imports them for Porsche's. But I chose a quaife for my setup too. Phred
-
I have used red, without bending the tabs. They came off without heating using a half inch impact gun. Phred
-
I use rubber gloves, acetone/lacquer thinner, and a scotchbrite pad. When all the old gunk is removed, wipe it all down with a fresh lint free towel dampened with a just a bit of cleaner. Then the paint will have a nice clean surface to stick to. Whenever you have a choice, always use a new gasket. I will only reuse a head gasket if I really don't have any other option. Phred
-
I have used just about all types of commercially available gasket sealing compounds. Most of them work. Some are easier to apply than others. If you just need to use it for one head gasket, and not take it apart again, just about anything will work as long as you follow the instructions. The silver paint things I like best are, price per gasket (you can paint a buttload of gaskets with one can). Reuseable gasket, if you really can't find a new gasket on the weekend you decide to take your head off. Generally, a painted gasket will come off without destroying it if you're carefull. For this reason, I always paint racing engine head gaskets, If you have a problem, and have to remove the head at a race, you can wipe the old paint off with laquer thinner or acetone, Paint it up again, and your on the track again. I have used a painted, stock Datsun head gasket on an 'O' ringed deck with 13.8:1 compression on a GT2 engine, and it sealed up fine. Whatever sealer you use, don't over goop it on, and let it drool down the side of the block, cause if it does, it is probably drooling down in your engine cyl. and cooling passages too. There are a number of good sealers, and a lot of people have used them sucsessfully. Be neat about it and it will work good, and look good. Phred
-
Yes indeed, painting a head gasket is an old trick to get it to seal up. The reason for silver paint, is the paint base is, at least it used to be, metal composition with a bonding agent that will melt into the surface of the head/deck when the enging gets hot. For best results, find the best quality silver paint, as it will have more base color. Then just befor you install the gasket, spray two coats on both sides. Install the gasket when the paint is just starting to set. This will work on all types of gaskets. To make sure the paint sticks, wipe down the gasket with acetone befor painting. I was shown this trick forty years ago. Who knows how long painting head gaskets has been around. My guess is that long ago, an engine builder didn't have any real gasket compound, and the only thing he could find in the shop was a can of silver paint. Turns out it was a great find. Phred
-
Greeting's from half a world away. My first car bought in 1966 was from the UK, a Frogeye which I kept for fourteen years. I have a 1971 240Z which is being turned into a vintage race car. Good luck with your projects. Stay in touch with updates on your progress. Phred
-
64imperial, You're close, but not quite correct. After 30+ years in the race engine, machine shop business, I can tell you the prefered sequence of events that lead up to a block being overbored. Preferably, a block will be brought in for work with the main caps torqued on. It's really up to the machinist to advise the owner what steps he should take. Most shops will first clean the block, then do a dial bore check to determin the worst spot in the worst cyl. The machinist will then know which oversize to buy. He will also have options or preferences of which pistons to buy. After the pistons are in his hands, he will do the work, once. Machinists don't generally like to start a job, set it aside, then pick it up and finish it later. That is not an efficient way to do business, and will be more labor intensive. Most replacement type pistons will also come with rings, and pin. He will will need to know what type of rings are supplied to be able to hone the cylinders with the proper grit stones. While your at it, you will probably need to have the old pistons pressed off, and the new ones installed. When its all done, have them final clean the block and reinstall the oil galley plugs. When you get it back, it should be ready for assembly. Phred
-
"i've miced my cylinders, and the bore on the whole block ranges from 3.3855" to 3.3895", Don't fret over what a std. bore is supposed to be. Your real problem is in your quote above. You have a .004 variance in bore size. If you stuff a std piston in there, you will have too much pist./cyl clr. I don't know what the FSM says, but new stock pistons in a fresh bore should only have around .0015 clr. And as a general rule, most books call out 86mm as std, which is 3.3858. As a machinist/engine builder, if I came across a block like this, I would recommend that it be overbored to the first O.S. piston that was available. Generally, that would be +.5 (.020) or a 1mm (.040) overbore. The other problem in putting a new std. piston and new rings in an oversize/out of round used bore, is the difficulty in getting the new rings to seal up properly. As you can guess, a new ring will have major problems following a bore that is not straight or round. The usual results are an engine that smokes, and generally will not run well as the fuel/air mixture is being contaminated with oil. I could go on and on about this, but you get the idea. Phred
-
Dang Gary, has it been that long? Phred
-
Cast piston clr. is generally .002 for a new piston/bore. Most used engines that are out there and running fine, probably have around .004 like yours. You stated your worst clr. is .004, so that will not be a problem for an older street engine. I must point out that I would never attempt to put an engine together with .009 clr. That is way out of line. More important on an old piston is the ring land clr. That's the clr. between the ring and groove when the ring is installed. A new piston will generally have about .0015 to .0025 ring land clr. If you have anything over .005 land clr. your engine will probably smoke, as the ring will flex and flutter and not seal well. If you replace the rings, at minimum, make sure to ball hone ( flex hone) the bores. If you have a new cam, send in your Datsun rockers to have them resurfaced. This will save you some money and they will work great. I have even used resurfaced rockers on race engines with no problem. Phred
-
"I guess you could in theory prime the system that way, but you still have to remove the oil pump to replace the distributor shaft, which mostly negates the whole "priming" thing doesn't it?" Walter, Removing the distributor shaft does not NEGATE anytyhing. The method stated, primes the oiling system, period. The purpous being to assure the lines have been filled, pressure has been verified, lobes are oiled, and no leaks are present. If you want to fire a new engine (without oil squirting on the cam lobes) or an engine you suspect may have a problem, without pre-oiling, have at it. Pre-oiling is mechanical (and mental) insurance. Phred
-
Hogie, If you're concerrned about the oil pressure, by all means, prime it with an old dist shaft. I used to have a shaft I cut down just for priming an engine prior to firing. To remove any dought about sender, or interior gauge calibration, buy a reasonably priced aftermarket pressure gauge at your local supplier and plumb it into the side of the block where the sender goes. Then you can monitor the pressure as you crank on the drill. Remember, the shaft has to have the drive gear removed by lathe, or grinding, or sorcery. I drive the shaft with a slow turning 1/2 in. drill motor, and have a helper slowly turn the crank/pulley bolt. This will guarantee all oil passages are flowing oil to the important parts. Also, you can remove the rocker cover and verify the spray bar (if you have one) has all holes open and squirting. Phred
-
I have personally straightend heads by the method you mentioned. It works. But, I still finished it up with a skim cut to smooth it up when I was done. Beware! If you choose to just surface it till flat, make sure you surface both sides! The top is just as important, as the cam towers must bolt down to a flat surface to allow the cam to turn freely. Phred
-
http://www.northwestz.org/ Check out a local Zclub noted above. They may be able to help. There will be a show 8-29-09 in Troutdale. And welcome, this is a good site with good people. phred