SteveInOakland
Free Member
-
Joined
-
Last visited
-
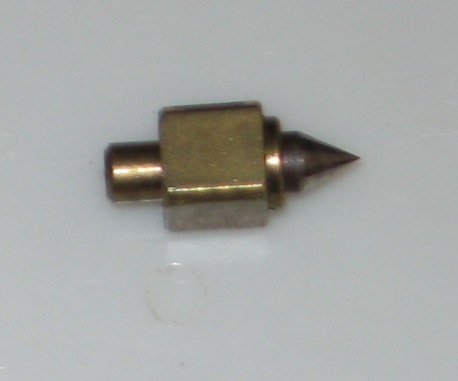
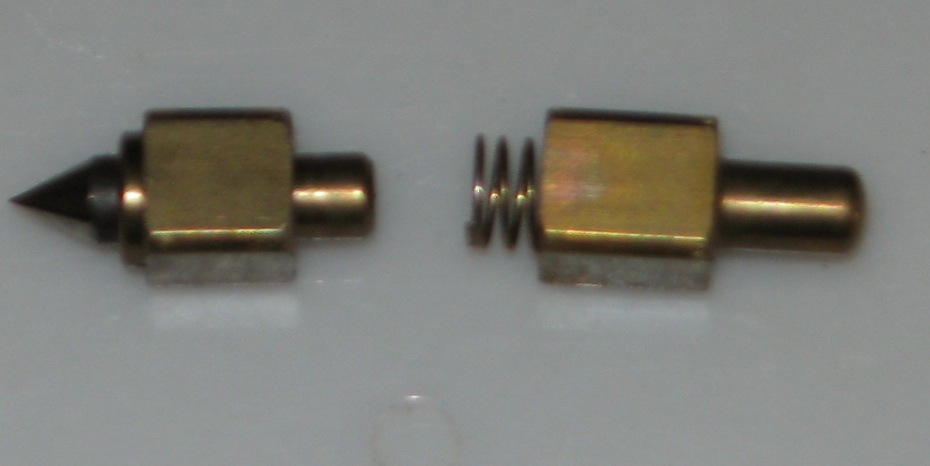
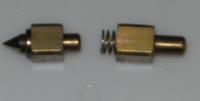
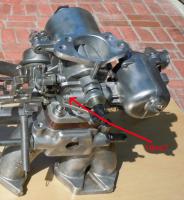
Thanks for the help, Blue and Bruce. Blue, I had missed that amazing set of photos. Extremely helpful. A lot of this stuff is not at all evident in either the parts fiche or the FSM, at least to me. The float-valve needle: I'm attaching a photo of one I just took out. No rubber tip. Do they invariably have one? Meaning this one is worn out? Or can there be a metal tip, no rubber? Looking at my photo showing the adjacent piece also, this whole assembly is a little different from the one in Blue's pic. Square vs. round for the piece that accepts the spring. I'm sure this is old ground; apologies.

-
Mine have the rubber as well (thanks, Blue). The photo is something I grabbed off the Internet. On the looser bowl, at rear, I was able to tighten the nut somewhat, so I guess at this point, both bowls are fairly stable. I still think it's a strange set-up and would also like to hear what Bruce has to say.
-
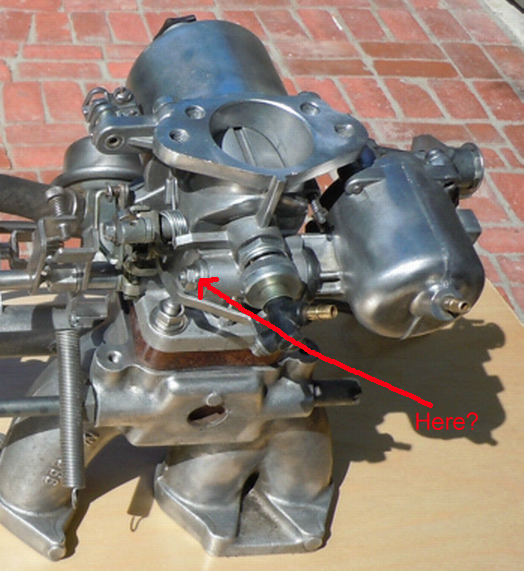
On my SUs, the float bowl pivots pretty easily relative to the carb body. One, more than the other. It seems strange to me that the affixment would be at just one point, so that it can in fact pivot. Is there a rationale for that? More to the point, am I right that the bowl gets attached via a stud culminating in the nut marked in photo shown here? If so, how tight is it kosher to torque down that nut? (If I can even get at it without undoing the choke linkage.) thanks, Steve
-
Thanks for all the well-informed replies! This guy certainly had a beautiful car. It's too bad the air dam isn't more readily available. Seems like a good design to me, without the big notch between the lights....
-
Couldn't locate one like this on a quick search. Anybody know? Thanks. http://carphotos.cardomain.com/ride_images/4/474/3569/38684284001_large.jpg
-
I just e-mailed these guys, but does anybody know anything about the rebuilt 240Z distributor they list on their site? Datsun 240z Distributor For instance, is it a Cardone? I'm looking at various options, also including Philbin and Advanced Distributors. Thanks.
-
No need to answer. Found threads in the diff. lacking the stub axles. Removed bolts and stub axles from the donor.
-
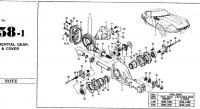
Aha, great. Thanks for answering. Is there anything that holds that nut in place, so that I'll be able to get the bolt into it when I re-attach; without taking the diff. further apart? (Yes, it's item 7; "Nut - lock, side flange.")
-
I picked up an R180 differential out of a 1972 240; hopefully less noisy than the one in my 1973. These are the exact same part. The replacement differential is missing the side flanges and stub axles and I need to get them out of my other rear-end. I know these stub-axles are known as "bolt on," and there's a bolt that apparently attaches the flange to the (splined) stub axle. But what is holding the stub axle itself into the differential? A clip? Where? Or do I just force out the stub axle, using the attached flange itself. I don't find a clip shown in the parts breakout; attached. Thanks.
-
I've been getting the Avast warning on HybridZ as well, running Avast on my Mac. This is probably only the second or third such warning I've gotten in 6 months or so of running Avast. I don't think that post #18 is correct, i.e. that the OP's computer is infected and that's why he's getting this result; whatever is in fact going on, I don't think that's what it is. Steve.
-
Well, the 1970-72 dash cap arrived today, and lo and behold, it fits really, really well. So Dennis of Palco was 100% right. Of course, I now have the indent for the toggle hazard switch, and my switch is the pull type. Frankly this doesn't bother me in the least. I am so, so pleased to have this resolved. A good thing for others to be prepared for, too. In sum -- a 1973 dash, without the off-on decal indent next to the hazard switch -- and the early dash cap fits, the 1973 does not. Acccording to Dennis, because multiple vendors were used to build the dashes. My car btw is January 1973 production.
-
Thanks guys for the thoughts, and glad to learn more about using heat. I spoke with Dennis of Palco this morning, and he says he runs into problems like mine from time to time. He wants me to try the cover for the earlier model, even though mine is a '73 dash and lacks the indent next to hazard switch. Dennis says that in conversations with Nissan some years ago, he learned that they used two different vendors to make the dashes, and there are slight differences here and there. I imagine this is behind what SteveJ mentions up above in Post #5. (Chuck, I don't have another car handy to try the cap on.) Will get the other cap from MSA and go from there.
-
Thanks, SteveJ, very interesting. Palco (aka Dashtop, MSA's supplier) currently lists only one cap for the 1973. Meanwhile, looking over the parts microfiche, it seems the glove box door is the same part on all 240Zs. Will be talking to Palco in morning about my cap....
-
Thanks for those thoughts. That looked promising, but my dash does seem to be a '73. It doesn't have the indent for the hazard-light decal, and the hazard light itself is the push-pull version. It does raise the question, what's the difference between a '73 dash cap and the one for the earlier cars. A bigger hole for the hazard light switch? That would help. Maybe I got the early cap with the wrong label. Re: the glovebox, my door measures a shade over 12-7/8 wide; like, 12-29/32. The opening in the cap is 12-3/4. Anyone feel like measuring the door width of the earlier glovebox?
-
Wondering if anyone else has found these problems with the '73 cap (not the same as those for the earlier Zs): 1. Glovebox opening narrower than door across the top couple of inches. I measured, and it's about 1/4 inch. No way you can close the door without mods to the opening. 2. Hazard light switch hole too close to the lighter hole above. Hole needs to be enlarged, most likely eliminating the left wall of the hole, where it wraps around the inset in the dash. Measured with caliper, there's about 3/16" difference, centers on cap vs. dash. 3. Driver side air vent (round) opening too close to tach. For this, it may be possible to heat and warp the 3/8" wall of the opening in the cap. As is, with the cap fitted perfectly into tach and speedo openings, the hole for the vent opening won't reach the inset in the dash. Also wondering how anyone has solved these problems, especially first and third. What happens to the material when you use a heatgun set on low or medium? What's the tolerance between workable and ruined? MSA says they've had no reports of these fit issues and that everyone is happy with the '73 cap. Hmm. I can't say that I like the idea of having to rework a product just to make it do the job it's meant for -- rework it enough to make the thing impossible to return, if I fail.... So looking for help from veterans. The half cap is starting to look a little better. Thanks in advance.