7T1240
Member
-
Joined
-
Last visited
Everything posted by 7T1240
-
 Steve, Thank you. Yes, Bob Bush - Fortune Wheelz. I have his name and phone number on the cover of the file for my '71 Z, and even spoke to him recently as part of my search for a correct underdash wiring harness. However, I did not know that he is near Golden, so this is much appreciated Steve - maybe now I can forgive you for some of the ebay auctions you've beat me out on! :classic: Gary S.
 -
Any recommendations? I'm looking for a Z specialist to do a pre-purchase inspection on a 240Z in the Denver / Golden area. Thanks, Gary S.
-
Just to mention another option, I recently came across the company Just Dashes (5941 Lemona Ave. Van Nuys, CA 91411 (800) 247-DASH). They were highly touted on a Porsche 944 website for dash work. I have had no work done by them personally, and would be interested to hear if anyone on this site has traded with them. I did phone them - cost for a 240Z dash is $880.00 as of 8/06. Gary S. [url=]http://www.justdashes.com/Index.htm
-
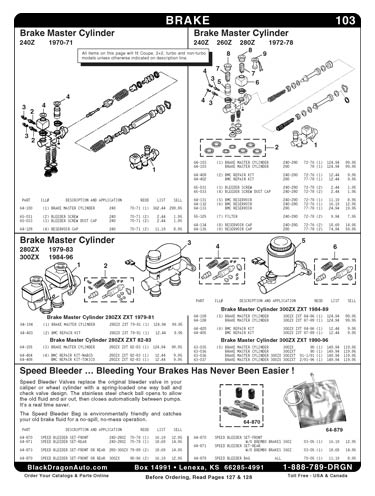
Zcarnut, you seem pretty right on on this one. I pulled the attachment below from the Black Dragon catalog. The unit on my car looks very much like 64-104 (1) Brake Master Cylinder 280ZX ZXT 79-81 pictured lower left on the attachment. The only discrepancy I find with your statement is that the unit on my car is 7/8, not 15/16 (it's cast into one side). Also, I can see that the front reservoir has an "R" stamped below it, and the rear reservoir has an "F" stamped below it. But, the piping has not been changed, i.e. my car has the front reservoir piped to the front brakes. On the booster, I recently thought that because the brake lines were not changed, that perhaps the booster was a series 1 style, maybe even the original, and that the paint was removed completely after spilt brake fluid had eaten away part of the original paint. I no longer believe this, as there is a pink dot visible at about 3 o'clock if sitting in the driver's seat, and I see no evidence of the decal that should have been affixed to the top. So, it would seem like I have the following choices: Buy brake booster and master cylinder for 70-71, stay with current piping. Buy brake booster and master cylinder for 70-72 and either try to source used brake lines to reroute fronts and rears or make / have new brake lines made. Sound about right? Gary S.

-
I will continue my search, but I would greatly appreciate it if you would keep me in mind. Gary S.
-
The seller emailed me back...and as has been suspected, the harness is from a car with automatic transmission. Arne, when you say you are parting out the car, does this mean the dash wiring harness from this car will be available for purchase? Gary S.
-
Will wrote: "I have a spare set from a '72 I will check the part number in the next several days. Will" Sounds good Will, please let me know. Arne wrote: "The part numbers on the actual tags on the two dash sub-harnesses are not generally listed anywhere in the parts list as they were not available separately. So I would not expect to find those two sub-harness numbers in the parts CD." So Arne, follow me here and tell me if you think this assumption is correct. The main dash harness number for 1/70 to 9/70 manual transmission is 24013-E4601, and it is in the parts CD. You mentioned in other posts that the subharness numbers are 24013-E4650 and 24013-E4651, which are not shown in the parts CD. The parts CD also lists 24013-E8801 as the dash wiring harness for 1/72 to 6/72 automatic transmissions, and 24013-E8803 as the dash wiring harness for 7/72 to 10/72. Is it reasonable to assume that any subharness numbers 24013-E88XX, or in this case 24013-E8827 and 24017-E8828 are likely subharness numbers for a ~ '72 vintage automatic transmission car? Gary S.
-
To those of you who have the Z parts CD, I have a question. In the Index by part number, are the numbers sequential and all inclusive? Here's an example of the genesis of my question. A seller has emailed me a part number from a dash wiring harness which he says is from a '72 240Z - 24013-E8827 and 24013-E 8828. Yet, when I look up the number in the Index by part number, the last entry I see in what would appear to be linear fashion is 24013-8803. I do not see an entry for 24013-E8827 or or 24013-E8828. Am I missing something...not looking in the correct place? Thanks, Gary S. BTW, the part I am looking for is dash wiring harness 24013-E4601 (1/70 to 9/70, manual trans.) or 24013-E4602 (10/70 to 12/70, manual trans.), with subharness numbers 24013-E4650 and 24013-E4651.
-
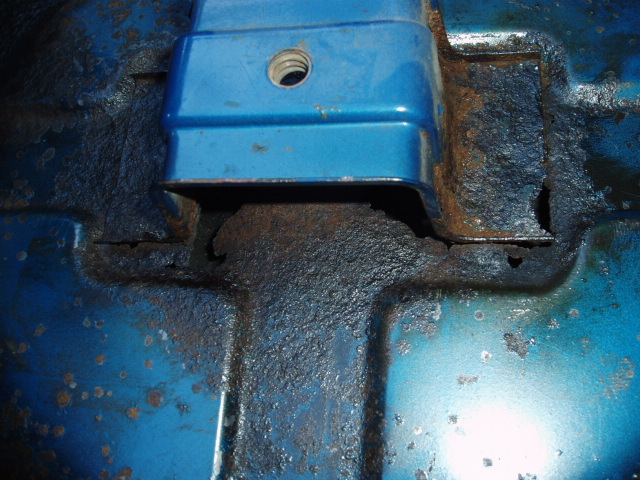
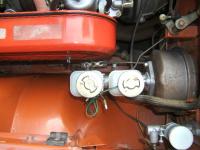
I have a 1971 240Z, with an 11/70 production date. This past weekend, I went to remove the air cleaner to check and / or replace the air filter as needed. Problem is, I never got to evaluate the air filter, since I could not get the air cleaner off, obscured as it was by the master cylinder. Upon further investigation, I have found that the master cylinder currently on the car has the bleed screws pointing in toward the air cleaner, as opposed to the correct placement toward the fender. Also, the reservoirs are same sized - obviously not stock correct for an early '71, and not even like the '72 and on examples I have seen in my recent research. The brake lines, however, seem to retain their stock placement, i.e. the front reservoir to the front brakes, the rear (firewall) reservoir for the back brakes. Oh, and I have no way of knowing if the brake booster is stock / correct for a 70-early 71, as there is no identifying nomenclature I can see. Can anyone tell what I've got here from the picture? The caps on the m/c reservoirs are inscribed "Tokico". The wires on the m/c have bullet connectors, while the stock wiring low fluid connectors are male and female spade terminals. At least the bore is correct at 7/8. So, question is, where do I go from here to restore the system to full functionality (air cleaner removable!)? Gary S.
-
Is Midwest Z still in business? I've done a google search to no avail. If so, does anyone have contact information? And on a related note, anyone have a line on the 'moulding - luggage stopper' (74965N4600 as described on the parts fiche)? Gary S.
-
Yes, thank you Carl and Jon. And Jon, thanks also for your patience with my addressing you by the wrong name...I think I've got it down now! Gary S.
-
Jim, please elaborate. I'm assuming that you have to pull the interior door panel. But is it also easier to tighten these bottom window bolts after removing the window? Does the window obscure access to the bolts? Gary S.
-
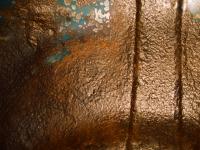
Some useful ideas Will, thank you. Below are two photos of the area needing repair. Jim, your proposal could be of interest...I'm still in the evaluation stage on the prospective car. But, if I do pull the trigger, I'm quite sure I will need a donor spare tire well. Can I get back to you as necessary? Gary S.

-
I am looking at a 240Z which needs the spare wheel well replaced, the rust resulting from water seepage past bad hatch gaskets (as explained by the current owner). I'm wondering about the cost of such a repair. Anyone have direct personal experience or work in the auto body and paint field to shed some light on approximate costs? Thanks, Gary S.
-
I see where they state on their website "Topcoat Optional" http://www.rustbullet.com/Products/Automotive/Automotive.htm. Dan, you could also try speaking with them directly at 800-245-1600. While it may be optional, I see where Grassroots/Classic Motorsports did topcoat their car in much the same application as you are looking at, followed by a seam sealer. http://www.classicmotorsports.net/news.php?cat=14 See the 6/27/2005 update. Gary S.
-
Hello Arne, Two questions regarding this thread: What did you use to clean up your hubcaps and wheels? Anything special, or especially mild? Please tell me more about the Euro Springs you intend to use to lower ride height. Thanks, Gary S.
-
I have purchased the Precision Weatherstrip Seal kit from Oliver Naugle @ Z Specialties. I particularly appreciated his willingness to answer questions and share his knowledge. With the weatherstrip kit came his writeup on how to install door and inner / outer hatch gaskets, including tips on how to make the job go easier and avoid pitfalls. My only negative is that since both Z Specialties and I are both in Washington State, I have to pay sales tax - not an issue for most. Gary S.
-
Thanks for your responses. Yeah Goose, I thought the nap of the carpet looked different than my '71, as well as what looks like a bound vinyl edge. Sounds like the seller's got some 'splainin' ta do! Gary S.
-
I'm going to give a nod here to Ollie at Z Specialties (www.zspecialties.com). I purchased my weatherstrip kit from him, and he includes the following instructions for Inner Hatch Gasket installation: Remove the rear hatch. DO NOT REMOVE THE HINGES FROM THE BODY. Undo the 4 Phillips screws that hold the hatch to the hinges. In many cases you'll need to use an impact driver to remove them. After removing the hatch you should raise the hinge up and put a crumpled paper towel under each one to keep it up in the air and out of the way. Remove all the old gaskets and glue. Sterilize the new gasket, and gasket surface, with lacquer thinner, enamel reducer, acetone, or ketone works too. Position the gasket, making sure you have it mated to its respective corners. Note that the upper corners are a sharper radius than the lowers. Read the instructions on the glue tube and follow them. We recommend using 3M black weather-strip adhesive. Don't be stingy on how much glue you use, especially along the top where the body isn't completely smooth. If you have any rust or exposed metal on any of these surfaces, you MUST treat and seal the metal before doing this job. Glue all 4 corners to the body first. The gasket will look oversized, so grab the approximate middle of each section and apply and glue about 8 to 10 inches of it. Once you've glued all 4 middle sections, then you can proceed to glue the remaining sections one at a time. You will need to cut a small section out of the gasket with a razor blade to clear the rear hatch shock or shocks, depending on your year. Each time you apply the glued gasket to the body, press it down firmly, making sure that it sticks. A little extra glue may force its way out from under the gasket, but just clean it up with a shop rag dampened with cleaning agent as you go. Don't wait for the glue to harden, it will be much harder to clean up. After the gasket has been installed and has set for at least an hour, go back and lightly try to lift up the outer edges to make sure the glue has adhered to both parts. If there are weak spots, squirt some extra glue in there, press it down, then lightly lift itup until it has tacked off. Press it down firmly and clean up any residue. Do not install the rear hatch until at least 24 hours have passed, and you're 100% sure that the gasket is completely and properly glued down. The hatch is going to shut a little hard for the first 6 months, or until the gasket has had a chance to break itself in. It doesn't hurt to coat your hatch and door gaskets with Sil-glyde after they have been properly installed and cured. That will make the doors and hatch close easier, and last longer. All gaskets that are glued on must be done at temperatures above 55 degrees and they must be kept above that during the curing process. Curing takes 24 hours. - Z man (Oliver Naugle)
-
I have been under the assumption that the shock towers on the Z came with the diamond upholstery pattern on them. Yet, in the '72 car pictured in the photo (purported to be highly original) there is no such pattern. Is this OEM or aftermarket? Thanks, Gary S.

-
PM sent. I'll wait to hear from you. Thanks, Gary S.
-
Thanks for your responses hls30 and BD280Z. A few more questions: BD280Z, you mentioned "two stage process"...does this refer to base coat / clearcoat? or paint / hardener? Second question - if I were to use this approach to paint the hatch jamb, any suggestions, ideas, tricks, thoughts etc. Thanks, Gary S.
-
Has anyone here used the Preval Sprayer? (see link here) http://www.prevalspraygun.com/ I saw it mentioned in a GRM / Classic Motorsports article on the 240Z. I'd like to paint the hatch jamb on my car before installing new inner and outer hatch weatherstrips, and I'm wondering if this would be a suitable tool? Thanks, Gary S.
-
Arne B., thanks for the clarification. And Henry, thanks for your input as well - it bolsters Arne's contention that staying close to one's build date will probably yield the best results. Gary S.
-
Arne, please elaborate. If I recall correctly, the harness you sourced was #24013-E4602, which was supposed to be for 10/70 through 12/70 inclusive, and correct for your car (except for auto. vs. manual transmission). What problems did you run into? Would you suggest going with the 24013-E4601 for 1/70 to 9/70? You see, my car is 11/70 build date, and I am looking for the same harness(es). Also, please PM me if you have suggestions on sourcing. Thanks, Gary S.