=Enigma=
 Subscriber
-
Joined
-
Last visited
Everything posted by =Enigma=
-
 Bummer man, I feel for you. It looks like someone already welded in some replacement metal in battery box area all the way down to the frame rail. Note that there are full frame rails available for these car that include the box that's all rusted out on yours http://www.baddogparts.com/
 -
Safety should always be a primary concern when working underneath the car. Never rely on a jack alone. If I plan on getting under there, I always put the car up on 4 jack stands, never just two. You could always substitute a pair of quality ramps for 2 of he stands. What I've found is that with a strong and stable set of 4 leg stands combined with intelligent stand placement on the car and a hard surface like cement, it's near impossible to knock the car off the stands. Remember that you have 2000+ lbs pushing down on the stands so moving the car is not easy. Stabiliy should always be tested to some degree before getting under the car. While I don't recommend trying to knock the car off the stands, I can actually put all of my weight (270lbs) and more into a full side push (lateral) on my car when raised, and the car will not budge. Swap out any of the aforementioned conditions and all bets are off. For example, using jack stands on dirt or warm asphalt, poor jack placement (rotation, location on car, etc), or using only two stands at a time. If you don't have nice cement floor to work on, I recommend building youself a set of support plates to place under your stands. Prior to having a stable cement garage floor, I made a set of 4 - 12" x 12" plates out of high quality 3/4" plywood. You could also weld a flat plate on the bottom of your stands for a more permanent solution, however seperate plates are nice because you can make them as wide as you want/need without making the stands bulkier. A word of caution on cinder blocks, these are not an appropriate substitute for proper blocking. I have seen these things crumble under the weight of a car, especialy when oriented wrongly, or when something other than a level/flat surface was resting on them. I would use them only as a last resort in conjunction with something like a couple 4x4s to disperse the weight across the entire surface of the block. I would be very uncomfortable under a car supported in any way by cinder blocks.
-
Here's those pics. PM me if you're interested. Go here for close-ups: http://www.flickr.com/photos/techn0freq/sets/72157615748106806/

-
The hammering method didn't work on mine even though the locking wedge came out without any problems and the pins were in excellent condition. The puller made child's play out of the job and the pins cam out like butta. If I hadn't ruined the threads on one end with the hammering method, I would have been able to re-use the pins. Note that the puller engages with much more of the thread than the nut does so it has a better hold of the pin. Also, pulling the pin out would in theory stretch the pin, making it thinner over all, whereas using a press would expand the pin making removal more difficult. When I installed the new pins and freshly re-plated locking wedges, I coated them with anti-seize to make sure that they would be easy to get out in the future.
-
I know how you feel on that one. I don't even want to know.
-
I have one. Try the search feature and use words like "5speed" and "swap". This topic has been covered ad nauseum.
-
My bad. Sorry John. I think you had your decimal point in the right place after all, assuming that we're talking millimeters and not fractions of an inch. I'm going to shut up now and go read about nitrous injection systems. Not because I'm interested, but because my curiosity has been piqued and I feel stupid now.
-
Yeah, I wasn't sure about that and was hoping someone would chime in. Thanks for not leeting me down.
-
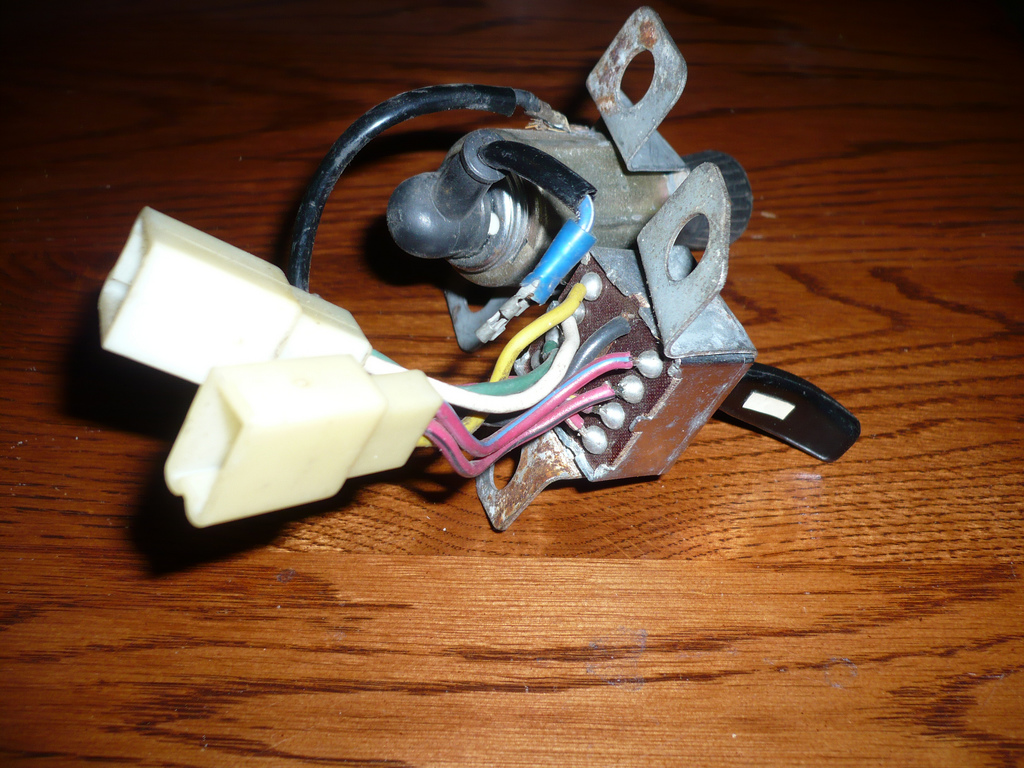
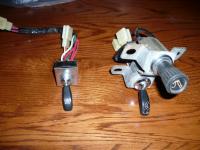
Sorry for the delay Steve. I believe I have what you're looking for but it's part of a complete hazard/lighter assy. Most of the white lettering (80%) is still in tact, and there's enough relief left to repaint it if you wanted to. I also have a Series I hazard switch missing the knurled mounting ring. Both operate crisply but neither have been electrically tested. I'll post pics tomorrow.
-
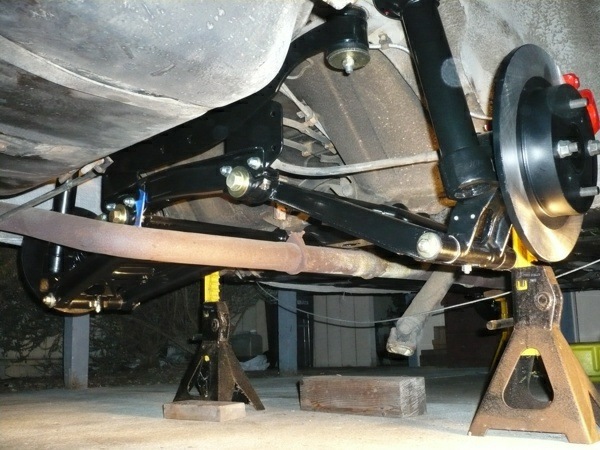
There's a fair amount of work here, but nothing I would call complicated. If you're willing to drop the exhaust, you can drop the entire rear suspension and diff as one piece making disassembly all that easier. I wish I had done this on mine. Based on my experience, the hardest part was getting the old bushings out. I used the burn and cut method and the pyro in me was greatly satisfied. However I felt guilty later due to the pollution factor involved. Spindle pin removal is a non-issue with the spindle pin puller. I do not recommend doing this without it. Loaner pullers are available here as well as on Hybridz for the cost of shipping. If you do this yourself, you'll also have the opportunity to refurbish and refinish them for less than what you'd pay for someone else just to replace the bushings. In the end you will feel a great sense of satisfaction and accomplishment. Right of passage?...maybe. To drop the whole thing as one piece: 1. Jack the rear of the car up by the diff 2. Support the rear of the car firmly on on jack stands. I use the rear frame rail extensions near the seat belt pockets. To make this more secure support the front of the car as well. 3. Remove both rear wheels 4. Remove the exhaust at the header or at a connection forward of the front diff mount (if available): 5. Support the entire suspension assembly by the diff with a floor jack 6. Unbolt propshaft from front of diff 7. Unhook e-brake lines from each wheel 8. Seperate flexible brake lines from hardlines at each wheel 9. Remove 4 bolts from front diff member 10. Remove 6 nuts from rear strut towers 11. Remove 4 bolts from transverse link mount brackets 12. Remove 2 nuts from rear diff mount (moustache bar) 13. Before droping the assy, tie the two struts together with rope or a toe down strap to prevent the strust from swinfing out and dinging your fender lip. 14. Slowly drop the whole assembly as one unit while steadying it 15. It's beer thirty!!!! I still have those brackets if you need them. PM me. See attached for a partial before and after.

-
Funny stuff there man. I've received those looks as well.
-
That fact certainly doesn't help matters but I'm not sure we can conclude that just yet.
-
I'll be taking a full week or two off to spend with the Z here shortly. Mostly because I have 240 hours of PTO and I'm not accumulating any more at this point. Due to the economy my company has throttled the max PTO back to 120 hours, so until I get below that, I definitely won't be earning any more........:mad: Let the Z work begin!!!!!
-
Probably not original for the 70' year but it might work in the interim if it's the same size. http://cgi.ebay.com/ebaymotors/ws/eBayISAPI.dll?ViewItem&item=200245068294 BTW, nice find there. I was just looking at your other thread on the new aquisition.
-
Hey welcome to the site. If you've already spent some time with the search feature and still can't find and answer, feel free to post your questions.
-
Huh? Don't you mean .125 or just 125? And isn't that a bit much for these little motors? Is this based on any kind of personal experience or experimentation on an actual L6 motor including post use inspection? "Just the facts maam".
-
I might have both a 70 or 71 and a 72 version. I'll see if I can dig it out tomorrow and confirm the years. Anyone have a link to a comparison?
-
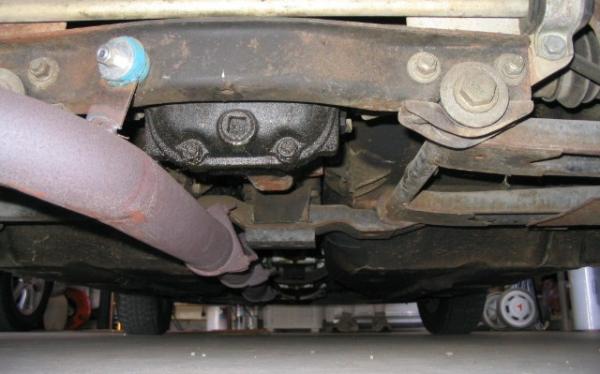
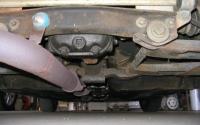
That's a diff isolator and mounts to the front diff member. The rear diff mount/member is often referred to as the moustache bar due to it's shape and bolts to the diff cover. This is mounted to the body on two large bolts that protrude down through the rear deck. Each end of the moustache bar contains a rubber bushing which can become worn to the point that it allows the mount/member to move around and clunk, normally upon acceleration, but potentially on decelleration as well if the wear is bad enough.
-
Actually the link was simply a pointer to a thread that contained relevant information, and was meant to avoid continuing yet another redundant thread. Now that we have a little more info, it sounds like you're using an older pulley on a newer engine (some speculation here) and probably do need the right side pointer. No idea where to get one but ebay is always a good place to look as was pointed out above.
-
The upside is that the leak is fixed. Don't feel too bad, my car is one big WIAT.
-
NOS parts are nice when they're available and reasonably priced, but repro parts help keep the costs down where NOS doesn't matter, or the hoarders are gouging the rest of us.
-
-
Save your pennies and buy a coil-over kit........
-
http://www.classiczcars.com/forums/showthread.php?t=22877
-
I agree with Kirk. Unless you're ready to rebuild that thing, I'd leave it assembled. Hitting the pistons with some WD-40 or ATF and letting it soak should free up the rings from the cylinder wall. You should be able to turn it over with the spark plugs out (looks like the heads off anyway) via the crank pulley bolt. Once rotating, this will allow you to get into some of the deeper nooks and crannies for cleanup. If you do decide to yank it apart, mark the main caps and the rod and rod end caps with a number or center punch so you can put everything back exactly the way it came out. You'll also want to put the bearings back in exactly as they came out if you're planning on using the engine without rebuilding the bottom end, so devise find a way (not a punch) to keep those in order as well. That said, I would probably replace the bearings if I planned on using the engine after reassembly.