


=Enigma=
 Subscriber
-
Joined
-
Last visited
Everything posted by =Enigma=
-
 Watchu talkin' bout Willis? If the lobes are pointed skyward, that means they're not pushing the valves down and therefore they are NOT "open". Remember this is an OHC(overhead cam) engine. I know you know this stuff. Am I missing something?
 -
Are you sure it was dirt based mud or was it perhaps sludge caused by moisture mixing with the water? In any event,at a minimum I'd probably put a new oil filter on it, run some engine flush through it, drain it, change the filter again, drive it for a few hundred miles and then do it all again one more time, assuming that everything looks ok after that. If not, repeat ad infinitum.
-
Welcome to the forum. The answer is obviously going to depend on the condition of the motor, what modifications if any have been done, and what size motor. As far as mileage goes, you're probably best off going for a 240Z with an L24 and SU carbs. The early 240's are lighter, have a smaller displacement engine, and the easy to maintain SUs. As the cars get older, they get heavier, especially the 280ZX. They also get larger displacements. Same blocks more or less, and not much weight difference there, but bigger displacement generally means lower mileage, although the addition of fuel injection in the later years may help to address this difference. Then it's all about weight and drag. None of the cars are particularly aerodynamic, although to the untrained eye you would think they were. Anyway I've gone on long enough.....
-
Hey welcome. Looks like you made a nice find there. What kind of plans do you have for the new rig?
-
Hello noobie! Welcome to the fray. Lots of great advice to be had here. Most topics have already been covered ad infinitum but free to toss up any you can't find answers to using the search feature. Let the mods begin!
-
Good one there mate. That one had me grinning for a while.
-
Nice, but I'd save 'em for the Honda.
-
There's always room for improvement, but this is definietly one of the better and more mature car related forums on the web. I can hardly walk by a computer without checking to see what new posts have been added. There's always going to be a few that like to make trouble, but don't let that ruin it for you, and don't contribute if you can help yourself.
-
Check www.zparts.com or www.datsunzparts.com. Zparts is having a moving sale. Not sure if they have any A quality bumpers but it appears thay do have some.
-
"So sorry" rhymes with Ferrari and that's exactly what this thing is.
-
Dave, the MO is in the mail for one headlight and one parking light harness. I can't wait to see the quality of your work. It will probably be a while before I do the actual install as I have a lot of other things to complete first, but I wanted to purhcase a set while I had the money and before you changed your mind about making the headlight harness.
-
Hey, welcome to the board. Just curious why you waited so long to post? Man of few words?
-
Very nice! I love the look of these. Let us know if you figure out an alternative for the dust caps. I'd hate to run without them.
-
Or go here and buy em' new. http://www.classicdatsun.com/new/panels.html
-
My thinking on this is that if you think it will add enjoyment to your ride, go for it, it's yours after all. But do so knowing that sun/moonroofs are prone to leaks, Z cars rust easily, it potentially weakens the structural integrity of the upper body, potentially decreases the resale value of the car, and most of the guys on here will have a hissy fit if you do. You're in a Classic Z Zone where preservation/restoration is the common desire. Taking a saw to the roof just flys in the face of what the majority of these guys are commited to. I think there are some who would actually have nightmares if you told them you did so. P.S. I have one. It was installed at the dealer when the car was brand new. As far as I know it doesn't leak after 30 yrs. I kind of wanted one anyway so it was no big deal that the car had one when I bought it earlier this year. It's real nice to take the window out and cruise the beach on a sunny day.
-
Yes, it will work with virtually any ignition system. You can use your existing dizzy. If I recall correctly, the 79' dizzy already has an e-12-80 ignition module. If so' you're in great shape for this upgrade. Based on memory, I don't think you need to worry about the tach hookup on a 280ZX. It should just work. Someone correct me if I'm talking out of my arse.
-
Is anybody using this combo sucessfully? I just did a test fit and it looks like the KYB boots are a little too wide for this spring. I guess the inner diameter of the stock springs must be a little wider. I'm not sure if I want the boot constantly rubbing on the inside of the springs and ultimately bunching up near the top. This won't be a big deal on the rear because I can strap the base of the boot to the strut housing. However, you can't do this on the front because the strut rod doesn't turn with the strut, which would end up twisting the boot. Any and all feedback is appreciated.
-
They still sell Z parts. Goto their new site here: http://www.blackdragonauto.com/
-
Welcome to the board Tom. Now let's see some pics.
-
When do you hear the grinding? Does it get worse when you put on the brakes? Only when you turn? We;re gonna need some more details to help.
-
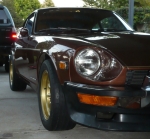
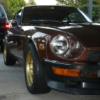
I love the wheels but would prefer a bit more rubber on them. Those are way too low profile for my taste.
-
I feel for ya man. I'm here in sunny CA and it's been raining for months now. As soon as things start to dry out, it starts raining again. My back yard has turned into a veritable swamp. I know it doesn't compare to the winter you have up there in MN, but it's all relative. The main problem I have is that it's preventing me from finishing the painting and suspension work that I was hoping to finish in January. Arrrggggg!!
-
Welcome to the board. That a nice lookin Z you have there.
-
Welcome and congrats on your new purchase. I'm sure you'll find all the info you'll need here or linked from here. Let's see some pics.
-
Hey! Welcome to the fray. Looks like your wallet is getting lighter alreay. Nice start. Let's see some pics!