240znz
Free Member
-
Joined
-
Last visited
Everything posted by 240znz
-
 Just stick to the prep procedure that POR-15 recommends. You don't want to be trying "trial and error" procedures do you? As the last thing you'll want is for the POR-15 to peel off as Enrique says. All the work you are doing now would be in vain. My car was not POR-15'd, but etch primed then semi hard chassis black paint and final body top coats plus clear. It's bloody bright under there. If I were to do it again, I'd paint the wheel wells black. Maybe if and when I change the suspension, I'll respray those areas.
 -
I know POR-15 has a very hard finish but I'd put some sort of stone/chip guard back on if you can. I've never used POR so I can't be sure but IIRC there is some additional prep you need to do before applying another paint over the top of POR. At the very least, an additonal stone/chip guard paint will help deaden noise etc. Especially around the wheel wells.
-
You're doing it the right way. I had a butane torch and paint scraper and about 8 to 10 hours of hot and stinky work. Liberal quantities of turps and plenty of rags gets rid of what's left.
-
What about some fuel and brake line insulators? Down the tunnel I have three lines, fuel feed, fuel return and rear brake feed. I think you guys had an additional line for venting?Mine are gone and I've had to make new ones out of sponge rubber. I'm not sure just how long they are going to last.
-
Best put up some pics of what you have found. If it's like mine, http://www.classiczcars.com/photopost/showphoto.php?photo=25915&ppuser=1608&sl=2 you'll need to have a real close look about. All I saw was a small dark match of underseal and when I poked it with a screwdriver, it shot through. The other side of this plate was rusted out as was the inner section of the frame rail. Remember that this part is two layers thick with no rust proofing. As it is in a ever moist area, if the seal isn't perfect, water will track through. I was lucky that the frame rail wasn't too bad, I had get some it replaced. Take off the front sway bar mounts and have a look in there too. Also have real good poke about under the battery tray from the wheel well with attention also to the seam where it meets the firewall/footwell area. Also check the front radiator support. Have a look at the pics in my gallery of what rust can be found in a seemingly "minimal rust" car. I'd suggest to anyone to drill some 19mm holes in each footwell so you can access the area with occasional rust preventatives. Checkj out the first picture in my gallery.
-
Yes, some 17's look good if the car is lowered enough to get that more aggressive look but simply shoving a set on can look a little out of sorts IMO.
-
Well, after scouring many car wreakers and my local Nissan dealer (got the usual, "a 240z? What's that....checked computer and NLA) I have had to make my own rubber insulators also the missing brackets. Found a rubber sponge section with the eaxct dims. Yes, once frozen, it is easy to drill, but it does thaw quickly. Managed to find some galvanised plate slightly thicker that the orginal brackets but bent up OK. Now in the process of figuring out how to use a pipe bender without having to waste enormous amounts of pipe. Slowly does it. Cocked a large bit up and now need more pipe. I'll keep going, it's kinda fun in a frustrating kind of way (if there is such a thing). Got out all the fasteners out that I got re CAD plated. Missing so many it's not funny. No steering knuckles, gone. To the parts car to grab those then off to the fastening supplies to pick replacement bits. May as well go stainless under the car. Should have gone with my instinct and wired them myself. Oh well. Getting there.
-
The second link works better. No fluid in the MC = no brakes, air in the lines, spongy brake pedal. Sort out the brakes before you dirve it again. Take off the scuff plates (they have DATSUN stamped on them) on the door threshold, lift the door to body rubber seal and assess the state of the seams. Just remember that the S30 is a unibody and therefore everything is important. What are the floors like?
-
It has cancer. I'd get it up in the air and have a good poke around with a flat blade screwdriver. Be prepared for the worst and then it can only get better. Assess what you find and put a dollar value against it before shelling out on what could be done cheaper on a rust free example.
-
Good luck with the car. Remember that the search function on this site is your best friend. Your first job should be to change the brake fluid and check the brakes. No good if it doesn't stop. Before you decide to do any altering of the car, drive it, a lot. You'll get a better feel for what you need to change first. Read as much as you can on here and other sites to get an idea of what you are in for. Do you realise just how much money you will need to turn it into a track/daily driver? A L28ET conversion will not be cheap. You may be better off with a rebuilt L28 on re-jetted SU's. It's all in the planning. Make a itemised list of what you think you want to do. i.e lowering springs, new shocks, new bushes (rubber or poly), upgrade sway bars, brake upgrade, gearbox upgrade, diff ration change, LSD, wheels, tyres, ignition upgrade, seat upgrade, head work, cage etc. For each upgrade put a realistic cost against it. Then you may have a better idea of each items priority. With a little thinking you'll be a good position not to waste money on things that are not needed. e.g new 17's look nice but for the money spent on them and the new rubber, you could complete several mods that make a real difference, not just cosmetic. Just make it safe, don't cut corners on safety as you are a long time dead.
-
Was he all mouth or was he once a hands on guy?
-
Geez Enrique.....busted.....on the net at work....again......yikes.
-
I'd be concerned about adhesion. Doors are subjected to slamming, flexing, extreme cold/heat and of course water. Water will dribble down the inside of the door, that is why there are drain holes in the bottom. I'm keen to learn more. Has anyone here fitted sound deadening on the inside of the outer shell and had issues?
-
To add an attachment when replying, click the paper clip in the menu bar. One the next screen, click the browse button to locate the image you want to upload from your PC and click "open" Once selected, you'll be redirected to the last screen where you need to click on the first "upload" button. Once it has finished uploading the file, you can close the window and submit your reply. Best start a new thread if you want to display images of your car.
-
Might be a good idea to also get it pressure tested. I got mine done and found a couple of pin holes on the top.
-
Yes, we have hijacked this one well and truly haven't we/I. New thread start shall I.
-
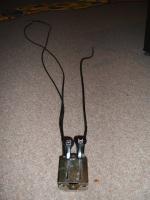
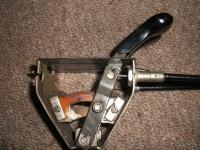
Enrique, My take on why Nissan put the hand throttle on the right was because as both HS and HLS versions have the carbs on the left, therefore the choke cables had to exit the firewall on the left. There couldn't a good arguement to have two choke and one hand throttle cables crossing over each other in the HS30. Or, maybe as the accelerator pedal is on the right, so it makes logical sense to have the hand throttle lever on the same side. I had a look in your gallery and noted that your hand throttle slot is only half that of the choke (same as Marty's). All HS30 that I have seen in NZ that have hand throttles are full length like mine. Hmmm, I wonder why the change. Marty, My parts car has a wheel with holes, if I can find a one without holes for a good price I'd jump at it. However, I just may end up welding a formed plate into the back of each spoke, fill, sand and paint to make it look like it's real. But as parts of the car aren't stock, I'm not so hell bent on getting every last thing perfect. Just nice to have it close as to what it came out as with a few good idea mods. The side on photo I took above shows the friction plate. There's an identical one on the other side of the lever. There is a bolt that runs through the lever (which is split) and is fastened by the nylock. It's that bolt-nut tension that must overcome the pedal return spring to hold the pedal.
-
Just compared side profiles with Marty's and you'll note a large difference. I'm guessing that the nylock bolt applies friction to the lever to stop the carbs return springs from pushing it back to the off position. But in saying that, I doubt that the springs have enough tension to move the lever anyway. How does your work Marty? Sorry to hijack your thread by the way. Anyone else got a lever assembly like mine?
-
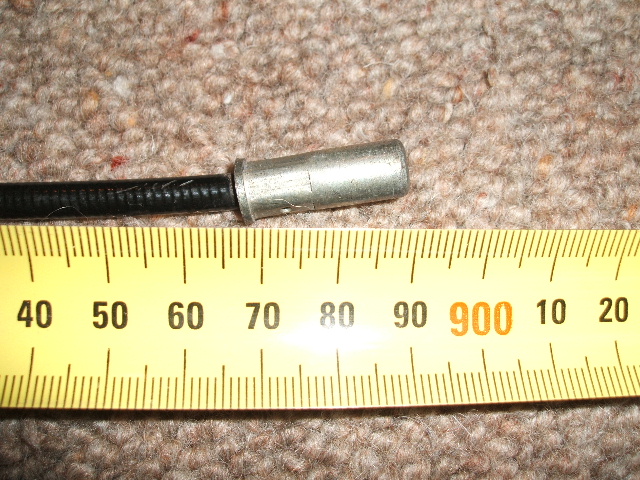
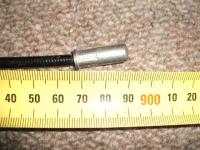
Best get the measurements of the underdash bracket from a LHD zed just in case they are different. Same probably goes for the cable as there could be differences as mine is a RHD. So for curiosity sake, here are the RHD measurements. Cable outer length is 890mm from the end to end. The inner has been cut off flush with the end so I have no idea how long it should be. I'm interested in the difference between Marty's hand throttle lever slot. Both lever slots on mine are 60mm long. Where Marty's hand throttle lever slot is shorter than the choke. Less travels means less throttle travel means less revs compared to mine. If anything, I would have thought that US cars would have had the longer slot due to the colder winters where the hand throttle would be needed more. My car was imported to NZ from Aussie in 1974. It has a build date we estimate to be around 12/70. Look closely at the side profile of the lever and you'll see that I have some work to build a new plastic (or is it bakelite) lever slider. Didn't see that before. Marty, maybe I'll hook mine up for the hell of it just to see what it is like. But as for selling it, never. I've paid a fortune for all the parts (less D caps) this car was missing already and it's naked without them. Just after a steering wheel now, but ebay pricing is just silly, want to sell me yours?
-
OK guys, the car is a 83 280ZX NA. http://www.blackdragonauto.com/icatalog/z/t.asp?page=90 I have no idea how to fix the clunk in the rear end of a ZX, so if any of you can help this guy out then go for it. But from what I see from the above link, part 59 could the issue.
-
Bloody dangerous thing is that hand throttle. I'm sure the PO got rid of it for the same reason. You should to. I'll measure mine tonight for you unless Marty gets there first.
-
1. Diff mount shot 2. Diff strap shot 3. Half shaft universals shot I'd place a bet on the mount and strap being stuffed. Cheap to replace and not to hard either. Get them from MSA and fit them yourself.
-
Those slots look great.
-
Hi all, Just thought I'd share with you the lastest issue with the resto. There are quite a few small hills to climb over that set you back days but nothing too large so far. Well, apart from the horror of finding rust and the invoiced due, yeah plain sailing really. I have new fuel and brake lines to go in. After collating all the little brackets and rubber insulators I find that I am missing four brackets and insulators for the tunnel section. That must have occured the panel shop removed the lines. As I picked up the old line they had been separated. Now I have to either find some or make some up. The parts car ones are munted. Spoke with our tool maker today and he recalls making similar insulators some years ago. Best method is to cut the rubber to size then freeze it. As it's far easier to drill rubber when it's frozen. Can anyone else confirm this? Sounds like a good idea to me. Anyway, just thought I moan a bit to ease the frustration. Yet another one. Who'd rebuild one of these cars.........:eek:
-
Nice S30 you have there. I know you already know but I'm going to drum it into you some more. Just make sure you drive it a lot before you pull it to bits. Rebuilds take more time than you can realise and the more time behind the wheel will help you remember why you are doing it. There will be moments you will think you are nuts for undertaking such a project but it will be worth it in the end. Good luck and don't worry about asking questions as there plenty of people who are more than happy to help.