240znz
Member
-
Joined
-
Last visited
Everything posted by 240znz
-
 Geez. Hope you all are tucked up nice and warm. Our news informs us that you are in for a lot more snow. Just think of us here on the other side of the planet basking in the sun, cool ale in hand.
 -
Get it up in the air and have a good look under the car. Mechanical parts are cheap to replace when compared to rust removal.
-
You should have a two parts to your urethane kit. 1 x bush and 1 x inner steel tube that fits between the stud/bolt and the bush. It will be a tight fit but not a press fit. You shouldn't have any slack at all.
-
-
That's a flux capacitor right there folks. Not many left. Sorry couldn't resist. I have no idea what it is but maybe a device for equalising vacuum pressure.
-
Sorry dude. I gave mine to a specialist guage shop to sort out. But here's a tip for you. Paint the inside of the guage white as it brightens up the back light a lot. Cheers James
-
Yep, there a couple of us posting here on occasion. This is a great website with a seemingly endless supply of information on the S30. Have a good look around and read plenty. If you are looking to purchase a zed, a good info source in NZ is www.zclub.org.nz This club is mainly Auckland based but there are a few members scattered about. Try not to set you mind on a particular year of 240z as you will narrow the search window by quite a bit. The 1973 240z was the most refined while the 1970 model had a few quirky issues. Where are you based? Cheers James
-
The idea of the white foam on the cowl is to stop the cowl from vibrating at high speed. The foam on mine was 5mm thick and was a perfect trap for water to sit and help harbour the rust monster.
-
Yep it sure is a good site. The thickness (could be read as height) of the closed cell foam is important as too much may cause the fender to dent if weight is applied to either side of the support location. Has anyone documented the recommended thickness of closed cell foam to use at each support location? Cheers James
-
Probably an egg. Sorry couldn't help myself.
-
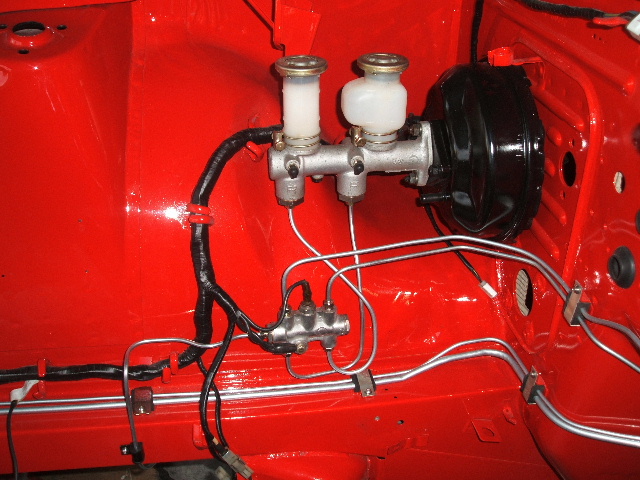
Brake booster and lines pic.

-
I made up new lines for my project. My advice is to bend up the rear lines first as they are the shortest so you won't get too pissed off when you **** them up. If you aren't confident with using a double end flare tool...well it's easy to do right with a bit of practise. Just buy a double end flaring tool and have a go. Just remember not to nip the tool too tight or the pipe will split. Buy a pipe cutter, you can use a hacksaw but the right tools for the job makes it easy to make them look great. Make sure you file the end of the lines at 45 degrees before flaring or else it won't seal.
-
You could hide the front head light loom in the arch cavity
-
Yep, you're not wrong. The original one on my 70 was like rock, the 73 one I have is like soft rock and the new one almost makes you think that they are too soft. Did you buy a new vent tubes while you were there?
-
Heh Byran, let m eknow what you need explained and I'll see if I can help. Car is in bit but easy enough to take photos if required. Remember it is a HS30, not a HLS30.
-
Good GOD, it's been two years since I got it back and I still haven't finished it. Bloody hell. What's done: Tank in, lines in, engine completed, gearbox rebuilt, old 3.9 in OK nick, suspension completed, firewall internals 20% completed, seats and mounts completed, resprayed the inner wheel wells in more matt black stone chip paint to tone the guards red down a bit (should make the rims stand out more. Getting closer but the progress is slow, snails are faster.
-
I'd hazard a guess that the rust you see is just the start. Is that more rust I can see causing the paint to lift? Look at the pic and peer through the headlamp hole. It would be wise to remove the whole left hand guard and check the state of the hollow section right the way to where the footwell fresh air nozzle is located. Check to see that the drains are all clear along that holow section. They nearly always fill up with mud and crud. There is a rubber strip that is installed between the guard and the inner guard to help stop crud from sitting.
-
Yeah Bob, just weld it back on and plenty of underseal should fix it fine.
-
Cats work well
-
I can't see any reason why you couldn't get them replated. You will have to coil the lines up first however. I would run some wet and dry paper over them prior to sending them to the platers. Plating isn't as expensive as you think. New lines are time consuming to bend and install.
-
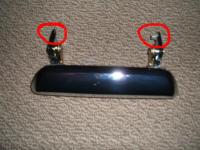
You need to pull the door card off, then you'll see if there is a rod hanging down. If it has a bit of diecast metal on the end, you have a broken handle. Normally caused by a gunked up lock assembly. My advise is to pull the entire lock assembly, soak it in a parts cleaner and re-grease it. Buy a new handle and put it all back together. It will be like new. If you don't want to buy a new handle, you can always swap it with the other handle as they have tabs on both side. Only down side to that is it's twice the work. Door handle part number is 80606-E4100.
-
Get yourself a couple of benders, flare end tool and go for it. The key is to carefully remove the old lines so that you have a pattern to work to. The rubber insulators clean up OK as do the 4mm clamp fasteners. Simply clean & wire wheel the clamps and fasteners prior to dropping to the platers. Peanuts to get replated. Just make sure you practice bends and flares prior. The hardest part is the tight curve of the fuel and return line as it exits the tunnel and onto the frame rail. Just bend that bit first.
-
Please go out and buy a lotto ticket you lucky man.
-
Thank you for saving another low VIN zed. Plenty of help here when needed.
-
If you have pulled it apart, there is no way of telling now. But as Mike says, there's no way you can bend valves either without the chain jumping teeth on the cam sprocket or it was installed incorrectly. I've never heard of a chain jumping teeth on a L series before. Have a look at the top of the pistons for marks where the valves hit.