


hmsports
Member
-
Joined
-
Last visited
Everything posted by hmsports
-
Keith, My car is set up for ITS racing with 5" ride height at the rockers and somewhere around 3 degrees negative camber on the front suspension and about 2 or so on the back and I don't have any rub problems. My springs are 275# front and 250# rear - don't know if that is stiffer than stock (I'm guessing it is). I am running wheels with about 3-1/2" to 4" offset (measured from the inner rim face). I did have some problems with the fender lip cutting into the tire (when I did some agriculture racing over the bump-strip) but I took care of that by bending the lip up from the inside - then again, it is a race car and not a cherry street rod. The strut towers had about 2-1/2" removed to accept racing shocks and race springs when it was lowered. I don't think you would have any problems with the tire rubbing on a modified street car. I may be able to test fit one on my new donor car and check how much room there is on a total stock suspension at full travel - would be able to do this early next week. Let me know. Another good tire that I haven't used yet but have heard good things is the Kumho. They are comparable to the Toyo both in price and performance (again, just from hear-say). Hope this helps. Rick.
-
The best header you can buy is from Jeff Winter at rallye/sport in Westminster, CO. It costs about $450 but has underwent a ton of dyno testing to make sure it is the best. It has a heavy flange and the tubes are stepped larger as they get further from the head. This makes sure that the expanding gases don't get sucked back into the head. Jeff has some statistics on how much better these are than any others, even Nissan Performance. It is a three-into-two design. Terminates with 2 2-1/2" tubes that can be collected using a flow-master Y-connector that can be welded onto a straight 3" pipe. Jeff recommends running a Flowmaster muffler at the end. Also, make sure to run about 9" of pipe behind the muffler. This adds a bit more power by smoothing out the exhaust as it exists the system. Jeff has been racing 240s and 510s for probably 30 years and has build some of the fastest in the states. He is great to work with too! Jeff can be reached at 303.427.0510 and his address is: Jeff Winter rallye/sport 7102 Raleigh St. #3 Westminster, CO 80030
-
I've found through racing that the Toyo Proxes (unshaved) at 225-50-R-14 are very well suited for street driving. They fit fine on a 14x7 rim. They don't have a lot of unruly sound. They are about $125 each from Vilven Tire in Chicago (delivered UPS). We have the tread shaved to race them but use a full-tread set for rain tires. They have great wear and are very predictable. Unlike Hoosier tires (which are faster on the track, but wear a lot quicker too), the Toyos will let you know when they are about ready to lose grip. Just my two-cents.
-
Here's the link to Courtesy Nissan in Texas... http://www.courtesyparts.com/ These guys are great to deal with - they know their stuff and are very friendly. If you belong to a Z car club they offer a discount.
-
I've have one from my '72 that you can have for nothing - just pay the shipping. It seems pretty clean. Let me know. I also will have one from a '70. I don't know the condition yet.
-
Hello All! My name is Rick Hanson and I live in St. Louis, MO. I'll be 38 this month, married with a 3 1/2 year old Son who is an aspiring Z car fan. I currently own a 1970, 1971 and 1972. The '70 is being prepped for SCCA ITS racing - first outing this August at Gateway International in St. Louis. The '71 is being made into my daily driver. The '72 is my two year project being prepped for SCCA E-Production. I've been racing 240s for seven years in ITS. Had two '72s. Both have been re-tired (pardon the pun, but you have to have a sense of humor after smacking the 'tire' walls at 100mph+). It's nice to race a car that is 30 years old and still whip up on the new BMWs and Mazdas! I'm a software engineer and run HANSON Motorsports on the side, specializing in custom roll cages and brake cooling ducts (www.hmsports.com). This is a wonderful forum and an enjoyable web-club. Later, Rick
-
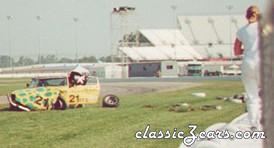 Last lap of the race, 3rd place. As I turned right into the second half of the 'S', the left front tire valve stem failed and the tire went flat. At 100mph and in a right hand drift, the car just slid off the track to the left. I tried to get the car turned so it would bounce off the tire wall but it dug in (hence the major left front damage) and was launched. You can see where the carnage started. The rear pitched up and over - nose down and roof toward wall. As it cartwheeled, the front of the car was pointing up into the air (I knew it was bad when things were quiet) Up to this point, it all seemed like slow motion. About now, the right rear tire hit the ground. The car was on its downward arc from vertical. The force ripped the a-arm like it was aluminum foil and pulled my spicer u-joints apart. The car violently finished the last 180 degrees of its 360 with a hard slap into its final resting place. I immediately shut off switches and egressed to the wall. The car has since been stripped and sent to the crusher. I'm working on a new one now! By the way, I still got a 3rd place finish since I was on the lead lap and the 4th place finisher was down one lap.
 -
I was shown a great do-it yourself method for bleeding the front calipers on an early Z. The problem with the pump/bleed method is that the calipers on early Z cars have two pistons with a single bleed screw on the inside of the caliper. It is difficult to fully get the air from the outside piston. Here's a foolproof method. Start with the right front caliper. Remove only the inner brake pad. Slowly pump the brake pedal one to two times. This will push the inner piston outward. Be careful not to go too far so the piston doesn't come out. Also, you will find it more difficult to push back in if it comes out more than about a 1/2" or so as it may **** sideways. This isn't fatal, but it makes it more difficult to get it straight and back in. Anyway, once the piston is out a bit, crack the bleeder valve (make sure to have a catch reservoir hooked up). Using a pair of groove joint pliers (monkey jaw as my Dad used to call them) slowly push the piston all the way in. Once it is in, close the bleeder. Repeat as necessary to remove all air bubbles. - usually takes no more than one or two times. Make sure to keep the fluid reservoir topped off. Once you as satisfied that all the air is out, put the brake pad back in and pump the pedal to seat the pad. Remove the outer pad and do the same thing. Repeat for the other caliper. This is very easy and as a racer, a guaranteed way to make sure there is no air left in the caliper.
-
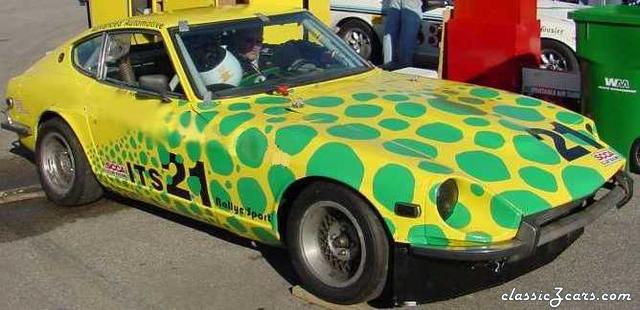 Ready to head to the grid at Gateway International. Full SCCA ITS Race prep. Very fast and handled great.
 -
I may have what you are looking for. I'm converting a 72 to an SCCA EP car and it had a good one that I removed. Call me. 314.466.5784 (Rick Hanson in St. Louis)
-
I have both of these if you want to call me we can work out the details. 314.466.5784. Rick Hanson in St. Louis.
-
According to the factory manual: 1 - Remove the float chamber cover and place it float lever side up. 2 - Lift up the float lever with the tip of your finger then slowly lower the float lever. Stop lowering the float lever at the position at which the float lever seat just contacts the valve stem. 3 - The float leve is correct if the distance from the top of the float lever (which is actually on the bottom now since you have everything upside down) to the inside top of the float chamber cover is 14-15mm (0.5512-0.5906 in.). Adjust to this dimension by bending the lever slightly. The level of fuel in the float bowl should be just above an imaginary half way point - about 23mm (0.906 in) below the inside top of the chamber cover when it is in place. A couple of things to keep in mind. Be extremely careful with the cork chamber cover gasket. If it is old and compressed, replace it. Also, when you pull off the chamber cover, be careful when you turn it over as the little pin that holds the float in has a habit of sliding out. It is a bugger to find if it falls on the floor.
-
That's right. This should be one of the last adjustments made after valves, carb synching using your synchrometer and float adjustments.
-
That's a good rule of thumb. Once both are set at the 2 1/2 turn setting, there is a simple way to set the correct idle mixture. First, make sure the valves are adjusted and then with the air cleaner off and the engine running, cover one of the carbs' intake horn with the palm of your hand. This will cut off any fuel/air to that bank of cylinders. The engine should run on the other bank pretty smoothly. With your hand still in place, adjust the idle on the other carb. If the engine is loping, open it up. If it is running smooth and fast, slowly close it down to where it just wants to die. Adjust it back out about an 1/8 turn. Once that one is adjusted, remove your hand and rev the engine to get things back to normal with both banks. Repeat on the other carb. Also make sure the carbs are synched before you do this.
-
I've been racing 240s for eight years in the SCCA and have tried several types of front air dams. The best is a simple flat pieces of sheet metal that is attached along the rear of the valance. There are two things that are important here. First, let the air dam run as far out to the edges as possible to move as much air around the front tires. The second, and maybe most important thing is to have a horizontal lip (about 1" wide) that protrudes from the front of the bottom edge. This will channel the air around and not under the car. I've had great luck with this up to my top speeds of 125mph. This type of air dam is easy to manufacture and provides a great custom look.
-
Immediately after airborne cartwheel, turn 3 at Gateway. That's the right rear suspension that was ripped from the car. No injuries.
-
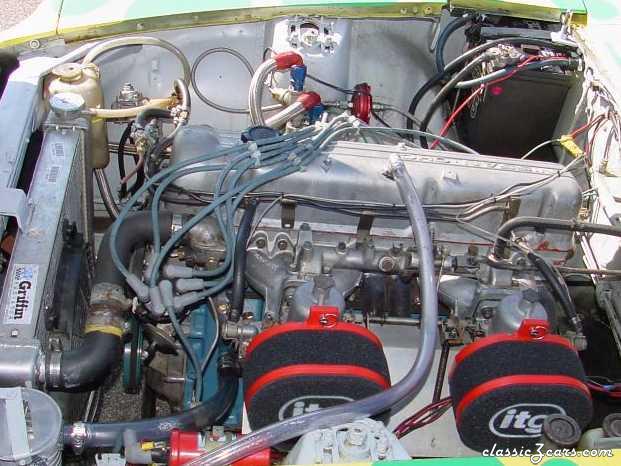 ITS Race prepped '72 240 engine. Bored .40, balanced, MSD, tapered needles, remote oil cooler/filter, euro damper, stepped header.