DeesZ
Free Member
-
Joined
-
Last visited
Everything posted by DeesZ
-
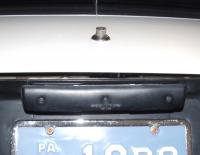
http://www.classiczcars.com/forums/attachment.php?attachmentid=24684&d=1219259950 Hopefully this will help.... There was also a thread on this back sometime I think in the later half of 2008. Do a search on "horn assembly" and it should pop up for you.
-
No 'edit' button here, either..... tried with Firefox and IE with same results. Must one register with Google Maps or something to make it work? I hesitate to volunteer info to Google; they take a lot without your consent anyway, and only God and they know what they do with it.
-
Does anyone package a complete kit of rubber bushings (like the urethane kits commonly seen for sale)? I'm looking for a set, but have not seen any after looking around for quite some time. (I have a '72.) Thanks!
-
Did it smoke before you changed the oil? I ask because I had this happen to me back in the '70s. I was running Castrol GTX 20-50, then in the winter switched to 10-30. I had a cloud within several minutes that went away only after going back to 20-50. So, this suggestion boils down to 'what was in there?' and 'what did you replace it with?' If you are lucky, it may be that simple. I'd eliminate this before I put a wrench to the car, anyway. Just a thought based on experience.
-
Carl Beck did a good response to the question about testing a fan clutch a while back in this forum. Here's a link to it. Thanks Carl! http://www.classiczcars.com/forums/showthread.php?t=25817&highlight=cardboard+clutch+fan
-
That cover doesn't look too bad. My guess is that it will require something a bit more harsh than Nevr-Dull, at least to start with. And yes, it'll might require sanding. The good news is that the spotting doesn't appear to be too deep, and you could likely start with a finer grade paper which would get you to the end (1500 wet) quicker. There is a chance that the polish may work for you, too. Try the polish first and see what happens. Just be prepared that you might have to take the extra steps. The Nevr-Dull is great for the final stage polish. You could begin with something like Mothers that will be a bit more effective removing the spots, then graduate up to Nevr-Dull. Trial and error will be your friend here, but now you know the options.
-
Like Dave said.... "Elbow grease, sweat, tears and a whole lotta sanding and polish......" But the results are likely to please you.

-
Do you have any pictures of the "nicks" and "scratches"? You may be facing a job of sanding prior to polishing. Many of us have refurbished these things so I'm sure if we saw what you were talking about you'd get some good advice. (For cam covers, check out the photo gallery - lots of pictures by many members.)
-
This is the configuration on my 05/72 HLS30....
-
I cleaned mine thoroughly with a blast or two of Simple Green and a Scotch-Brite kitchen scrub pad. That may leave some of the plastic showing, so be prepared to stain and coat as others have suggested. (Yes, plastic with a molded wood grain, so there is no benefit to using a 'penetrating' staining agent; you need a top coat.) Be certain to let it cure according to the instructions on whatever you coat with. I have been told that Minwax Polyshades works quite well (I just used a Mahogany stain and clear poly on top.) Take the suggestion for painting the metal with satin black (after you prep it properly), too. Doing this will give you a new looking wheel. Notice, there are not many variations on this theme among those of us that have done it.
-
Balkan Sobraine (the original pre-Balkan war stuff) and 7-Star Metaxa. My two favorites then, and now, if you can find any....
-
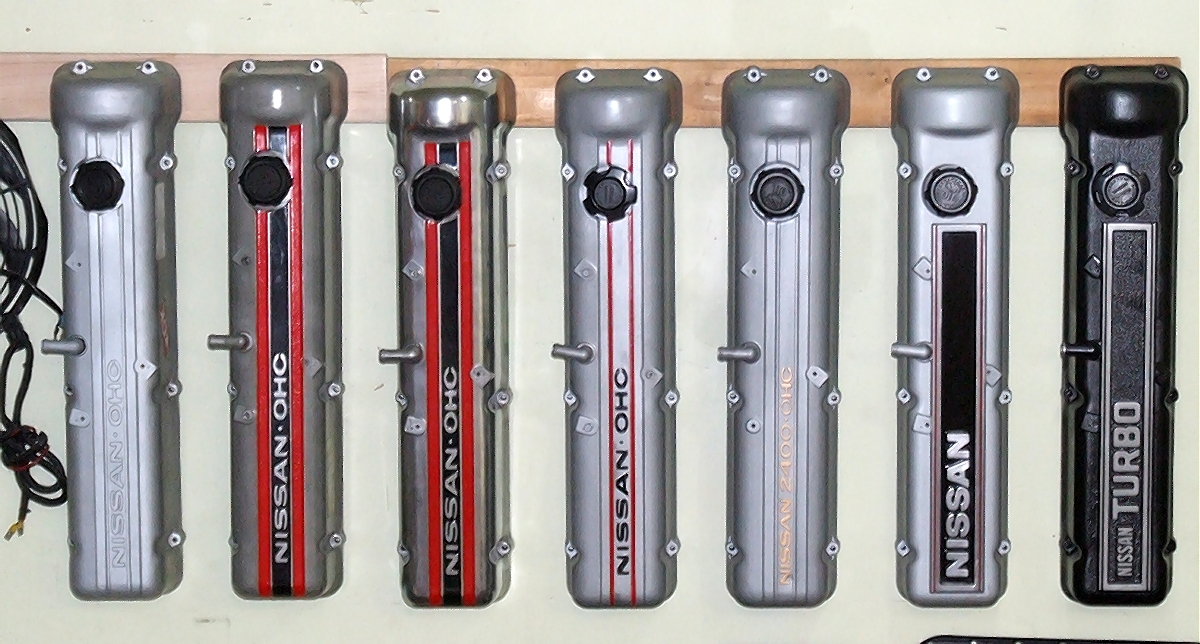
 This is a group of cam covers that represents most of the OEM covers found on L24, L26, and L28 engines. These all started out dirty and well used, and ended as you see them. The colors in most cases are not OEM, but they (in my opinion) look much nicer than the plain-Jane original configuration. Where paint was used, I applied very high temperature or high temp engine paint. Comments are welcome. Also, any suggestions on paint schemes?
 -
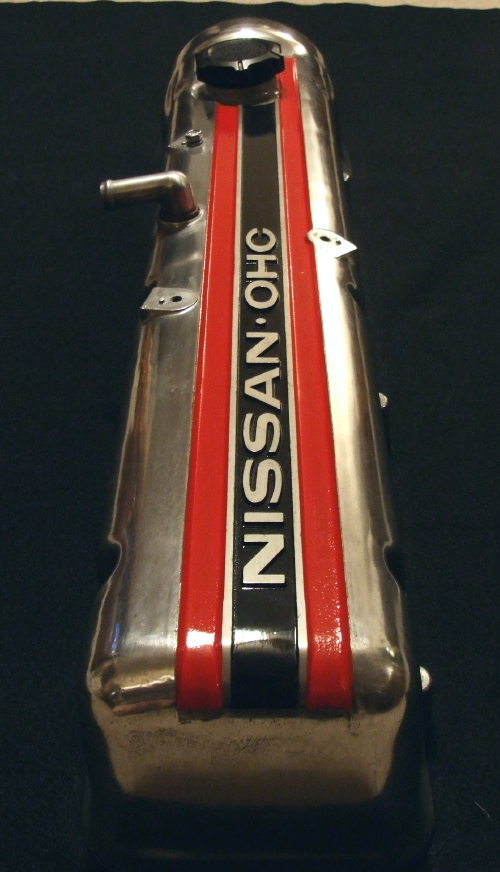
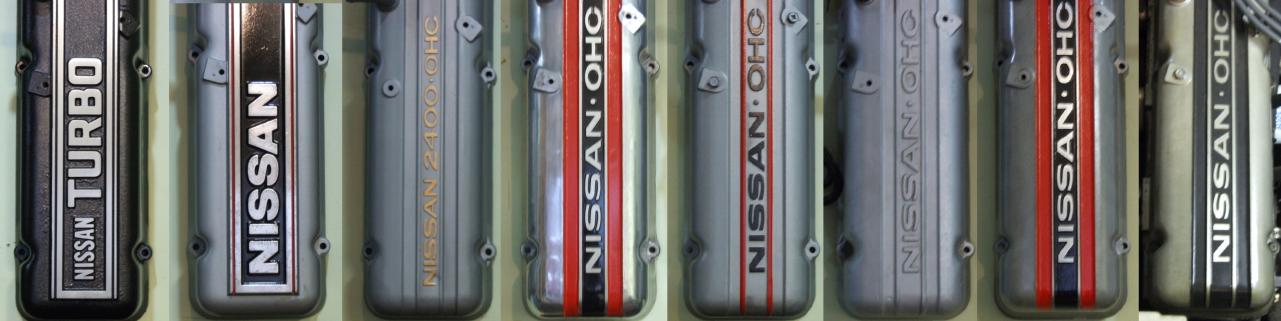
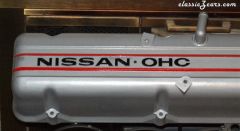
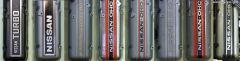 A closer view of the lettering variations of cam covers found on most L24, L26, and L28 Nissan engines. These all started out dirty and well used, and, after a bit of work ended up as you see them here. The colors in most cases are not OEM, but they (in my opinion) look much nicer than the plain-Jane original configuration. There are more pictures in my gallery. Where paint was used, I applied very high temperature or high temp engine paint. Comments are welcome. Also, any suggestions on paint schemes?
 -
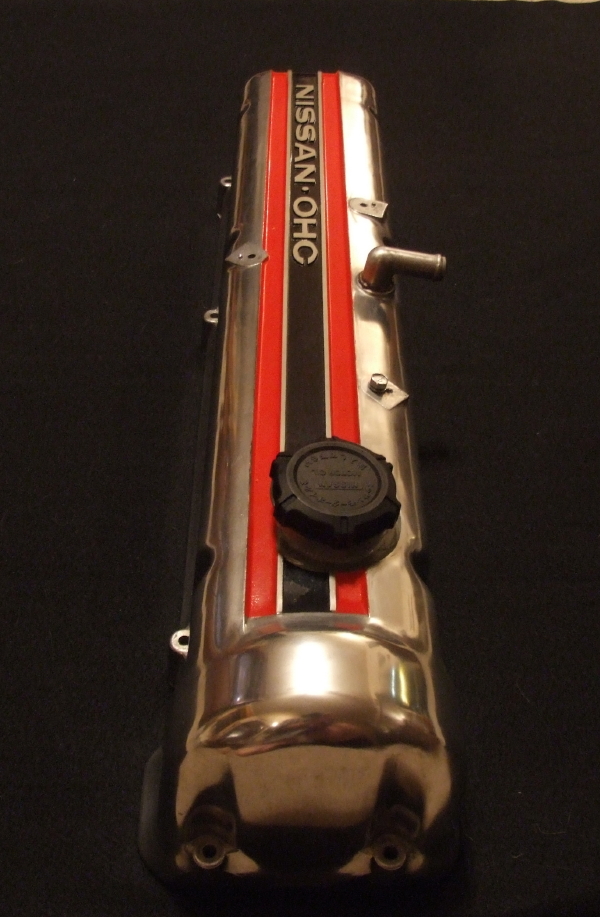
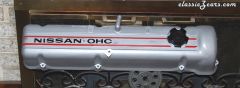
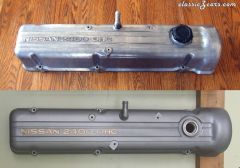
I think this pretty much sums up the OEM (not aftermarket or special mfg.) cam covers found on the L24, L26, and L28, except for the 'larger' large "NISSAN".... Anything else missing to your knowledge? Please let me know if so. Note: The paint details on these are not claimed to be original configurations in all cases. I took some creative liberties to suit my tastes. Your comments and suggestions are welcome. There are other pictures of cam covers in my gallery (see link below). Here's a group..... Here's a closer look at each plus one on my car....


-
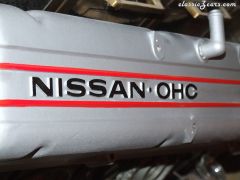 Finished product of cam cover refresh process.
 -
 Closer view of the detail work on the cam cover.
 -
 This cam cover started out pretty ratty, but made a nice transformation. In short, it was thoroughly cleaned with Simple Green (inside & out, media blasted with Silicon Carbide, and painted/detailed with very high temperature colors to my taste. .... another one to add to the finished cover collection.
 -
I've dressed up some parts, cam covers, etc., but not touched the car other than to charge the battery.
-
 Hi, Ron.... Yes, media inside the cover is to be avoided at all costs!! I clean the inside of the cover with Simple Green (the new grease cutting formula is pretty good, too) and a stiff fiber brush. Then seal off the whole bottom, filler, and vent with several layers of tape to assure there is no available point of entry and keep everything out of the under side while media blasting. That stuff around the baffle does deteriorate, in some cases pretty badly, and sometimes not at all. They used at least two types of sealant, and the earlier one (lighter in color) really deteriorates badly. If it's questionable I take it all off, clean up and re-do with Permatex #2. (I have been cautioned by board members not to use something like RTV, and several recommended the #2 which is "non-hardening". I tried it and like it.) Those little screws are a pain in the rear, and I've noticed on about 20% of the covers I get that one has actually fallen out. That worries me, so I generally remove them, degrease, add a dab of Lock-Tite or JB, reinstall, then rebead the perimeter of the baffle with the Permatex #2 with an extra dollop on each screw head (as the factory did them). An interesting thing on the old 2400 OHC cover is that they did not use screws, they used rivets. I made certain to re-bead the baffle on that one with a really good dab of Permatex on each rivet, too. It gives me some peace of mind that they won't fall out and eat up an engine. I've been experimenting with cam cover finishes and accents. Check out my gallery to see a few. Thanks for your interest. If you have any suggestions, I'm interested to hear them - on methods, technique, accenting designs, etc. John
 -
Thanks, kinfish! Process in general: degrease/remove all crud seal up the inside thoroughly media blast (used SiC on this one) repair deteriorating sealer around the baffel paint - VHT flat aluminum header paint cure paint w/heat per instructions on can detail letters with gold coat lightly with VHT clear coat cure final coat with heat take pictures mount on wall with others in the collection!
-
I just go to the local dealer. No postage charges that way, either. Actually, I email the parts department with the numbers I need & they get back to me with availability & cost. I pay with a card then over the phone & pick the stuff up when they tell me it's in. Works out well.
-
It's sad what some people will do. I don't understand the growing disregard for other peoples stuff. You're from Windber! Last time I was there the bridge was washed out by the big flood in the '70s.... I flew rescue helicopter out of the Vo-Tech athletic field for about 3 weeks.... memories....
-
13267-23000 will do the trick. Just checked what I paid: $9.75.....
-
Arne is correct, no sleeve and a sealer. I just replaced one last week, and it threaded in tightly enough that I wondered why they used a thread sealer at all. I did use a sealer - Permatex #2 IIRC without going out to the garage to check. I can't tell from the picture, but are the threads on the elbow pretty much missing (I don't see them on the sides)? The threads in the cam cover look pretty good. The elbow is still available at the dealer for about $9.00 if you need one.
-
The several of these that I have worked with all are threaded and 'screw' in to threads in the valve cover. I think I'm talking about what you are talking about.... please post a picture and we can confirm that. Something doesn't seem right.