aarc240
Free Member
-
Joined
-
Last visited
Everything posted by aarc240
-
 Tool up for a different manifold... wooden plugs for the castings, new fixtures for the different shape for machining, reset all the machine tools for the new design, document it, produce both the production parts and the spares parts, inventory it, manage fitting a different engine into the production cycle, document THAT, inventory the revised engine assembly etc etc then throw it all away after a few months ....... and SAVE money ?? Actually the GT manifold is slightly lighter than the usual L24 unit (a whole 7 grams). Maybe Nissan did 'develop' the product by switching back to a lower performance part that was already in the parts bin for the previous six years. More likely that is wishful thinking. Unless you also compare a Euro 73 GT to an Oz 73 GT to confirm that they started from the same point then a comparison of 74's won't mean anything. Yep, the 240z sure did have two different heads. The L24 has had at least 5 different heads that I know of.
 -
Sorry, I completely missed this one! Manifolds weren't vendor controlled - Nissan cast and machined them in house (and still does). Why would a manifold change for other than performance or drivability when the existing one was adequate for several years? The carb is the same unit as all other L24 single carb engines although the one from our engine has slight differences in jets etc presumably because the manifold changes the air/fuel ratios a little. Nissan labled all 6cyl C110's and 610's gt?? Ummmm - what about all those 6cyl C110's marketed in Australia that were not only badged but ADR plated as GL's? I don't think they are a figment of everyones imagination and there were thousands of them.
-
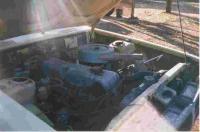
I saw that listing in the specs of the mechanical fuel pump, but our car was fitted with electric pump and a blanking plate where the mechanical pump would normally be. I'll try to locate a better version of the 4th image which showed the Mitsubishi Electric pump as installed at the top of the right hand suspension tower. Funny thing that all the cars I have seen have the wiring there from the factory for the electric pump It's documented in the wiring diagrams and the Mitsubishi Electric pump is the only thing I have seen that fits those two captive nuts and flats at the top of the right tower perfectly. Also happens to be the only place the wiring reaches the pump 'pigtail' without fouling on something.
-
You're comment about the European (and British) markets is very true. I can find nothing to indicate that there was anything other than the GT badge beimg marketed there. Unfortunately it is a bit too far to be able to physically check out those cars and see just what was installed on them. It would be very interesting to see if they had that manifold!
-
Another interesting bit of trivia to confuse the issue! The L24 fitted to all 240K's sold in Oz are rated at 130hp at 5600rpm, exactly the same as the same engine in 240c, Cedric etc in all market areas. The first batch had that odd manifold but has exactly the same rating on the ID plate. Given the difference in velocity of the gas flow between the two manifolds there has to be a difference in either power band, peak power point or power output or some combination of those. It has much the same effect as mild porting and I don't think anyone believes that won't help. So one or the other is inaccurate but which?
-
'GT' was only loaded as far as the insurance companies in Oz were concerned (and one Evan Green) but the car makers of the day didn't have the balls or brains to clobber the insurance industry here. Rebadging had nothing to do with the govt, just the car makers folding to the desires of a rapacious insurance industry. Regardless of what we think, it's not a GT simply because the factory said it wasn't. But then ours isn't a GL and neither yours nor ours are Skylines!!
-
Good that Steves hardtop went to a good home regardless of ID!
-
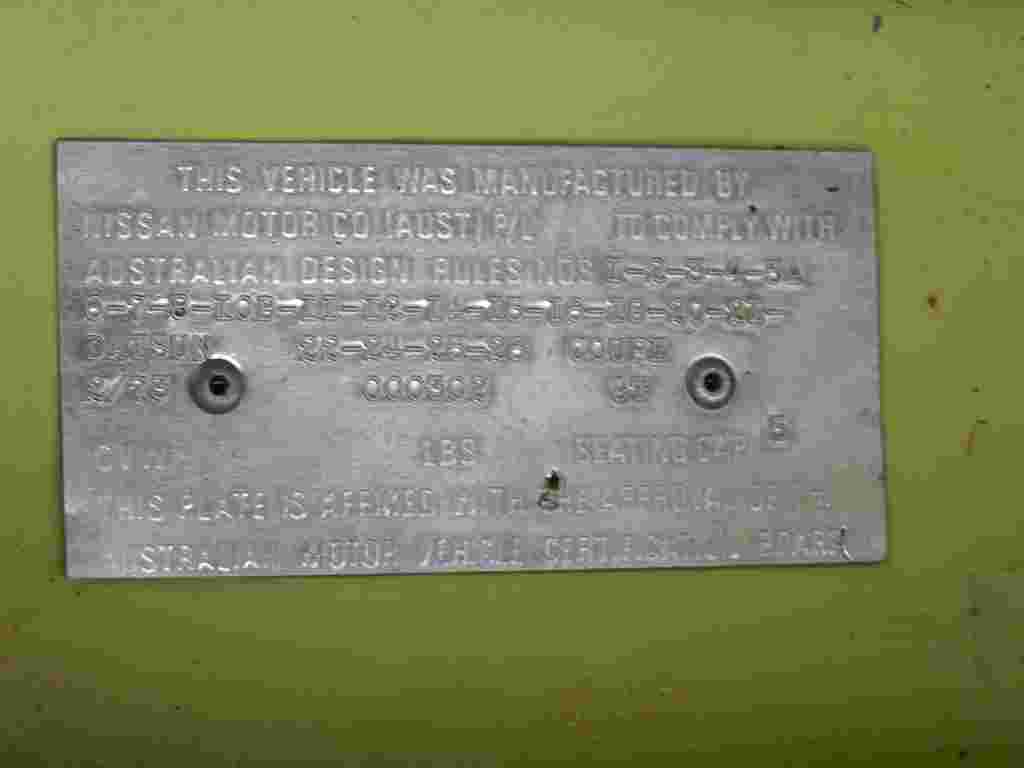
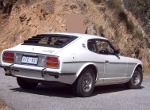
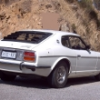
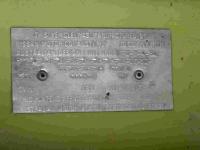
You're right, a new thread is much better idea! In the case of Oz cars there wasn't a problem with the ID as each car had the option codes on the build plate. Those determine what the car is from a legal standpoint eg ALL Ford Falcon GT's are build code JG33 for a 4dr and JG66 for a 2dr, Chrysler had E38, E49 to id engines etc The Japanese cars didn't have this level of detail in the ID plate so Freds C110 GT has the same code as Joes C110 hardtop (both are KHGC110). Thus the insistence from Federal Transport that the manufacturer ID it by description in the ADR plate. Whether there was much (or any) difference between the physical cars wasn't in question since that was up to the manufacturer. The legal eagle points out that this was the beginning of the 'truth in advertising' efforts in Oz. Anyway, what we are really interested in is the first batch of cars. Recollections of the dealers around at the time together with the published articles indicate that all the 2dr hardtops were GT's and the 4dr sedans didn't have anything other than 240k. No-one seems to know exactly how many cars were in the first batch or whether there were even any 4drs in it! I've searched high & low without success. Customs would have the info somewhere(!) but have no idea where and are not prepared to help. Nissan just don't even answer queries on anything earlier than about 2005. One former dealer tells me that he saw the cars at Datsun Australia before release and can't recall any 4drs. He is of the opinion that there wasn't a lot of them as the major line was the 180B. Published reports from the time only refer to the GT and give no indication of quantity or body types other than the tested 2dr. A small clue has surfaced in that there were only three ships from Japan off-loading in Sydney and one more in Melbourne during the period the cars had to arrive. The vessels are all pretty much the same size and stevedores familiar with transport then reckon there wouldn't have been more than about 80 cars as deck cargo and at most around 100 as hold cargo (in each vessel). Since it's unlikely that the batch would have been split across ships (they were a 'toe in the water' after all) and the K is pretty much as big as the hold access could take on those early ships then we have a possibility that the first sanple batch was less than 80 even if all the deck space was used. Compared to modern ships those things were toys!! So we can only assume that what we have is a GT unless we are lucky enough to have the ADR plate tell us. As there is at least one car I can document as having that plate with the description (see attached) then the probability is that Nissan DID use the description including GT on those cars. It also helps that the first batch could not have been ADR plated later than March 73 as Nissan was by then already telling motoring writers that the cars were going to be GL's. So if it's not a 2/73 or maybe 3/73 ADR plate then Nissan themselves were publicly stating that they were not GT's, they were GL's. What physical differences were there? All GT's seem to have had MPH speedos and imperial gauges, although early GL's also were Imperial Intake manifold (see attached) Electric fuel pimp on GT, mechanical on GL Front springs (GT 6.75, GL 7.25 turns) Rear springs (GT 7.75, GL 8.25 turns) Dampers ('shock absorbers') Badges (front, rear, sides and door trim)

-
Didn't much more than glance at this before but .... That 'condenser' or 'noise suppressor' (really a capacitor) should have its pigtail connected to the B+ terminal and its body attached to the E terminal. Installed as in the photos it is at earth potential both sides and won't do diddly squat! There should NOT be a wire from E to the car body. That should be done at the battery -ve terminal direct to the body AND to the top starter mount bolt. You are right that the alternator earths through the mount bracket.
-
Start by cleaning up every body earth point. As the brake lights are involved, pay particular attention to the rear light earths. Unscrew each fastener, lift the terminal, scrape/sand body and terminal to bright metal, apply a thin smear of grease (copper base if you've got it but not critical) to both. Remove all globes and clean. Check for corrosion inside the globe holder and if there is much carefully scrape/sand to bright metal and coat with a smear of grease. You may need to clean each multi-way plug/socket too. It's a peculiarity of early Datsun's that when earths are not really good you get some weird interaction which is most noticable in the headlights! There could still be a real power drain so if earth cleanup doesn't fix it pull the globes from the rear lights and see if the headlights dim then.
-
I didn't think to explain this before. If anyone wants to get a nice 'stock' look then a neat trick is to use that black steel cover stuffed in the corner behind the battery. Add a second fusible link block on the outside alongside the original. Inside, re-orient the regulator (if still in use) and chuck the original headlight relay. Enough room can be made to fit relay mount bases from Ford Fairlanes to accomodate 6 small 'cube' relays for headlights, driving lights, fog lights and horn. Do the wiring and looming neatly and even an expert won't detect that it isn't standard (until they lift that black housing!)
-
If you want more lights on the front (like me!) then it's pretty easy to add wiring that satisfies the fuzz. Add a 25A relay for each pair of 100W lamps. Supply one side of the contacts in each relay from a new fusible link (a second assy from another K works nicely and can be fitted alongside the original for a 'stock' look). Run wires from the other side of the contacts to the front of the car and connect the lamps. ok, we'll assume two driving lights plus two fog lights. Working with the relay attached to the driving lights. Connect one side of the relay coil to hi beam at the output of the hi-beam relay. Run a wire from the other side of the coil back to a switch in the dash or console. Wire the other side of the switch to ground. Repeat this for the second (fog light) relay but this time connect to the lo-beam. You can leave the switches both on and the fogs will run with lo-beam but not with hi-beam, the driving lights will run with hi-beam but not with lo-beam. Switches off will kill the appropriate lamps regardless of beam selected. If you get a sticky cop who insists on only 6 white lights on the front use amber fogs and then modify the parking lamp circuit so that park is earthed THROUGH the driving lights. In other words, what should be an earth for the park lamp now connects to the supply side of the driving lamps. When the driving lamps come on with hi-beam the park lamps turn off ('cause there is now 12V on both sides of the globe) only to magically turn back on when the driving lamps are switched off!
-
Assuming an attachment means the same thing on this site! Dang, it worked!

-
In a nutshell, a self opionated jackass of a motoring writer by the name of Evan Green set out to be the consience of Australia whether anyone else liked it or not. Published a blistering series of attacks on the high powered cars that HE considered unsafe without regard to reality or facts. Caused such a stink in the media that the politicians got in the act (as they are wont to do) who started screaming like they had wet nappies. End result was that the big three (Holden, Chrysler and Ford) canned their planned supercars and we lost the edge in top end motoring. The insurance companies were handed a gilt edged reason for ripping everyone off on the basis of badging. (always did wonder if that bastard got a really nice retirement cheque from the insurance industry - he should have!) Sort of like Nader really with his 'unsafe at any speed' about the Corvair when in reality it was the drivers who were unsafe at any speed.
-
Totally unrelated to Datsuns but of historical interest, the 'new' Torana was not to be an XU-2. The original XU-1 actually referred to the factory build code for the body and made a pretty neat badge to stick on. Unfortunately by the time the new 'weapon' in the guise of a highly modified Torana was to come about the build code XU-2 had already been used (on a taxi variant of the full size HG sedan of all things!). The V8 Torana was actually code W-51. Also, technically the Ford Falcon GT that didn't see the light of day (apart from 3 red pepper and 1 mint green cars) was a GTHO Phase 4. The Ford Falcon GT appeared in effectively the phase 4 guise without the hoo-ha under Regular Purchase Option 83 ('RPO83') where all the needed bits were fitted without the badges.
-
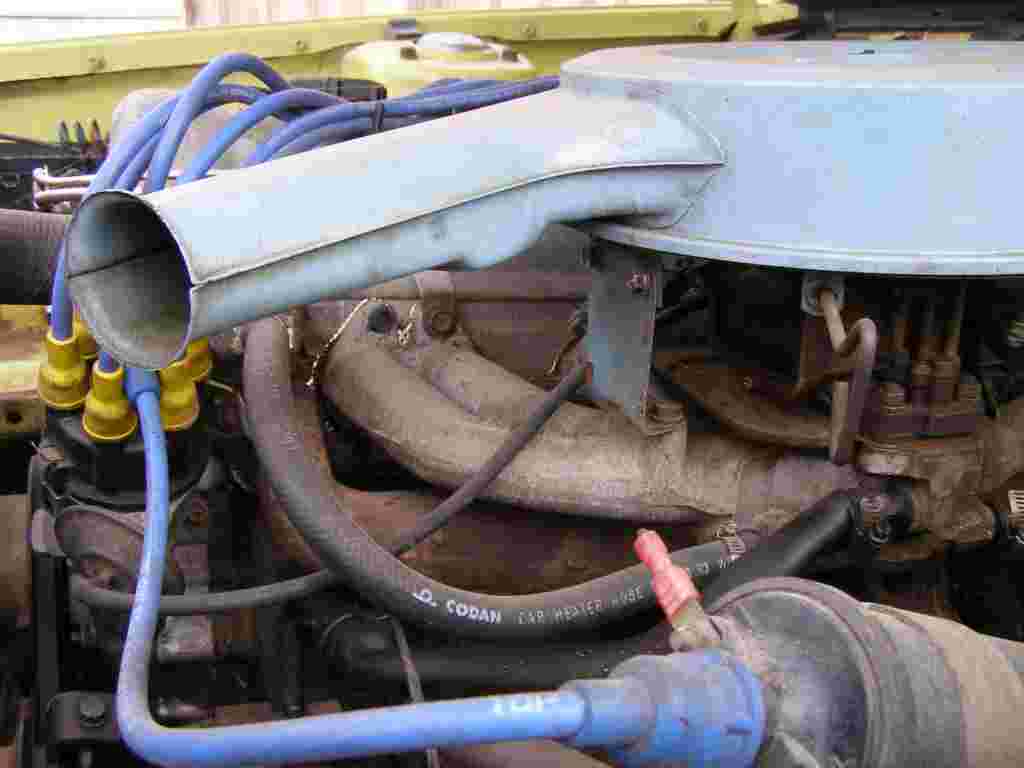
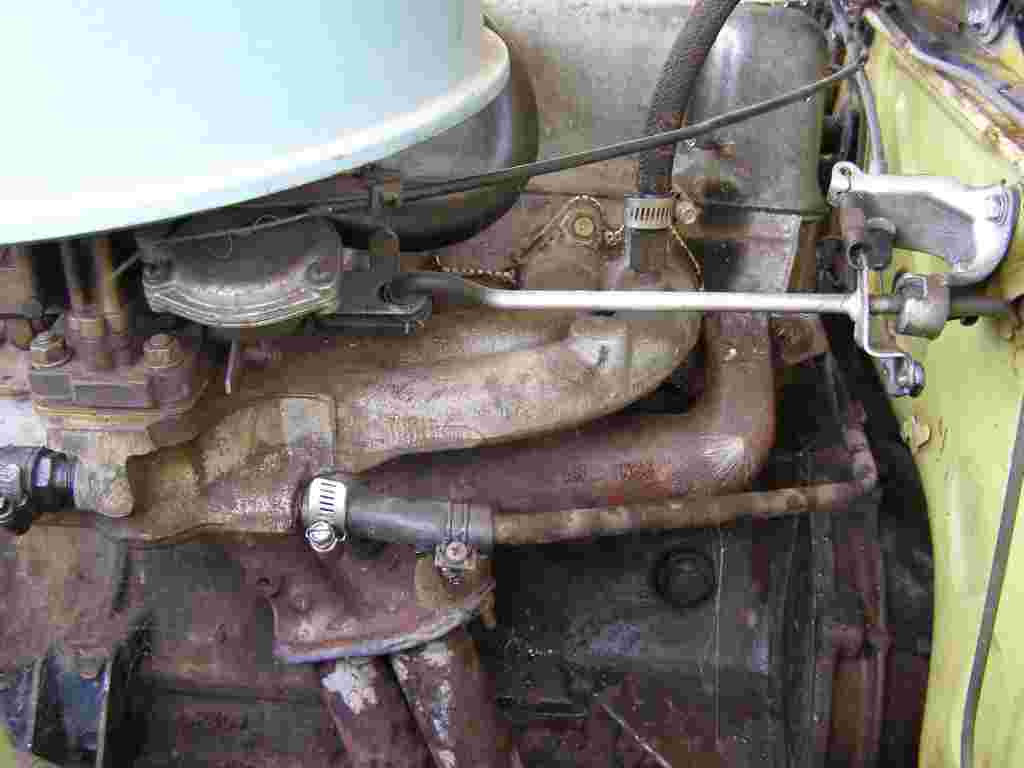
Not true if you look at the build configuration of the cars. Only the first batch arriving in Oz had the GT intake manifold. All others have the basic 'log' manifold common to everything from 240k's to 240C, 260C and even the Patrol 4WD. Also, every 240k I've looked at has one turn too many on the main springs both front and rear for them to be GT parts. How many 240k's have 3.90 diff gears with the four speed gearbox? Again, these were standard on the first batch. Since those were the main differences (apart from cosmetics like badges) then the GL's were NOT GT's by any stretch of the imagination. Like every other manufacturer selling cars under the ADR's, Nissan was legally required to specify EXACTLY what the car was on the ADR plate. So, if the ADR plate doesn't specify that the car is a GT then it never was a GT (something I only recently learned from a wiley lawyer!)
-
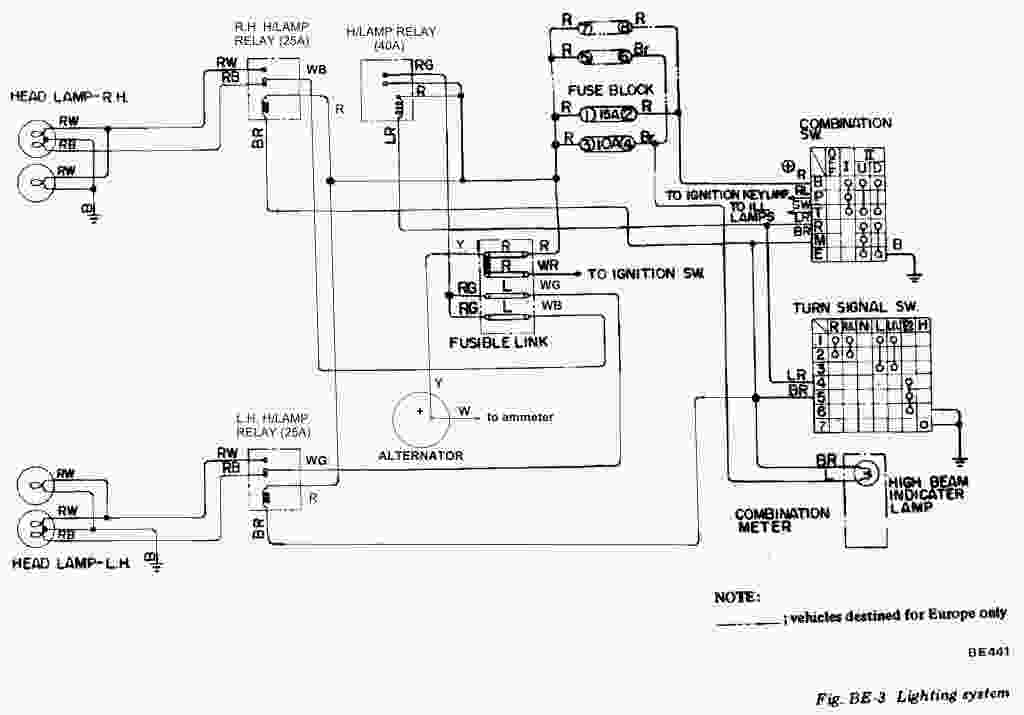
Headlight wiring is pretty basic as long as you understand that things are 'upside down'! Essentially power is applied through the fusible link to a dual relay and from there to the switches. The switches ground the appropriate part the relay which then grounds either high or low beam element(s) as required. Two more fusible links also supply power to the common terminal on the lamp(s). The catch is the column switches. Do you have two switches on the right side of the column? If so, does the one closest to the dash switch the lights on/off plus do hi/lo beam and does the one closest to the s'wheel do indicators plus passing beam? I assume you do. If that is the case then you can't easily change the headlight operation to a more 'conventional' arrangement without losing some functionality. The best answer is to duplicate the factory arrangement out to but not including the relay. Use that wiring to switch relays and use the relays to drive the headlights in a conventional manner with earthed common and power applied to the beam when needed. This also allows you to put semi-sealed beam halogen headlamps in without frying wires. Get familiar with wiring diagrams by breaking it down into logical sections. Nissan even broke it down into smaller chunks already! Page BE-5 in the FSM is just the light wiring. If you are using C110 column with indicator switch plus combo switch I can help out with the wiring diagram for my modified harness (just the light bit as in BE-5).
-
By all means use degreaser first followed by a water bath. Mild hydrochloric acid: start with 'spirits of salts' from any large hardware store (comes in a small black plastic bottle) about half a cup of distilled or demineralised water in a plastic or glass container add acid to water to approximately 20% by volume (ie 4 parts water plus 1 part acid) btw NEVER add water to acid - it can boil up into a small vapour explosion (nasty!!) after cleaning with acid give the parts a good long rinse in clean water apologies for the delay - we were out playing in the dirt!
-
Having used several of these in rewiring 50's & 60's era lead sleds I can give you this much. The quality is really tops but.... 1. headlight wiring is 'conventional' with switched power to the light beam needed and common earth - not compatible with your C110 light/dip switch combo. Solutions are to use a GM product but then you have to fit that or use relays to run Datsun configuration for the switch with extra wiring. 2. indicator wiring is configured for a GM switch unless you special order 3. no provision is made for hazard flashers 4. alternator wiring has to be modified to suit Australian integrated regulator units (not hard) 5. LHD isn't an issue - just flop the harness over 6. you won't have ANY means of separating harness sections 'cause it's all wired from the fuse box out as continuous wires Can't get a decent fuse box in Oz?? There are some pretty good choices available from Hella, Bosch and Narva. Anyway, what's wrong with getting a 'shotgun method' unit from something like a VL Commodore or late model Nissan? Lots of fuses, all the relays you will need. Just shorten the wires, solder join to the stubs and use heat shrink sleeving for insulation and reinforcing. If you have doubts about soldering neatly, get some thin wall brass tube from your hobby shop. Tin the inside (heat and flow solder through), tin the wires, fit a short sleeve of tube and 'sweat' the joint to flow the solder inside. Then use the heat shrink tube. If your REALLY paranoid, use heat shrink that has low melting point glue on the inside for a totally environmentally sealed joint. Works for Antarctica! For a source of wire with lots of colour code options get a harness or two from an 'up-market' version from Nissan (smashed 350z's are good). Cars that have lots of optional $^!# like power windows aircon etc are good. Don't mix brands - they use different logic so colour coding gets real confusing. Don't bother using the original harness, it was only just adequate in the first place and has since suffered from heat, air, ozone, oil, adhesive and God knows what else. If you have or get a set of 'jewelers' screwdrivers you CAN remove the connectors from the housings. That means you CAN remove the original wires entirely. The original connectors clean up nicely with a slosh around in mild hydrochloric or oxalic acid (NOT nitric or sulphuric) and can then be reused with new wiring for a neat result. When 'looming' either use top grade tape (Nitto) or go for convoluted tube jacketing. hth!!
-
Should be good fun for tarmac events like Speed On Tweed, Duttons, Forest Classic etc if it's eligible.
-
OK, now I see what you're getting at! Yes, C110 has eye top and pin bottom mountings but that has nothing to do with normal or inverted ('upside down') dampers. Inverted or 'upside down' have the BODY at the top and the SHAFT at the bottom (to reduce unsprung weight primarily). Mountings can be had in a number of combinations - have a look at the Koni catalogue from their website or Monroe from their site. Koni in particular will supply their competition grade adjustable dampers in any mounting configuration you need, it just might take a little longer!
-
Disc size doesn't really have much to do with booster size. Booster type and size is dictated by how much pedal pressure can be tolerated and how much feedback ('feel') is desired. A 10" will be a reasonable starting point, just don't be surprised if you need to change it for better feel/control. A booster/cylinder combo that is surprisingly popular and effective is a 7" TD Gemini dual diaphragm booster with a 1" LX Torana cylinder. Works real well on 4 wheel discs even with Volvo 4 pots front and rear. The strut tops you have will likely wind up costing no more than selling and going to something else. Get SWM to make new spring seats - Stewart will know what is needed. Absolutely nothing wrong with Konis, just a bit more expensive. Equally nothing wrong with KYB, just uncommon in motorsport. Your rear dampers on a C110 are normal way up and adjustable units are readily available from Koni and others. Easy to adjust too. What sort of 'track car'? A C110 with an RB25DET isn't going to fit into many classes you can afford to play in! On top of that a full-on track car is so far from a street car that a second car becomes very attractive in short order. There are just too many things to change each time. Just for starters, you will put in competition (non ADR) seat belts, change springs, change sway bars, adjust ride height, adjust the dampers ('shock absorbers'), adjust suspension alignment, change wheels & tyres and tape over headlights. End of the day reverse the process. When I got sick of that I bought a well used V8 VC Valiant sedan, stuffed a 360 in it and bought a car trailer. Ah, heaven! Even now with a C110 that is mild compared to where you are going we run a 260Z 2+2 as our normal street car.
-
Bugga! OK, so what you have is a set of adjustable strut tops for use with standard C110/C210 springs and a set of struts with adjustable lower spring perches and small diameter springs. As you already have upper spring seats to suit the small springs it sounds like the adjustable tops don't have sufficient strength (very likely not enough material in the middle) to carry those smaller spring seats. Without replacing the strut tops SWM are correct - the new seats to suit the springs will need a larger outer flange to spread the load right out to where the stock seats would have. Unless the springs are actually broken they can be re-processed by any good spring manufacturer. Basically they are heated to cherry red, reformed to correct free length, quenched and then tempered. Not very expensive - you should get in with both done for under $100 for the pair. Koni adjustables are hardly justifiable unless you intend competing with the car. Monroe GT Gas or Pedders Red are a reasonable compromise for a streeter and a hell of a lot cheaper. Put some time in with some damper catalogues that include dimensions of the cartridges. There are alternatives meant for other vehicles that can be used. Once you know which ones will fit talk to Pedders - they will valve the cartridges to suit your requirements for very little (if they supply the cartridges of course!). Just as SWM intend, if a cartridge is shorter than the strut case a spacer is used under the cartridge to make up the difference. Doesn't cause a problem and new cartridges from Tokico have been seen with a short stub of tube tack welded to the bottom from the factory. It is only a piece of thick wall steel tube cut to length! As you have already said you have little idea about suspension, do you really want to spend the extra to get something you won't understand well enough to tune to suit the car, road surface and your driving style? Mind you, that's no criticism of you as I've been messing with these things for nearly forty years and still get it wrong at times! Why the 10" booster? You will find that the brakes are very hard to modulate so once you get lock-up you won't get it to unlock before hitting the scenery. I'm using a 9" booster from a 260Z with a 1" master cylinder from a Patrol on 4-spot front calipers and 2-spot rears. A bit hard to push but VERY controllable.
-
-
How about just getting the 'Datsun 240K' changed to read 'Skyline/Datsun 240K' in the index? Subsections can cater for C10, C110 & C210 if REALLY needed.