Jump to content
We Need Your Help! ×

Search the Community

Showing results for tags 'weatherstripping'.

  • Search By Tags

    Type tags separated by commas.
  • Search By Author

Content Type


Categories

  • Interior
  • Exterior
  • Electrical
  • Engine & Drivetrain
  • Fuel System
  • Exhaust
  • Body & Paint
  • Suspension & Steering
  • Wheels, Tires & Brakes
  • Z News
  • Technical Articles

Forums

  • CLUB TALK
    • SOCIAL
  • CAR TALK
    • CLASSIC Z CARS
    • MODERN Z CARS
    • OTHER CLASSIC DATSUNS
  • GENRE
    • HISTORY
    • RACING
    • SHOP
  • MARKETPLACE
    • VENDORS
    • CLASSIFIEDS
    • GARAGE BUSINESS
  • NW Arkansas Z Car Club's Discussions
  • Maryland Z Club's Discussions
  • Midwestern Z Club's Z Chat
  • National Zcar Convention's Discussions
  • National Zcar Convention's Announcements

Calendars

  • Zcar Events and Shows
  • Zcar Club Washington
  • Classic Car Shows
  • National Zcar Convention's Events

Categories

  • Wiring Diagrams
  • Microfiche
  • Service Documents
  • Brochures
  • Factory Service Manuals
    • 240z
    • 260z
    • 280z
    • 280zx
    • 300zx
  • Manuals
    • Owner Manuals
  • Website Support
  • CAD Files
  • Software Tools
  • Tech Articles
  • Club Graphics

Product Groups

  • Club Merchandise
  • Direct Advertising

Blogs

  • Mike's Blog
  • Blog livenbad
  • Blog Denny
  • Blog omega Z
  • Blog lenponz
  • 1975 280Z Project
  • Blog Joe Moreland
  • Blog 83Turbo
  • Blog sleepyzzz
  • Blog KirkgZ
  • Blog smokingwheels
  • Blog cowboywilly
  • Blog Zmax
  • Blog titaniumspine
  • Blog ozconnection
  • Blog Montezuma
  • Blog s14280zx
  • Blog 59blane
  • Blog robertsjeff
  • Blog Rainman
  • Blog sevangelos
  • Blog Ivans240z
  • Blog kirkE
  • Blog Righthandman
  • Blog jimmypleitez
  • Blog tomjr713
  • Blog lookn4answerz
  • Blog BFOUR
  • Blog Zedyone_kenobi
  • Blog zman2003
  • Blog jgniorio
  • Blog robert clark
  • Blog zcarlady1
  • Blog mel marabante
  • Blog steves72z
  • Blog JRG
  • Blog realoldrocks
  • Blog stevef1972z
  • Blog hls55@yahoo.com
  • Blog chachacourt
  • Blog pmf
  • Blog ConchZ
  • Blog pukegreenz
  • Blog Mikes Z car
  • Blog juniorzep
  • Blog msawaya1
  • Blog VITAMIN Z
  • Blog Bobby
  • Blog barfife
  • Blog rallylife69
  • Blog Chuckak
  • Blog tallen1424
  • Blog black gold
  • Blog miker
  • Blog 402bryce
  • Blog 280man
  • Blog Baki 280z
  • Blog zorroo24
  • Blog Gary in NJ
  • Blog TheNateums
  • Blog LazyZ
  • Blog Qwildurn
  • Blog mikej707
  • Blog hosting
  • Blog ColeQ
  • Blog meshoo250
  • Blog krogel24
  • Blog marco280
  • Blog mkwhite
  • Blog BSCM@310
  • Blog tylersnyder
  • Blog vjones
  • Blog Hart Lutter
  • Blog matt240z
  • Blog Z dreams
  • Blog ThomasD.
  • Blog KAP
  • Blog z e r o
  • Blog greenmachine
  • Blog louie999
  • Blog diesel280zx
  • Blog G2Services
  • Blog House3571
  • Blog mikey265
  • Blog Francesco
  • Blog mikeddiezel
  • Blog John78Z
  • Blog kriminal
  • Blog peterb
  • Blog Billmadson
  • Blog bschaaf
  • Blog M&P
  • Blog quinnys
  • Blog electricalman777
  • Blog mobileman23
  • Blog tayS30lor
  • Blog jimndee1967
  • Blog Ken M1
  • Blog cycloid
  • Blog patar
  • Blog zdonka
  • Blog david gordon
  • Blog tamo3
  • Blog mattm180
  • Blog mnilges
  • Blog momluvdherz
  • Blog fastmike
  • Blog gg30
  • Blog danielsheehan
  • Blog illest240z
  • Blog DanielE
  • Blog 77_FairladyZ
  • Blog Stevie P
  • Blog James Bell
  • Blog bigmime4098
  • Blog vuddysr
  • Blog EuroDat
  • Blog ryanonthevedder
  • Blog RayF
  • Blog scruz32
  • Blog Z4Her
  • Blog The moist shaft
  • Blog jguler
  • Blog sycoz
  • Blog Ardent
  • Blog 81datsun
  • Blog gius
  • Blog CJO
  • Blog bulltherott
  • Blog JordanNoblin
  • Blog BlueSky224
  • Blog william12
  • Blog Bryson@80z
  • Blog ricky86
  • Blog noahfriedel
  • Blog hotflames280z
  • Blog blindsquad
  • Blog jamul scott
  • Blog chefman1
  • Blog BigBird
  • Blog fawazalazmi
  • Blog Michael's Zcar
  • Blog TBrider1
  • Blog Antonio Gonzalez
  • CaseyByrd72 Restoration
  • Blog mattszcar
  • Blog BMO280z
  • Blog Scarab#157
  • Blog Guy Mayer
  • Tracy Westman
  • AndyAtkinson's Blog
  • vjones' Blog
  • WalterConde's Blog
  • My 280z
  • Blaxdragon's Blog
  • Affortable Sandblast set up
  • 1972 240z Restoration (lots of rust)
  • noradress.com
  • rickster240z
  • Saint Philip's Day
  • adidas nmd r1 rose
  • adidas pas cher
  • Aaron McClanahan
  • Dexter
  • Yarb
  • Yarb
  • docfedt

Categories

  • Z Cars
    • 240z
    • 260z
    • 280z
    • 280zx
    • 300zx
    • 350z
    • 370z
  • Other Models
    • 240k
    • 510
    • Skyline
    • Wagon
    • Trucks
    • Roadster
    • Sedan
  • Other Brands
    • Cars
    • Motorcycles
    • Trucks
    • Pets

Categories

  • For Sale
    • Cars for Sale
    • Parts for Sale
  • Want Ads
    • Cars Wanted
    • Parts Wanted
  • Completed Ads

Find results in...

Find results that contain...


Date Created

  • Start

    End


Last Updated

  • Start

    End


Filter by number of...

Joined

  • Start

    End


Group


Map Location


Occupation


ZCCA Membership ID


About me and my cars


Website


Yahoo


Jabber


Skype ID


Facebook Page


Zcar 1 VIN


Zcar 2 VIN


Zcar 3 VIN


Zcar 4 VIN


Zcar 5 VIN

Found 7 results

  1. DISCLAIMER: I did this on a '71 240z - I cannot confirm this works for later models. Preliminary Notes: In searching for new weather-stripping, I came across many forum posts recommending late 90's to early 2000's Kia Sportage weatherstrips. In some of the comment sections there was mention of McMaster-Carr, and one thread dedicated entirely to this stripping. I followed exactly what the guy did in his post, so I am ripping him off, however I thought it'd be worth making a post of my own not only to back up his findings, but also to (hopefully) give this weatherstripping a bit more publicity. Now, I originally had Precision's weatherstripping set, however their stuff made it impossible to close the doors, and was a bitch to get on in the first place. I looked into the Kia Sportage, however the weather stripping was discontinued, making it both very hard to find and exceedingly expensive. McMaster-Carr's weathersrtipping is everything you'd want - it's relatively inexpensive, easy to install (no glue required), and well made. I spent $80 in all (for both doors!) not including shipping, and the weatherstipping arrived 1-2 days after order. I may have bought more than I needed, but even so, it cost around half of anything else. Parts Bought: I bought two different kinds of weather-stripping from McMaster-Carr: 25ft of 1120A331 and 10ft of 1120A581. 331 is a bit smaller than the 581, however 331 is too small for the upper parts of the doors. Originally I only used 331 for the whole door, however, after vigorously spraying the car, water was allowed in at the top of the door - with the 581 this did not happen. This is evidenced by the third picture, where you can see a line of water across the weatherstripping that the water does not go below - if it did, I would have gotten wet. The forth and fifth picture are taken directly below, perpendicularly to the weatherstripping, and you can see quite obviously in the fifth picture that the 331 does not extend far enough to cover the gap of the original weatherstripping (this is where the original silver paint of the car meets the newer red), whereas the majority of the silver is obscured by the 581. Instillation: First, I cut the weatherstripping in half, leaving me with two 12.5 ft. pieces of 331, and 5 ft. pieces of 581. Next, you measure the length from the top corner of the door, down to about where the side window ends. You'll cut a little more than this length from the 581 - one cut will be at a 45 degree angle so the 581's will meet nicely in the corner, and the other end will be where you will connect the 331 to the 581. You connect the 331 to the 581 by cutting about an inch of the vinyl part off of the 331, leaving just the rubber hose, and inserting the 331 hose into the 581. You do the same with the other connection. [NOTE: Before you make the 45 degree cuts on the 581, practice making these cuts on the 331 and connecting them at the corner such that they fit flush together (something like in the picture) as, by the end of this, you will have plenty of excess 331, but you will use all of the 581. Making the 45 degree cuts aren't hard, it's quite intuitive, but it's best to figure it out by trial and error with the 331 before you make any permanent decisions (and mistakes) with the 581.] You make the other 45 degree cut on the longer piece of 581 and run it as far as it goes down the frame, connecting it with 331. Cut the 331 to the necessary lengths such that the tube inserts into the 581, and the vinyls of both kiss each other. It's easiest to start at one connection of the strips, get that one right, and then cut the other half as necessary to acquire the desired result. The stripping holds on to the door by a pinch welt, so all you really have to do is push it on with your fingers, though you could use a rubber mallet if you needed to. Also, don't pull the weatherstipping itself while applying, just press it down naturally - pulling it will allow it to invariably move back to it's natural length, thus not resting in the position you had intended worst case scenario leaving gaps at the seams. Be careful when applying on any curved parts of the door, such as the bottom right and left - you want to be sure they fit snugly on those corners, not letting them come off their grip as you continue farther down the weatherstripping. Conclusory Notes: As you can see in the second to last picture, the design of the Precision stripping is entirely different. The Precision rubber, particularly on the curved bit, is far too thick and rigid, not allowing the door to fully shut. The design of Precision's is a bit more like OEM stripping in that, rather than be a full circle of rubber, it's only about half a circle - not connecting unto itself. Also, the lip where the Precision stripping fastens to the door is far too short to get a good hold, so it requires glue to hold it in place, and then a separate piece of vinyl over top of it to further hold it steady - a piece of vinyl which, if you wish to suffer through installing the Precision stuff, you hopefully kept from the original stripping, and a piece of vinyl that comes pre attached to the McMaster. The door closes all the way with McMaster (evidenced by the door being locked in the final picture as the lock won't engage otherwise), though it does require a bit of force. This, however, could be chalked up to the fact I only just installed the stripping, so it hasn't had time to 'break-in', as it were. The corner piece with the 45 degree cuts may also need some slight pruning. When testing the reliability of this stripping, I absolutely blasted the doors with a hose, subjecting it to forces and quantities of water no storm short of a CAT5 hurricane could posses. I even blasted directly into the seams of the doors, but the stripping still held strong. Water did, however, just barely find it's way into the bottom of the door, but I think this is because I need to replace some gaskets. At any rate, McMaster-Carr survived my brutal tests. Hopefully the weather-stripping stays as resilient as it is now after it breaks in, otherwise I have jumped the gun on this post. I have yet to do the driver side, so if anyone wants me to make a video of that installation to better explain the process, I'm willing to do so - but you'd better ask fast because I plan to do it tonight or tomorrow. If you have any questions, feel free to ask.
  2. I'm in need of door seals (weatherstripping) for 1981 280zx 2+2 (or coupe) both door side and body side. Could really use any leads here so that I can finish my restore!!! Trey 251-424-2151 or treyfellers@hotmail.com
  3. Hello all - I am restoring a 1981 280zx 2+2 and need right and left door seals and right side door body seal. I haven’t been able to find on a self anywhere. Anyone have these or know an option to “rig”?!?
  4. From the album: 78 280Z

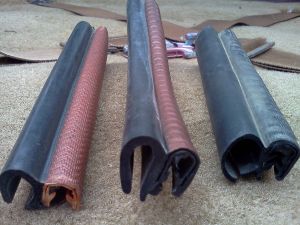
    From left, stock, Black dragon, and Kia Sportage The Black Dragon was put on 10 years ago, at the same time I was painting a fender. I scuffed and masked and shot the inner side to fake the stock driver side. No one ever noticed, and it was close enough that I didn't really notice either...
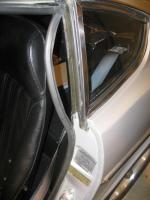
  5. I am having trouble seating the weatherstripping on my 76 Z driver's door. The gap on the upper rail (shown in the attached photo) is supposed to exist, correct? A mechanic attempted to fix, but the door seal was too tight (trouble opening door). I will likely buy a new door seal but I appreciate your advise. Also the window has to be pushed the last 1/8 of an inch to close tightly. Any ideas rebuilding the crank mechanism, is there a replacement kit available? Thank you.
  6. I am new to this site, restoring my Z and ned help finding weather strip: I need the door weather strip to fit an 83 280zx 2+2 with T Tops, this is the strip that attaches to the body, running up the front of the door, to the roof, around the t top cutout and back down the back of the door/ window, need both L and R sides- can you get it? or direcct me to any other possible sources I have tried the easy stuff, Z Barn, Black Dragon, etc. Any other ideas??help!!! Thanks Ronhdds Lubbock TX
  7. I have been reading the forum for some time and find it very useful source of information for helping my son with his 78 2+2. However I have not been able to find anything on the 2+2 quarter windows so I thought I would ask. I have checked most of the vendors out there, BD, Vintage, Courtesy, and a host of Ebay sellers and I cannot find the seal that goes on the leading edge (by the door) for the 2+2. It appears to run the height of the frame, with cutouts for the metal tabs that appear to be the hinges to open the window, and extend across the top approximately 2 inches where the weatherstrip similar to the door sash weatherstripping begins. Any help would be much appreciated.
×
×
  • Create New...

Important Information

By using this site, you agree to our Privacy Policy and Guidelines. We have placed cookies on your device to help make this website better. You can adjust your cookie settings, otherwise we'll assume you're okay to continue.